Rain garden design isn't something you can eyeball. Get it wrong, and you're looking at a flooded basement, drowned plants, and stagnant water that becomes a mosquito nursery. And once the soil is in place and the plants are installed, fixing a poorly designed garden means digging it all up and starting over.
In our research, the most common failure point is skipping the soil percolation test. Without knowing your infiltration rate, you simply cannot size the garden correctly. That single metric, measured in inches per hour, dictates whether your rain garden drains within 24 hours or stays wet for a week.
That's why understanding the core mechanics before you dig is critical.
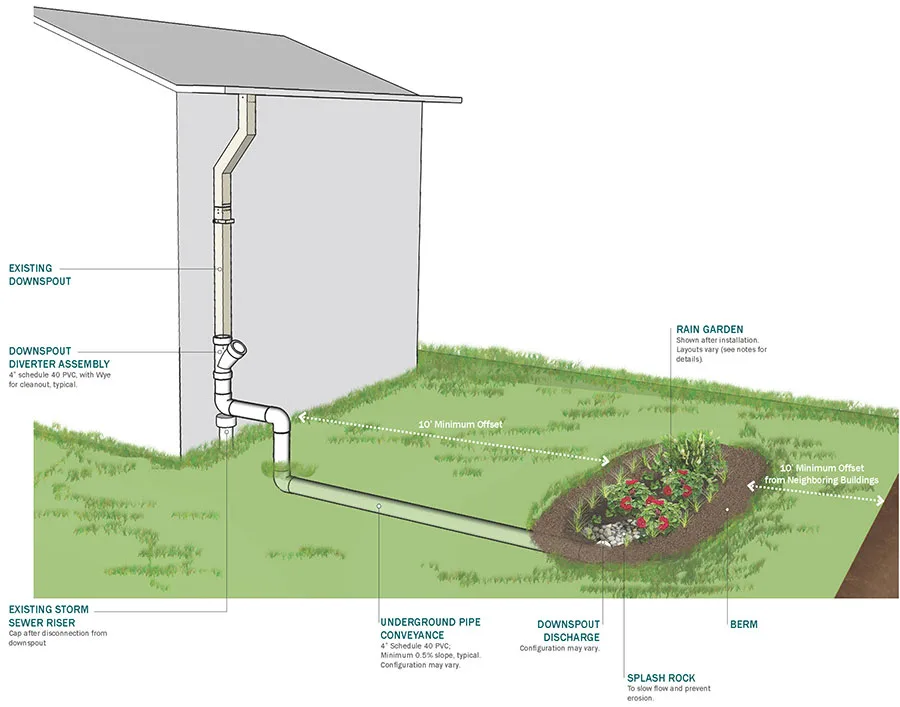
Image source: Web (Bing) / animalia-life.club (Web image (fair-use with source credit))
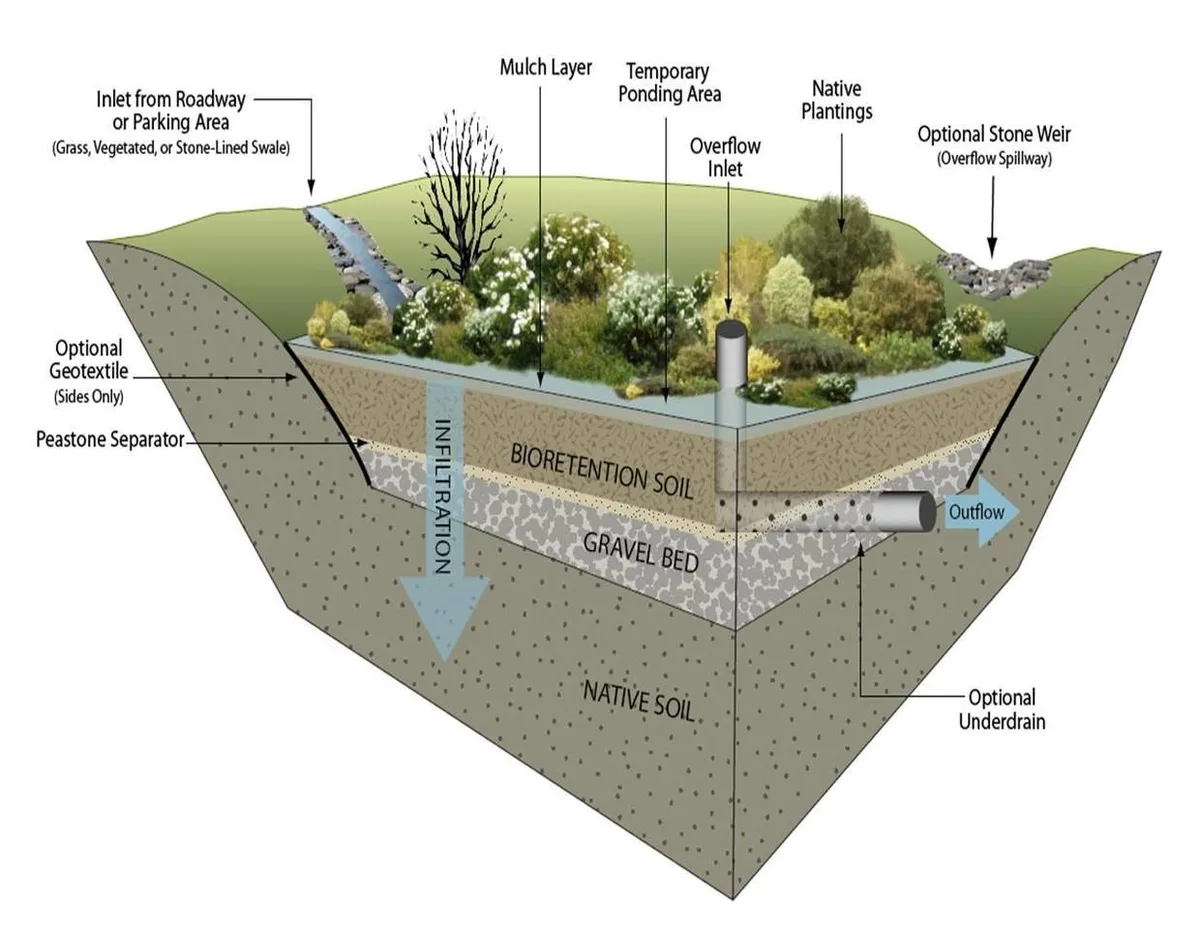
Image source: Web (Bing) / jp.pinterest.com (Web image (fair-use with source credit))
Why Rain Garden Design Accuracy Matters
A rain garden is not a decorative flower bed. It's a stormwater management structure. Treat it like one, and it works for decades.
Treat it like a hole in the ground with pretty plants, and it will probably fail.
The stakes are real. Siting a rain garden within ten feet of your foundation can channel water into your basement. Sizing it too small means it overflows during heavy rain, sending untreated runoff into the street or your neighbor's yard.
Oversizing it on slow-draining soil creates a permanent pond.
Here's what happens when the basic rules get ignored:
- Foundation damage. Water saturates the soil next to your house and seeps into the basement or crawlspace.
- Mosquito breeding. If water stands longer than 48 hours after a storm, mosquitoes lay eggs.
- Plant death. Plants that tolerate wet roots still need the soil to dry out between rains. Constant saturation rots the roots.
- Wasted money. A typical rain garden costs $5 to $15 per square foot for a DIY install and $15 to $40 per square foot professionally. That's real money.
The good news is that the rules are straightforward. The industry standard drawdown time is 24 to 48 hours. The required infiltration rate is at least 0.5 inches per hour.
The minimum setback from a foundation is ten feet. Follow those numbers, and you're already ahead.
Rain Garden Basics: How Bioretention Works
Think of a rain garden as a shallow, planted basin that captures runoff, filters it through engineered soil, and releases it slowly into the ground. The engineered soil mix is the key. It drains faster than native clay but holds enough moisture for plants.
The system has four essential parts:
| Component | Function | Typical Spec |
|---|---|---|
| Ponding area | Holds water temporarily while it infiltrates | 6 to 12 inches deep |
| Soil media | Filters pollutants, stores water for plant roots | 12 to 18 inches of sand, compost, and topsoil |
| Native plants | Absorb water, stabilize soil, support pollinators | Selected by moisture zone |
| Overflow outlet | Safely directs excess water during heavy storms | Pipe or spillway set 1 to 2 inches above ponding depth |
The ponding area is the visible depression you'll see after a storm. Water collects there and slowly soaks in. The soil media underneath is engineered to be porous but biologically active.
It's not bagged topsoil from the hardware store. It's a specific mix of sand, compost, and sometimes fine-graded topsoil.
Native plants do more than look good. Their deep root systems keep the soil porous and pull up water between storms. The overflow outlet is your fail-safe.
Every rain garden needs one, even if you think it'll never rain that hard. Trust me, it will.
The Step-by-Step Rain Garden Design Process
Start with a thorough site assessment before you buy a single plant or bag of compost. You can sketch the rest from your desk, but the site conditions determine everything.
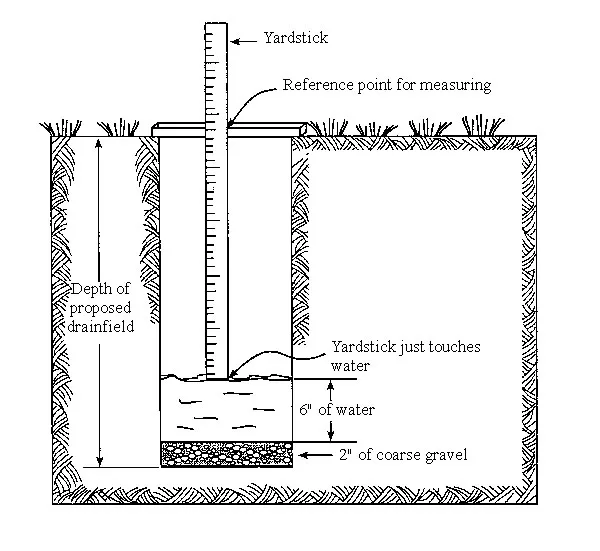
Image source: Web (Bing) / piersandpiles.com (Web image (fair-use with source credit))
Step 1: Check the slope and sun. Find a flat or gently sloping area (under 5 percent grade) in full to partial sun. Steep slopes require terracing or professional help.
Step 2: Call 811. You need utility locates before you dig. This is not a suggestion. Hitting a gas line or buried cable is dangerous and expensive.
Step 3: Run the percolation test. Dig a hole 12 inches deep and 8 to 12 inches wide. Fill it with water and let it drain completely. Fill it again and measure how fast the water level drops.
This is your infiltration rate. Here's how to read the results:
| Infiltration Rate | Soil Type | Feasibility |
|---|---|---|
| Over 1 inch per hour | Sandy or loamy soil | Ideal for rain garden |
| 0.5 to 1 inch per hour | Silty or clay-loam | Works with amended soil |
| Under 0.5 inch per hour | Heavy clay | Requires extensive soil replacement or a different approach |
Step 4: Size your garden. A typical rain garden should be 20 to 30 percent of the impervious area draining into it. If your roof section is 1,000 square feet, your garden should be 200 to 300 square feet. That's a guideline.
Adjust up for heavy clay soils, down for sandy ones.
Step 5: Lay out the shape. Kidney- or crescent-shaped gardens look natural and hold more water along the edges. Mark the boundaries with spray paint and excavate to 12 to 18 inches deep with sloped sides.
Step 6: Prepare the soil media. Mix 50 to 60 percent sand, 20 to 30 percent compost, and 20 percent topsoil. Fill the excavated area with that mix, then plant by zone. Deep wet zone at the bottom.
Moist middle zone. Dry edge zone at the top.
Step 7: Connect the downspout. Direct your gutter downspout into the garden with an extension pipe and a rock splash pad to disperse the flow. Never let concentrated water hit bare soil or it will erode.
Common Rain Garden Mistakes That Cause Flooding and Property Damage
Even experienced gardeners slip up on rain garden design. Here are the ones that cause the most damage.
Mistake 1: Siting too close to the house. This is the most expensive error you can make. Water that collects near your foundation will find its way into your basement. Ten feet is the absolute minimum setback.
Farther is better.
Mistake 2: Skipping the percolation test. You can guess your soil type all day, but the test tells you the truth. Clay soil that drains at 0.2 inches per hour will not work without major soil replacement. You cannot design around guesswork.
Mistake 3: Undersizing for real storms. A garden sized for a light drizzle will overflow during a one-inch rain. Always design for the local 1-year or 2-year, 24-hour storm event. Your local extension office or municipal stormwater department has that number.
Mistake 4: Ignoring the overflow path. Every rain garden needs a safe place for water to go when the basin fills up. If you don't plan the overflow, water will find its own path, and it might be toward your house.
Mistake 5: Choosing nonnative or invasive plants. Nonnative plants often die in the wet/dry cycle. Invasive species can escape into nearby natural areas. Stick with proven native plants suited to your region.
Mistake 6: Using the wrong soil mix. Regular topsoil compacts and drains poorly. The engineered soil mix with sand and compost is nonnegotiable. Don't cut corners here.
You'll regret it.
Rain Garden Costs, Rebates, and Practical Data
The cost of a rain garden varies widely based on size, soil conditions, and whether you go DIY or hire a pro.
| Expense Category | DIY Cost per Square Foot | Professional Cost per Square Foot |
|---|---|---|
| Excavation labor | $0 (your sweat) | $2 to $5 |
| Soil media materials | $2 to $4 | Included in labor rate |
| Plants | $1 to $3 | $2 to $5 |
| Mulch and stone | $0.50 to $1 | $1 to $2 |
| Downspout piping and fittings | $0.50 to $1 | $1 to $3 |
| Total | $4 to $9 | $15 to $40 |
A typical residential rain garden averages $500 to $2,500 DIY or $1,500 to $6,000 professionally. Professional work includes design, soil testing, and a warranty on the system's performance.
Rebate programs. Many cities offer rain garden rebates to reduce stormwater runoff. Portland, Philadelphia, Seattle, and Washington D.C. all have programs as of 2026. Check with your local stormwater utility or environmental agency.
The rebate often covers 25 to 50 percent of the installation cost or a flat fee per square foot.
Key metrics to track.
- Ponding depth: 6 to 12 inches
- Drawdown time: 24 to 48 hours
- Minimum infiltration rate: 0.5 inches per hour
- Soil depth: 12 to 18 inches
- Size ratio: 15 to 30 percent of contributing area
Keep those numbers handy. They are the benchmarks for a healthy, functional rain garden.
Safety, Setbacks, and Local Regulations
Rain garden design has safety rules that aren't optional. Ignoring them can damage your home, upset your neighbors, or land you in a dispute with your municipality.
Foundation setback. Ten feet is the minimum distance from your house. Some local codes require 15 feet. The goal is to keep water away from the foundation wall and basement.
If your yard is small, choose a location at the far end rather than squeezing it in close.
Septic system and property lines. Keep the garden at least 10 feet from any septic drainfield component. That includes the tank, pipes, and leach field. For property lines, check your local setback ordinance.
Many areas require 5 to 10 feet from the boundary.
Underground utilities. Call 811 at least three business days before you dig. The service is free and marks gas lines, electric cables, water pipes, and sewer lines. Hitting a gas line is dangerous and your responsibility.
Local stormwater permits. Some cities require a permit for rain gardens larger than a certain size. Others exempt residential gardens under 500 square feet. Check with your local stormwater utility or building department before you start.
HOA restrictions. If you live in a planned community, review the covenants, conditions, and restrictions. Some HOAs limit changes to landscaping or require approval for stormwater features. Get written permission to avoid fines later.
Regional climate adjustments. In cold climates, design the garden to handle freeze-thaw cycles. Use coarser soil media and ensure the overflow outlet is above the frost line. In arid regions, choose drought-tolerant plants that handle occasional ponding.
Coastal areas need salt-tolerant species.
When to Hire a Professional vs. DIY
A rain garden is a weekend project in ideal conditions. Sandy soil, a flat yard, and a small roof area. Most properties aren't that simple.
Go the DIY route if:
- Your percolation test shows at least 0.5 inches per hour
- The site is flat (under 5 percent grade)
- You have easy access to the area for excavation
- Your local codes don't require engineered plans
- You're comfortable digging and hauling soil
Hire a professional if:
- Your soil is heavy clay that drains under 0.5 inches per hour
- The site has any slope over 5 percent
- You're within 15 feet of your foundation or septic system
- Your municipality requires a stormwater permit with calculations
- You want a warranty on the system's performance
A professional designer or installer brings soil testing equipment, grading expertise, and plant knowledge. They also handle the permit process and coordinate with utility locates.
What to look for in a pro. Ask for examples of completed rain gardens in your area. Check that they understand bioretention soil media, not just general landscaping. Confirm they include a percolation test and engineered sizing in their quote.
Avoid contractors who say they can "just dig a hole and plant things."
The cost difference is real. Professional installation runs $15 to $40 per square foot compared to $4 to $9 for DIY. But if your site has challenging conditions, the pro saves you from costly mistakes that require digging it all up again.
Frequently Asked Questions
How long does a rain garden take to install?
A typical residential rain garden takes one to three days for a DIY install and about two days for a professional crew. The percolation test and utility locates add a week of lead time before you dig.
Can I grow vegetables in a rain garden?
No. Rain gardens filter stormwater runoff that may contain pollutants from roofs, driveways, and lawns. Those contaminants settle in the soil and can be absorbed by edible plants.
Stick with ornamental native plants.
How much maintenance does a rain garden really need?
In the first growing season, water weekly and pull weeds. After that, plan for two to three hours per season. Check the inlet and overflow for debris.
Replenish mulch every other year. Replace any plants that die.
What should I do if my rain garden stays wet longer than 48 hours?
That means the soil is draining too slowly. Test the infiltration rate again. If it's under 0.5 inches per hour, you may need to replace the soil media with a sandier mix.
Installing an underdrain pipe is another option.
Will a rain garden attract mosquitoes?
Not if it drains within 48 hours. Mosquitoes need standing water for at least seven to ten days to complete their life cycle. A properly designed rain garden with the right drawdown time won't breed mosquitoes.



