Pruning roses feels intimidating until you learn to read the plant. The good news is that it's a skill you can pick up in one season, once you know where to look and what to cut. If you've ever stood in front of a rose bush with shears in hand, unsure where to make the first cut, you're not alone.
The right time to prune is determined by your climate zone and the rose's growth stage, not the calendar alone. Per the Royal Horticultural Society, the ideal window is typically two to four weeks before the last average frost date, when buds are swollen but not fully open. That timing gives cuts time to heal before growth kicks in.
So let's walk through the visual cues that tell you exactly when and where to prune.
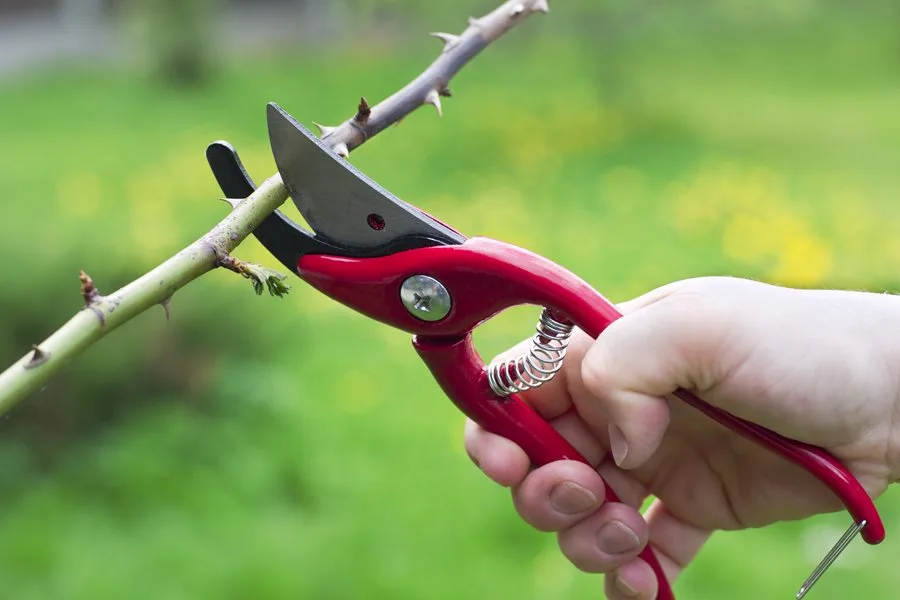
Image source: Web (Bing) / gardendesign.com (Web image (fair-use with source credit))
Quick Answer
Prune roses in late winter or early spring. Wait for swollen, red-tipped bud eyes on the canes. Cut at a 45-degree angle, one-quarter inch above an outward-facing bud.
Remove dead, damaged, and crossing canes first. Always use sharp, clean bypass pruners.
When to Prune Roses: Read the Plant, Not Just the Calendar
Why does timing matter so much? Prune too early and a late frost can kill the fresh cuts. Prune too late and you sacrifice the first flush of blooms.
The plant gives you a clear signal: watch the bud eyes. Those small swellings on the canes turn pink or red and begin to bulge just before growth starts. That's your cue to grab the shears.
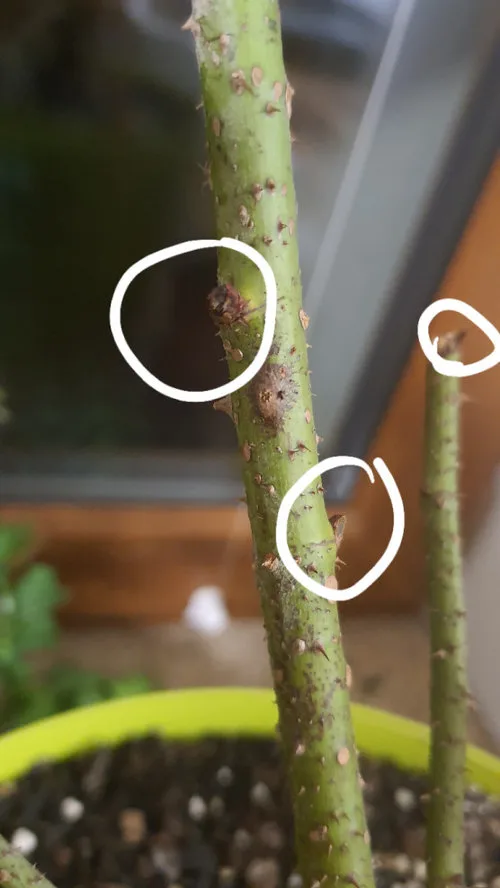
Image source: Web (Bing) / houzz.com (Web image (fair-use with source credit))
| Climate Zone | Typical Pruning Window |
|---|---|
| Zones 3–5 (cold) | April to May, after frost risk drops |
| Zones 6–7 (temperate) | March to April |
| Zones 8–10 (mild) | January to February |
| Zones 11+ (tropical) | After rainy season, before dry spell |
If you're in a region with late spring frosts, wait two to four weeks before your average last frost date. The RHS suggests timing your prune so the cuts stay dormant until the cold snap ends. If you already see green shoots emerging, prune right away, then protect the new growth with frost cloth if needed.
What about fall or summer pruning? In general, avoid hard pruning in fall because it stimulates tender new growth that won't harden off before winter. Instead, do a light tidy-up, removing spent blooms and deadwood only.
The main prune stays in late winter or early spring, depending on your zone. One more visual check: if the canes have green bark and plump buds, you're in the sweet spot. If the buds are still tiny and tight, wait another week or two.
How to Read a Rose Cane: Deadwood, Living Wood, and Bud Eyes
Before you make a single cut, you need to know what's alive and what's not. This is the step most guides skip, and it's where the real skill lives. Pick a cane and look at its color.
Healthy, living canes are green or reddish-green, with smooth, firm bark. Dead canes look brown, gray, or black, and the bark often wrinkles or peels away.
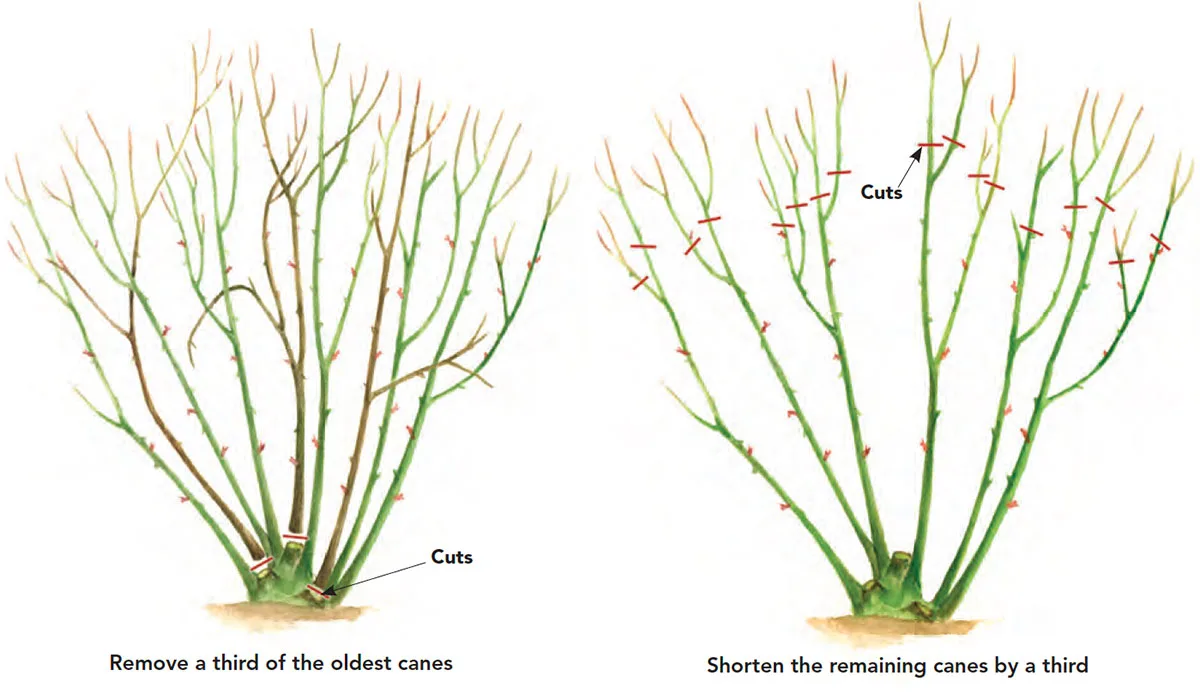
Image source: Bing (Web (fair-use with source credit))
The surest test is the pith test. Scrape a small nick in the bark with your thumbnail. If the tissue underneath is white or cream, the cane is alive.
If it's tan, brown, or dry, that part is dead. Keep scraping down the cane until you hit white pith, then cut just above that point.
Bud eyes are another key identifier. These are small, dormant buds that sit where leaves used to attach, usually just above a leaf scar. On a dormant rose, they look like tiny pink or reddish dots.
You want to cut to a bud eye that faces outward, away from the center of the plant. That encourages new growth to spread out, not tangle inward.
Suckers are a different story. They emerge from the rootstock below the graft union, usually as thin, vigorous canes with lighter green leaves and more thorns. If you leave them, they'll steal energy from the desired rose variety above.
Trace a suspect cane down to the soil. If it starts below the swollen graft knot, cut it off at the base.
Here's a simple visual guide for cane health:
- Green, firm bark with white pith: keep and prune
- Brown, brittle bark with tan pith: cut back to white pith
- Black, shriveled, or mushy: remove entirely
- Thin, wispy growth thinner than a pencil: remove
- Red-tipped, plump buds: your target for cuts
That quick assessment takes less than a minute per bush. Once you've sorted out deadwood from living wood, you're ready to think about where the actual cuts go.
The Anatomy of a Cut: Where and How to Prune Each Cane
The tools matter, but not as much as the technique. For most roses, a pair of sharp bypass pruners is all you need. Bypass blades slide past each other like scissors, giving a clean, precise cut that heals quickly.
Anvil pruners crush the cane, leaving a ragged wound that invites disease. Use bypass for live canes up to a half-inch thick. For thicker, older wood, switch to loppers or a pruning saw.
Now, the angle. You want a 45-degree cut that slants away from the bud eye you're keeping. That way, water runs off the cut surface instead of pooling on the stump.
The cut should sit about one-quarter inch above the bud. Don't go closer, or you risk drying out the bud. Don't go farther, or you leave a long stub that dies back and attracts cane borers.
Follow a consistent sequence. Start by removing the three D's: dead, diseased, and damaged canes. Work your way around the plant, cutting those at the base or back to live tissue.
Next, remove any canes that cross through the center of the bush or rub against each other. Then take out thin, spindly growth that's weaker than a pencil.
After that, you're shaping. Step back and look at the plant. For a hybrid tea or English rose, you're aiming for an open, vase-like structure.
Keep three to five of the strongest, youngest main canes, spaced evenly around the center. Shorten each of those canes by one-third to two-thirds, always cutting to an outward-facing bud eye.
It's also worth keeping your blades clean. Dip your pruners in rubbing alcohol or a 10% bleach solution between plants. This stops black spot and crown gall from spreading, even if the bush looks healthy.
As of 2026, the American Rose Society still recommends this as the single best disease-prevention habit for pruning.
If you're unsure how hard to cut, take a conservative approach. You can always prune more next year. But cutting too much is hard to undo.
Pruning by Rose Type: The Method Changes for Each Class
Not all roses follow the same rules. In fact, pruning the wrong way can cost you an entire season of blooms. So let's break it down by class.
Hybrid teas and English roses are the classic long-stemmed varieties. They respond well to hard pruning. Cut them down to about one-third to one-half of their height, leaving three to five sturdy canes.
You'll get fewer, larger blooms, which is exactly what these roses are grown for.
Floribundas and grandifloras bloom in clusters, so they want a lighter touch. Trim them back by about one-third, and remove only the oldest, thickest canes at the base. This keeps the bush full while encouraging plenty of new flowering wood.
Shrub and ground-cover roses need the least pruning. In late winter, just remove dead or diseased wood and do a light shaping. Every few years, you can take out a couple of the oldest canes to keep the center from getting woody.
That's usually enough.
Climbing roses are a different beast. Their main structural canes should stay mostly intact; you prune the lateral sideshoots that come off them. Shorten those sideshoots to two or three buds.
This spurs flowering along the main canes. One-time bloomers, like many ramblers, should be pruned right after flowering, not in late winter, or you'll cut off this year's buds.
Miniature and patio roses get a simple treatment. Reduce the whole plant by about one-third, then thin out any crossing or weak growth. They don't need the structural work that larger roses do.
Here's a quick decision guide based on what you're growing:
| Rose Type | When to Prune | How Much to Remove |
|---|---|---|
| Hybrid tea | Late winter/early spring | 1/3 to 1/2 of height |
| Floribunda | Late winter/early spring | 1/3 of height |
| Shrub | Late winter/early spring | Light shaping only |
| Climbing | Late winter or after bloom | Lateral sideshoots to 2–3 buds |
| Rambler | After flowering | Remove old canes at base |
| Miniature | Late winter/early spring | 1/3 total reduction |
The key is knowing which class you own. If you're not sure, wait until it blooms. Then look up the growth habit and prune accordingly.
It's better to be a season late than to guess wrong and lose the whole show.
The 7 Biggest Visual Mistakes That Stunt or Kill Roses
Even experienced gardeners make these missteps. The good news is that they're all avoidable once you know what to look for.
1. Cutting too low and lobbing off the bud eyes. If you need to squint to find a bud eye, you're cutting in the wrong spot. Leave at least one-quarter inch above the bud.
That little margin is what protects the dormant eye from drying out.
2. Leaving long stubs. A stub longer than half an inch above a bud will die back. That dead tissue becomes a highway for cane borers.
Always cut just above a living bud eye, not in the middle of a long stretch of bare wood.
3. Making inward-facing cuts. When you prune to an inward-facing bud, the new shoot grows toward the center of the bush. That creates a tangled, crowded interior with poor airflow and more disease.
Always choose a bud that points outward.
4. Pruning all canes to the same height. That gives you a padded, hedge-like look and weakens the center. Instead, keep the middle slightly lower than the outer ring.
This opens the plant to light and air.
5. Confusing a sucker with a healthy main cane. Suckers rootstock growth usually have lighter green leaves and a more aggressive, thorny look. They also emerge from below the graft union.
Cut them flush with the ground, not at mid-height.
6. Disinfecting once, then spreading disease. If you jump from an infected bush to a healthy one without cleaning your blades, you've just become a disease courier. Rubbing alcohol or a bleach solution between plants takes ten seconds and prevents real problems.
7. Sealing cuts with pruning paint or glue. The myth says it protects, but research from university extension services shows the opposite. Sealing cuts traps moisture and slows healing.
Fresh cuts exposed to air callus over naturally.
Do all seven correctly, and your roses will look better within a season. Skip any one, and you might spend the summer fighting weak growth or disease. Pruning is forgiving in the long run.
The plant recovers. But avoiding these visual mistakes is what separates decent roses from truly stunning ones.



