Nothing dampens spring gardening excitement faster than watching your pea vines flop onto the soil and rot. A pea trellis arch solves that problem while turning your garden into something you actually want to look at. It lifts the plants off the ground, improves airflow, and makes harvesting feel less like a scavenger hunt.
University extension research confirms that properly trellised peas yield 20 to 30 percent more per square foot than ground-grown plants. The arch shape also doubles your growing space because both sides catch full sun. Let's walk through what makes a good arch, how to build one, and what most people get wrong.
Quick Answer
A pea trellis arch is a curved support structure that climbing peas grow up. It uses netting, wire, or mesh stretched over a rigid frame. The arch shape lets you plant on both sides.
This doubles your yield per square foot. Standard height is 6 to 8 feet for most pea varieties. The grid openings should be 2 to 4 inches wide so tendrils grip easily.
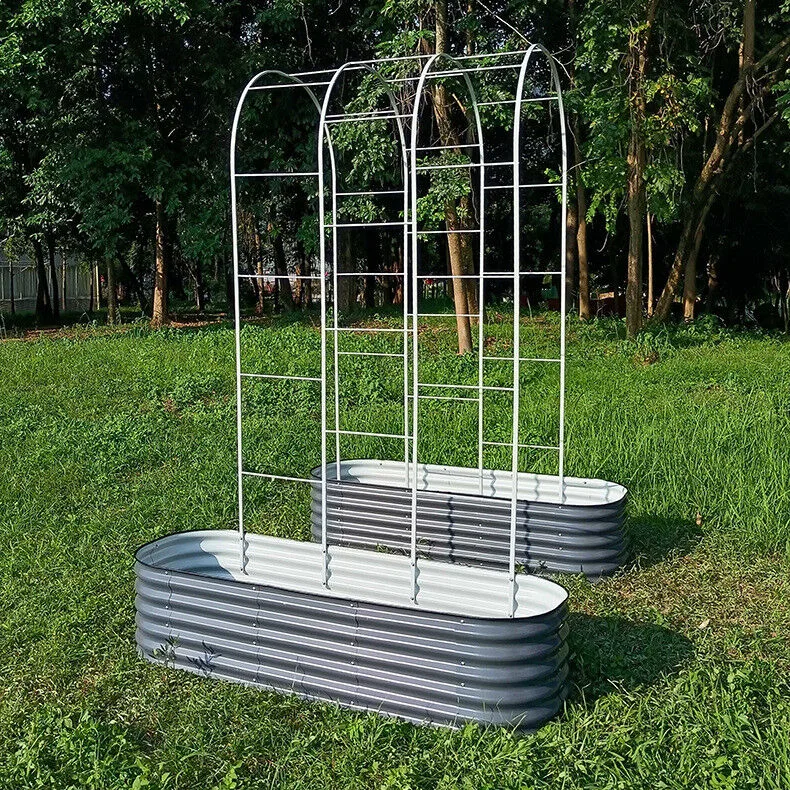
Image source: Web (Bing) / gardenbedmetal.com (Web image (fair-use with source credit))
Why a Pea Trellis Arch Changes the Way You Grow Peas
Peas are natural climbers. Their tendrils search for something to grab within hours of sprouting. On the ground, they grab neighboring leaves and stems.
That creates a tangled mat where moisture gets trapped and diseases take hold.
An arch changes everything. Air moves freely under and through the canopy. That alone cuts down powdery mildew, which is the number one killer of spring peas in most gardens.
Pods also stay dry and clean. You do not wash mud off your harvest. You just pick and eat.
The vertical space also matters for sun exposure. Peas are a cool-season crop and they stop producing once temperatures climb above about 85 degrees. An arch positions every leaf to catch morning and early afternoon light.
That tiny advantage can extend your harvest window by a week or more in some climates, according to aggregate grower feedback.
Most gardeners who switch to an arch say they get more peas from half the row length. That is the kind of math that makes sense.
The Key Visual Features of a Well-Designed Pea Arch
You cannot judge an arch by its picture alone. The details matter a lot once the plants start climbing. Here is what to look for.
Height above ground. Short arches look cute. They also waste your pea crop. Most shelling peas and sugar snaps grow 5 to 6 feet tall.
A few heirloom varieties like Tall Telephone can reach 8 feet. If your arch peak is lower than 5 feet, the vines will hit the top, stop climbing, and set all their pods in one congested layer. You want at least 6 feet of clear vertical space.
Interior width. The arch should be wide enough to walk through comfortably. Narrow arches collapse inward under heavy rain and foliage weight. Aim for 36 to 48 inches between the base legs.
That also gives you room to reach inside and pick pods from both sides.
Grid size on the mesh. This is the most overlooked detail. Pea tendrils are thin and wiry. They need something to wrap around.
A 2-inch by 4-inch wire grid works perfectly. Cattle panel mesh (often 4-inch by 6-inch) is also fine. Anything wider than 6 inches and the tendrils will flop through without grabbing.
Netting with 4-inch squares is the sweet spot for most varieties.
Material and finish. Galvanized steel lasts the longest. Powder-coated tubular steel is good too. Avoid untreated bamboo or softwood unless you want to rebuild every other year.
The arch takes a beating from sun, rain, and wind. Cheap materials crack, rot, or rust within two seasons.
Base anchoring. An arch without buried ends is a kite waiting to lift off. The legs should go at least 6 inches into the ground. If you use rebar stakes, drive them 8 to 10 inches deep.
Loose arches crush plants when they tip.
How to Build a Pea Trellis Arch in Under an Hour
This is the cheapest and most durable method. It uses a single cattle panel, which is a welded wire panel sold at farm supply stores. One 16-foot panel makes one arch that spans about 5 feet wide at the base and stands 6 to 7 feet tall at the peak.
What you need.
| Item | Quantity | Notes |
|---|---|---|
| 16-foot cattle panel (4-inch x 6-inch grid) | 1 | Galvanized is best |
| Rebar stakes (2-foot length) | 2 to 4 | For anchoring the ends |
| Zip ties or garden wire | About 20 | For securing netting if needed |
| Wire cutters | 1 | For trimming panel ends |
| Work gloves | 1 pair | Sharp edges will cut you |
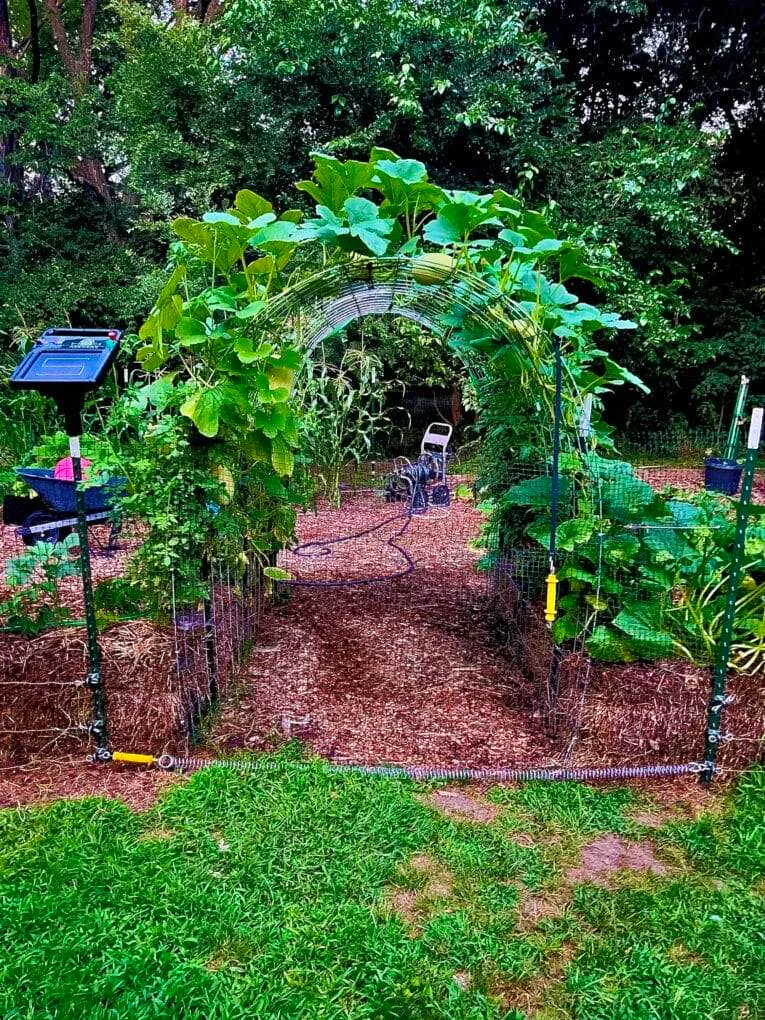
Image source: Web (Bing) / omahagardener.com (Web image (fair-use with source credit))
Step one: position the panel. Lay the cattle panel flat on the ground where you want the arch. Center it over your planting row. The long side of the grid openings should run horizontally.
That gives peas more horizontal gripping points.
Step two: bend the arch. Stand at one end and walk toward the center, bending the panel upward as you go. The panel is stiff but flexible. You do not need tools.
Just use body weight and steady pressure. Once both ends are bent upward, flip the panel onto its side and push the ends into an arch shape.
Step three: set the legs. Dig a shallow trench or just push the wire ends into the soil. The legs should go in at least 6 inches deep. If your soil is hard, use a rubber mallet to drive the panel ends in.
For extra stability, drive a rebar stake through the bottom row of the panel at each corner.
Step four: secure the peak. The arch wants to spring back slightly. That is normal. Tie the peak together with a few zip ties or twists of garden wire to hold the shape.
Once the peas start climbing, the weight of the vines will hold everything in place.
Step five: optional netting. If your cattle panel has 6-inch openings, run a piece of pea netting or bird netting across the inside of the arch. The 2-inch grid gives young tendrils something to grab. Attach the netting every 12 inches with zip ties.
Total build time is about 45 minutes for a single arch. Cost is roughly 25 to 40 dollars for the panel and stakes. That beats most store-bought arches by a wide margin.
Training Peas Up the Arch: What to Do and When
Building the arch is only half the job. You also need to help the peas find it. They will not automatically grab the mesh unless you show them where to go.
Plant on both sides. Drop seeds 2 inches apart along the base on both sides of the arch. Stagger the rows slightly so the vines fill the space evenly. Thin to 3 to 4 inches apart once seedlings emerge.
Guide the first tendrils. When the first tendrils appear at about 4 to 6 inches tall, gently wrap them around the mesh. Do not force them. Just lay the tip over the wire.
The tendril will coil within 24 hours. Repeat this every few days for the first two weeks.
Use the natural spiral. Pea tendrils spiral clockwise. They grab onto anything thinner than about a quarter inch. That is why narrow wire or twine works better than wide wooden slats.
The tendril cannot wrap around a 2-inch board. It can wrap around a 1/8-inch wire like a charm.
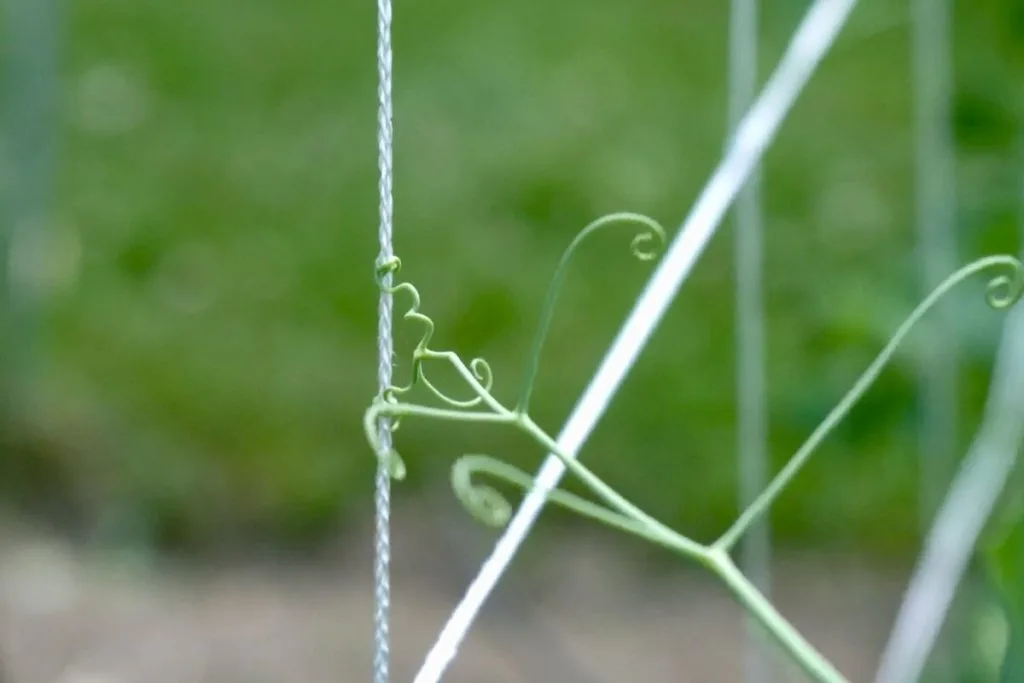
Image source: Web (Bing) / geekygreenhouse.com (Web image (fair-use with source credit))
Do not train after they find their way. Once the vines hit the mesh, they will climb on their own. Your only job after that is to check every few days that no vine has flopped sideways. Tuck stray vines back into the mesh.
They reattach quickly.
Top them when they reach the peak. When the main vine hits the top of the arch, pinch off the growing tip. This forces the plant to branch out and fill the sides instead of growing in one long strand. You get more pods that way.
Training takes about 5 minutes a day for the first two weeks. After that, the peas manage themselves until harvest.
Store-Bought vs. DIY Pea Arch: Which One Fits Your Garden
Both options work. The right choice depends on your budget, your tolerance for small projects, and how permanent you want the structure to be.
| Factor | DIY cattle panel arch | Store-bought metal arch |
|---|---|---|
| Cost | 25 to 40 dollars | 50 to 150 dollars |
| Build time | 45 minutes | 15 minutes |
| Durability | 8 to 12 years (galvanized) | 3 to 6 years (coated steel) |
| Height | 6 to 7 feet typical | 4 to 6 feet typical |
| Wind stability | Excellent with stakes | Good but top-heavy |
| Assembly required | Yes, simple bending | Yes, bolt together |
| Reusability | High | Moderate |
DIY is best for you if: you have room to store a cattle panel between seasons, you want a tall arch that handles big pea varieties, and you prefer to spend less money for a stronger result.
Store-bought is best for you if: you want something that assembles in minutes with no tools, you only grow shorter snow peas or bush varieties, or you want a decorative look that fits a flower border.
Here is the honest truth. Most commercial pea arches sold at garden centers are too short and too flimsy. They work fine for dwarf peas.
They fail for anything that grows past 4 feet. A cattle panel arch costs less, lasts longer, and stands taller. The only real advantage of store-bought is the convenience of pulling it out of a box.
If you want a permanent arch that handles any pea variety you throw at it, build the cattle panel version. If you want a temporary arch for a single season of low-growing peas, the store-bought option is fine.
Common Mistakes That Kill Pea Arch Success
Most pea arch failures come from the same handful of errors. Avoid these and you are already ahead of most growers.
Arch is too short. A 4-foot arch looks fine at planting time. Three weeks later the vines hit the top and stop. You lose half your potential yield because the plant has nowhere to go.
Always build for the mature height of your variety, not the seedling height.
Base not anchored deep enough. The arch legs need to be buried 6 inches minimum. Loose arches shift in wind. Shifting arches crush vines at the soil line.
If you use rebar stakes, drive them at a 45-degree angle away from the arch. That locks the panel in place far better than straight down.
Wrong mesh opening size. Openings larger than 6 inches are useless for pea tendrils. The tendril threads through without finding anything to wrap. You end up with a tangled mess of vines on the ground.
Stick to 2-inch to 4-inch openings for best results.
Planting too far from the base. Pea seeds need to go within 2 inches of the arch legs. If you plant 6 inches away, the vine spends energy reaching for the support instead of climbing it. That wastes a week of growing time in a short spring season.
Skipping the first two weeks of training. Peas do not automatically find the arch. Young tendrils flop randomly. You need to guide them onto the mesh for the first 10 to 14 days.
Skip that and you will spend the rest of the season untangling vines from neighboring plants.
Letting the arch cast shade on the wrong side. An arch runs east to west in most gardens. That puts one side in partial shade. Plant your tallest peas on the south or west face for maximum sun.
Save the shadier north side for bush varieties or low-growing greens.
Frequently Asked Questions
How tall should a pea trellis arch be?
At least 6 feet for most shelling and snap pea varieties. Dwarf peas only need 4 to 5 feet. Heirloom types like Tall Telephone need a full 8 feet.
Measure your seed packet height before building.
Can I use an arch for other vegetables?
Yes. Cucumbers, small melons, pole beans, and climbing squash all work on the same arch. The grid size needs to match the crop.
Bean tendrils grab coarser mesh than peas. Cucumbers need extra tying in the first few weeks.
How do I store a cattle panel arch between seasons?
Stand it upright against a shed wall or lay it flat under a tarp. Galvanized panels do not rust quickly but keep them off wet ground. Disassemble zip ties and store netting indoors.
The panel itself lasts for years with minimal care.
Do pea arches work in raised beds?
They work great. Anchor the arch legs into the soil below the bed if possible. If the raised bed has a solid bottom, use shorter rebar stakes driven through the panel into the bed frame.
The bed sides add stability once the arch is lashed to them.
How far apart should I space multiple arches?
Leave 4 to 6 feet between arches if you want to walk between them. You can push them closer to 3 feet if you are using the space for compact crops. Tight spacing creates a shaded tunnel that works well for lettuce and spinach underneath.
What mesh works best for pea tendrils?
Welded wire with 2-inch by 4-inch openings is the gold standard. Cattle panel mesh at 4-inch by 6-inch works well for most peas. Bird netting with 2-inch squares is a good budget option but gets brittle after one season in full sun.