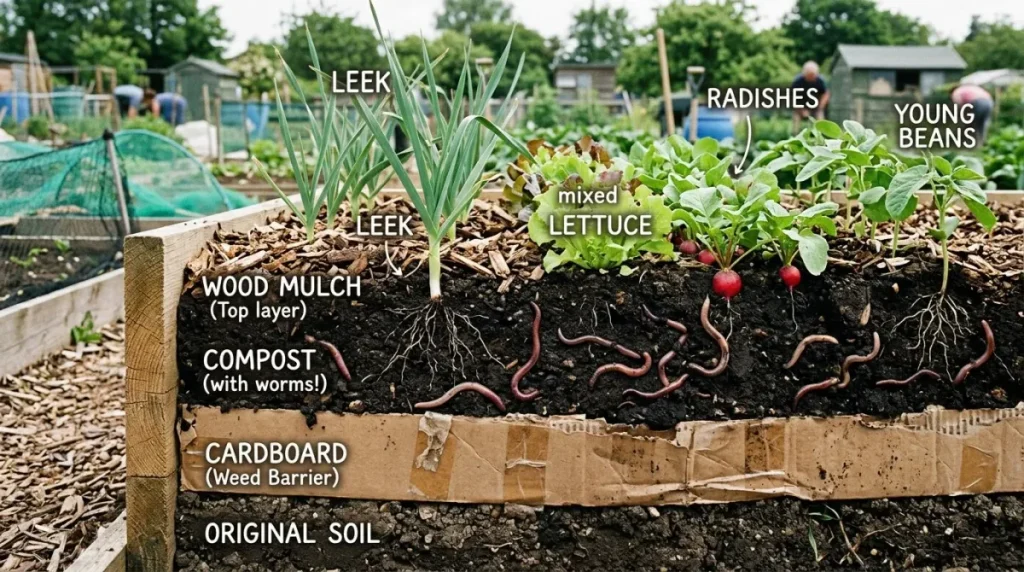
No dig gardening is about working with the soil instead of against it. You stop tilling, stop turning, stop disturbing the underground ecosystem that keeps your plants healthy. The idea is simple: pile organic matter on top, let earthworms and microbes pull it down, and never flip the soil again.
According to the USDA Natural Resources Conservation Service, no-till and no dig systems can increase soil organic matter by roughly 0.1 to 0.2% per year compared to conventionally tilled beds. That difference compounds fast. For the home gardener, it means richer soil, fewer weeds, and a whole lot less physical labor.
Let's walk through what this method actually involves and whether it's right for your garden.
Quick Answer
No dig gardening skips tilling entirely. You layer cardboard and compost directly on top. Soil organisms break down the layers naturally.
Plant straight into the new bed. Fewer weeds and less labor each season. The soil gets better every year.
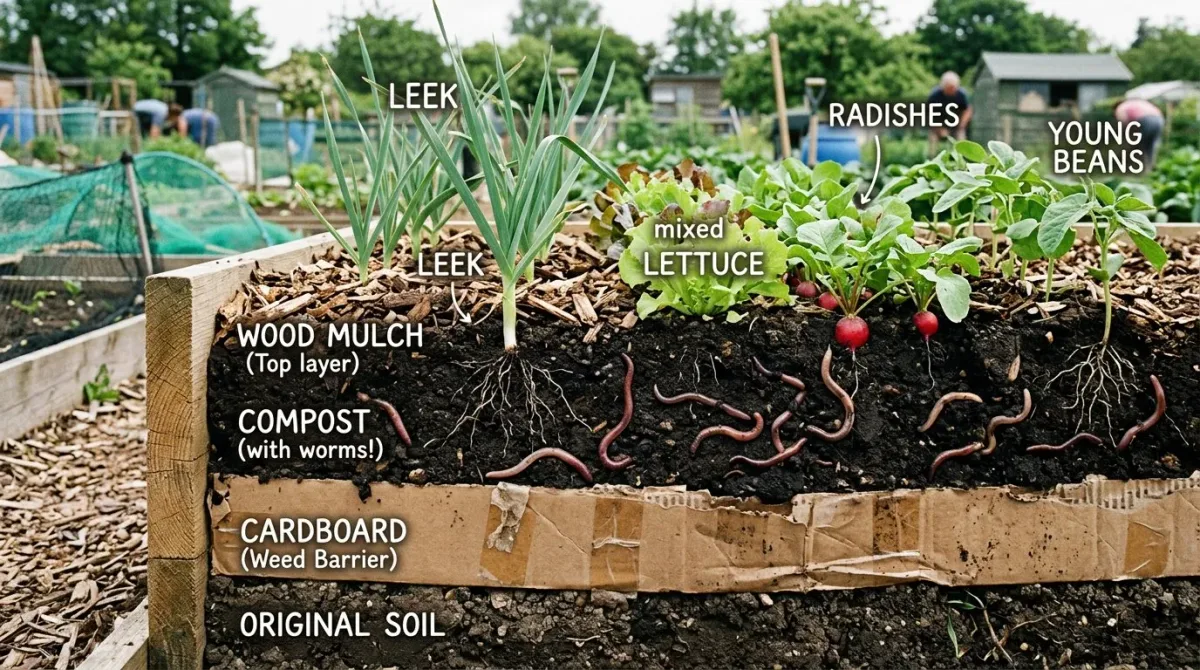
Image source: Web (Bing) / bluestem.ca
Should You Start No Dig?
This method works best for gardeners who want to reduce physical strain and improve soil health over time. It is not a magic fix. It is a long-term approach that rewards patience.
Start no dig if:
- You have compacted or heavy clay soil that is hard to work
- You are physically limited by age, injury, or chronic pain
- You want to spend less time weeding and watering
- You are starting a brand new bed on grass or lawn
- You are tired of fighting the same weeds every spring
Think twice about no dig if:
- You have a serious infestation of perennial weeds like bindweed, couch grass, or Japanese knotweed. These can punch through cardboard and compost within weeks
- You need to warm your soil early in spring. No dig beds stay cooler longer because the mulch layer insulates them
- You genuinely enjoy double digging and find it relaxing. Some people do. No dig is not a moral choice
The majority of home gardeners fall into the first camp. If you are on the fence, try one bed no dig and leave another bed conventionally tilled. Compare your results after one season.
Most people never go back.
What Actually Changes When You Stop Digging
Tilling does more than break up soil clods. It destroys the fungal networks, worm tunnels, and microbial colonies that build healthy soil structure. Every time you turn the soil, you disrupt these systems and expose buried organic matter to oxygen.
That oxygen burns up the carbon as carbon dioxide. You are literally losing soil to the air.
When you stop digging, three major things happen.
First, soil structure improves naturally. Earthworms and plant roots create channels that aerate the ground better than any tool can. Your soil develops aggregates, small crumb-like clumps that hold water and nutrients without compacting. Over time, the soil becomes spongy.
It absorbs rain instead of letting it run off.
Second, the weed seed bank stays buried. Most weed seeds need light to germinate. When you stop digging, you stop bringing fresh seeds to the surface. Every year without tilling, fewer weeds appear.
Many no dig gardeners report a 60 to 70% reduction in weed pressure by the third season.
Third, organic matter builds consistently. Each year you add a fresh layer of compost on top. Worms pull that material down into the root zone. The carbon stays in the ground instead of floating away as greenhouse gas.
Your soil becomes darker, richer, and more alive with every season.
This is the core advantage of the method. It is not about avoiding work. It is about channeling your energy into the right kind of work, adding materials instead of moving them around.
Which No Dig Method Fits Your Starting Point
Your starting point determines which version of no dig you should use. The basic principle stays the same. The materials and order change slightly.
| Starting Point | Best Method | Key Material | Time Before Planting |
|---|---|---|---|
| Lawn or grass | Sheet mulching | Cardboard and 4–6 inches of compost | 2–4 weeks for grass to break down |
| Bare soil or old garden bed | Simple top dressing | 2–3 inches of compost directly on soil | Plant immediately |
| Heavy clay or compacted soil | Lasagna layering | Cardboard, then alternating greens and browns, topped with compost | 4–8 weeks for layers to settle |
| Existing raised beds | Annual resurfacing | 1–2 inches of fresh compost each spring | Plant immediately |
| Weedy patch with perennials | Deep sheet mulch | Cardboard, then 8–12 inches of mulch over compost | One full season for stubborn weeds |
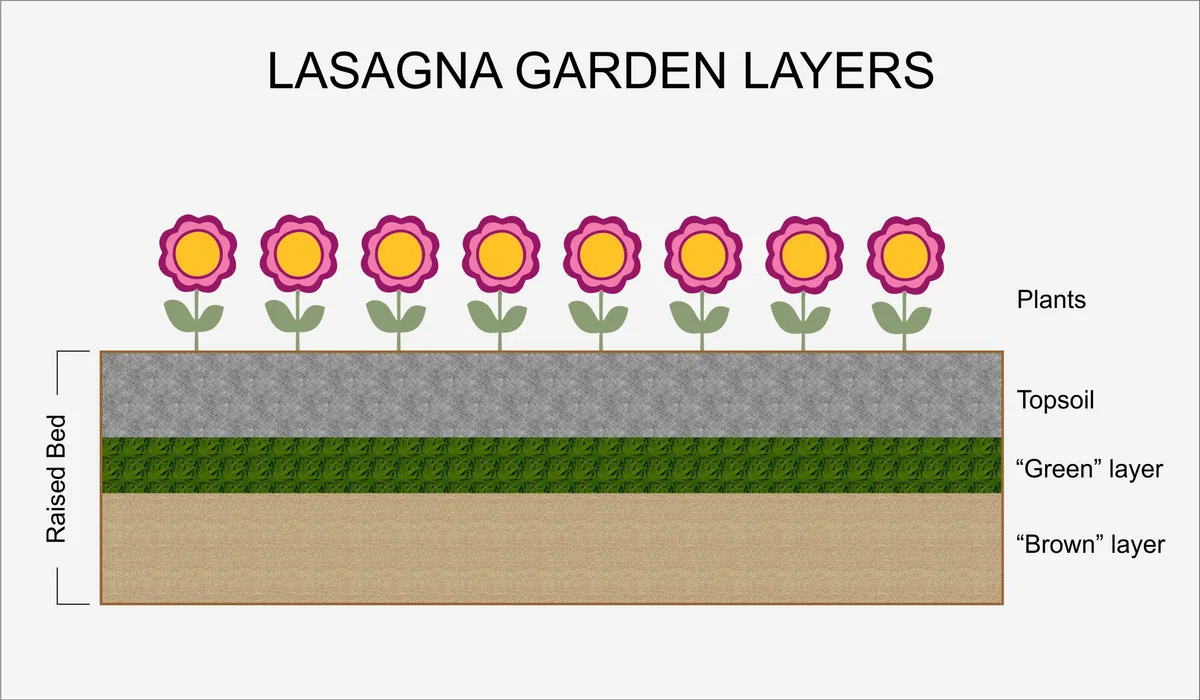
Image source: Web (Bing) / sagesacre.com
For lawn conversion, sheet mulching is your only reliable option. Mow the grass as short as possible. Lay cardboard directly over the entire area.
Overlap the edges by at least 6 inches so no light reaches the grass. Wet the cardboard thoroughly. Then pile 4 to 6 inches of compost on top.
Wait two to four weeks before planting.
For bare soil or an old garden bed, you can skip the cardboard if the area is already weed free. Apply 2 to 3 inches of compost directly on the soil surface. Plant right away.
This is the simplest version of no dig and the one most experienced growers use every spring.
For heavy clay, add extra layering. After the cardboard, alternate nitrogen-rich greens, kitchen scraps, fresh grass clippings with carbon-rich browns, dry leaves, straw. End with a thick layer of compost.
The extra organic matter breaks down over a few weeks and creates a rich planting medium faster than compost alone.
For existing raised beds, just add 1 to 2 inches of fresh compost each spring. No cardboard needed. No tilling.
No layers. Just a clean reset every year.
Most beginners start with sheet mulching on a lawn area. It gives the most dramatic results because the before and after difference is obvious.
How to Build a No Dig Bed
Building a no dig bed takes about an hour for a standard 4 by 8 foot area. You need cardboard, compost, a garden hose, and a sharp knife or scissors.
Step 1: Clear large debris. Remove rocks, sticks, and existing weeds. Do not pull out the weed roots. Just cut them at ground level.
Heavy disturbance defeats the purpose.
Step 2: Mow or cut vegetation short. Grass, clover, and small weeds should be as low as possible. This helps the cardboard sit flat and prevents air pockets.
Step 3: Lay cardboard with heavy overlap. Use single-ply cardboard from shipping boxes. Remove all tape, labels, and plastic stickers. Overlap each piece by at least 6 inches.
Think of it like shingles on a roof. No gaps.
Step 4: Soak the cardboard. Use a hose or watering can. Wet cardboard molds itself to the ground and blocks light more effectively. Dry cardboard leaves gaps that weeds can find.
Step 5: Add compost. Dump 3 to 5 inches of well finished compost over the entire cardboard surface. Spread it evenly with a rake. Do not skimp.
Thin compost layers let weeds push through faster.
Step 6: Water the bed. Give the compost a good soak. This settles the layers and activates the soil biology underneath.
Step 7: Plant directly into the compost. Use a trowel to part the compost. Cut through the cardboard if needed. Set your seedling or seed into the soil below.
Water it in. That is it.
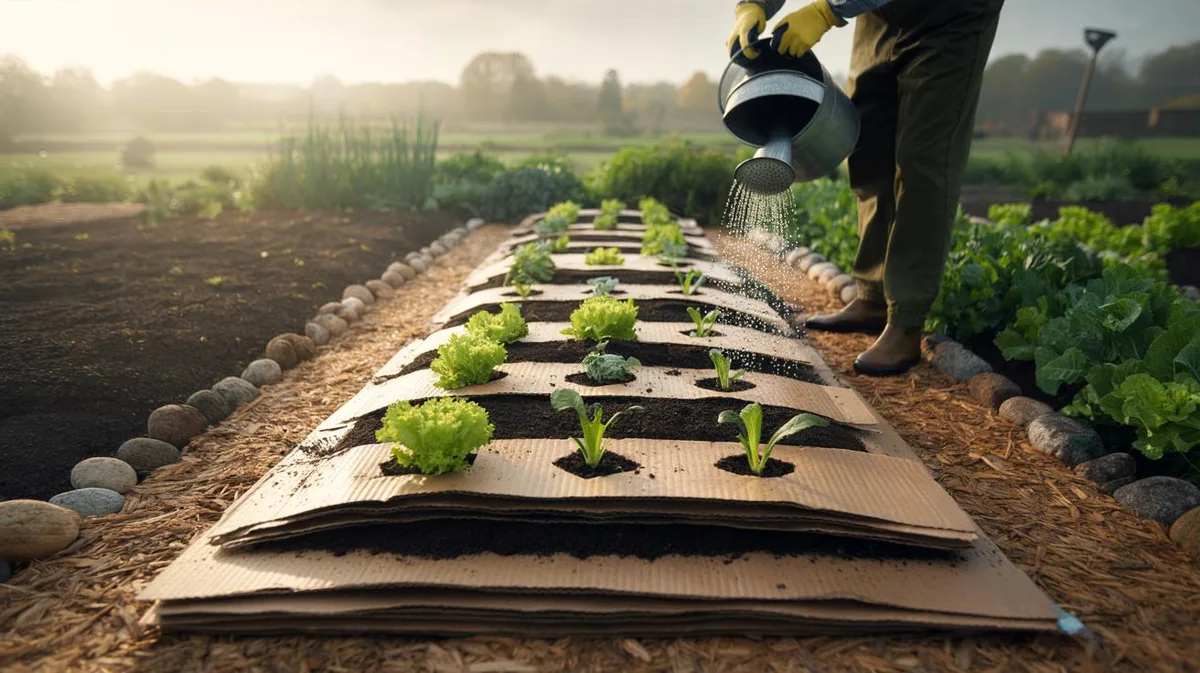
Image source: Web (Bing) / menuthai-fleet.co.uk
The cardboard breaks down within three to six months. By then, the grass and weeds beneath have died and become organic matter. The worms have moved through the cardboard and the compost.
Your soil is already changing.
For pathways between beds, use wood chips or straw over cardboard. Do not walk on the planting beds themselves. Walking on no dig beds compacts the soil you worked so hard to loosen.
Common No Dig Mistakes (and How to Fix Them)
No dig gardening is forgiving, but a few common errors can set you back.
Using thin cardboard. Single sheets of thin cardboard, like cereal box cardboard, break down too fast. Weeds push through within weeks. Use standard shipping cardboard.
Double ply is even better. Overlap generously.
Skipping the water on cardboard. Dry cardboard curls at the edges. It leaves gaps. Weeds find those gaps fast.
Always wet the cardboard until it is fully soaked and lying flat against the ground.
Adding too little compost. A skimpy 1 inch layer of compost lets light reach the cardboard. That light heats the cardboard and accelerates its breakdown. Three inches minimum.
Five inches is better for first time beds.
Planting too deep. No dig beds are loose and fluffy. If you bury a seedling deep, it settles into the compost and can rot. Plant at the same depth the seedling was in its pot.
Walking on the beds. This is the most common mistake after the beds are built. Compacted no dig beds lose their biggest advantage. Use plank bridges or simply reach from the edges.
Using fresh wood chips as the top layer on beds. Fresh chips tie up nitrogen as they decompose. This can yellow your plants and slow growth. Use wood chips only on pathways, not on planting areas.
Use compost on the beds.
Ignoring perennial weeds before starting. If you have bindweed or couch grass, cardboard alone will not stop them. They spread laterally and emerge at the bed edges. Dig out the worst patches before you layer.
Or wait one full season under a very deep mulch.
Most of these mistakes are easy to fix. Thin cardboard can be doubled up. Skimpy beds can be topped off.
Compacted beds can be loosened with a broad fork, though that is counter to the no dig philosophy. The best fix is to do it right the first time and avoid the extra work.
FAQs
How long does it take for cardboard to break down in a no dig bed?
Standard shipping cardboard breaks down in three to six months. Wet cardboard breaks down faster. Cold, dry conditions slow the process.
In our research, most gardeners report the cardboard is fully gone by the first harvest. Earthworms do most of the work.
Does no dig gardening work for all soil types?
No dig works on every soil type, but the timeline differs. Sandy soil shows improvement within one season. Heavy clay takes one to three years to become truly friable.
The method is most dramatic on poor soil because the organic matter builds structure that tilling never could.
Can I start a no dig bed in spring?
Yes, plant immediately after building it. The compost layer is ready for seedlings and transplants right away. Just make sure the cardboard beneath stays wet.
The grass beneath will die as the cardboard breaks down. Your plants will grow while the soil builds itself below them.
What do I do about slugs in a no dig garden?
Slugs can be an issue because mulch retains moisture. Hand picking at dusk works well. Beer traps and copper tape help around beds.
Aggregated gardener reports suggest ducks are the most effective long term solution. Also, spread compost rather than fresh manure, which attracts fewer slugs.
Do I need to add fertilizer to a no dig bed?
Compost provides most nutrients that vegetables need. Add a balanced organic fertilizer or compost tea mid season for heavy feeders like tomatoes and brassicas. Most leafy crops and root crops need nothing extra.
Your compost quality determines your fertilizer needs, so use well finished compost.
Your No Dig Decision Guide
If you want less weeding, fewer chores, and soil that gets richer every year, no dig gardening is worth trying. The first season requires effort gathering cardboard and compost. After that, each season gets easier and cheaper.
Choose no dig if:
- You are starting a new bed on lawn or bare soil
- You have heavy clay or compacted ground
- You want to reduce your physical workload
- You plan to garden in the same spot for more than one season
- You are willing to wait two to four weeks before planting
Choose a hybrid approach if:
- You have serious perennial weeds like bindweed or Japanese knotweed. Dig out the worst patches first, then switch to no dig maintenance
- You need to plant immediately into very poor soil. Mix compost into the top few inches once, then never dig again
As of 2026, no dig gardening is one of the best documented home gardening methods. Research from organizations like the USDA Natural Resources Conservation Service supports the soil health benefits. The practical evidence from thousands of home gardeners confirms it works.
Start with one bed. Keep your expectations reasonable. The results will surprise you by the end of the season.
By year two, you will wonder why you ever picked up a shovel in the first place.