
Imagine stepping into your garden, where the sun gently kisses your plants and the air is filled with the scent of fresh blossoms. Now, picture yourself with a dedicated space to nurture and organize your passion for gardening.
This is where a garden potting bench comes into play, transforming your gardening experience into something more efficient and enjoyable. By building your own garden potting bench, you gain a personalized workspace tailored to your specific needs. Think of it as your gardening command center, where everything you need is at your fingertips.
No more bending over for long periods or searching for lost tools. Instead, you’ll have a stylish and functional piece that enhances your garden’s aesthetic while providing practical benefits. In this guide, we’ll walk you through the simple steps to create your very own garden potting bench. Whether you’re a seasoned gardener or just getting started, you’ll find that building a potting bench is not only easy but also rewarding. Get ready to discover how this project can transform your gardening routine and bring you closer to nature. Let’s dive in and unlock the secrets to crafting your perfect garden potting bench!

Credit: www.coastalhomestead.com
Materials Needed
Wooden planks, screws, and a hammer form the base of a garden potting bench. Choose weather-resistant materials like cedar. Add shelves, hooks, and a durable countertop for functionality.
Building a garden potting bench can be a rewarding project that enhances your gardening experience. But before you roll up your sleeves, it’s crucial to gather all the necessary materials. The right materials will not only ensure durability but also make your bench a functional and pleasant space for potting plants. Let’s dive into what you need to get started.Wood Selection
Choosing the right wood is a pivotal part of your project. Opt for weather-resistant options like cedar or redwood. These types of wood naturally resist decay and insects, making them perfect for outdoor use. Think about the environment where you’ll place your bench; if it’s exposed to moisture, a treated wood might be beneficial.Essential Tools
Your toolbox will be your best friend during this project. Make sure you have a saw, drill, and screwdriver ready. A tape measure is essential for accuracy in your cuts and assembly. Safety gear, such as gloves and goggles, is also crucial for protection. What tools do you already have, and what might you need to borrow or purchase?Additional Supplies
Aside from wood and tools, you’ll need a few more supplies to complete your bench. Screws and nails will hold everything together; ensure they’re appropriate for outdoor use to prevent rust. Sandpaper is handy for smoothing rough edges, while wood stain or paint can add a touch of color and protection. Depending on your design, consider adding hooks or shelves for extra functionality. What features would make your potting bench uniquely yours? Engaging in this project not only equips you with a useful garden accessory but also allows you to express creativity and craftsmanship. Gather your materials thoughtfully, and you’ll find the process as rewarding as the end result.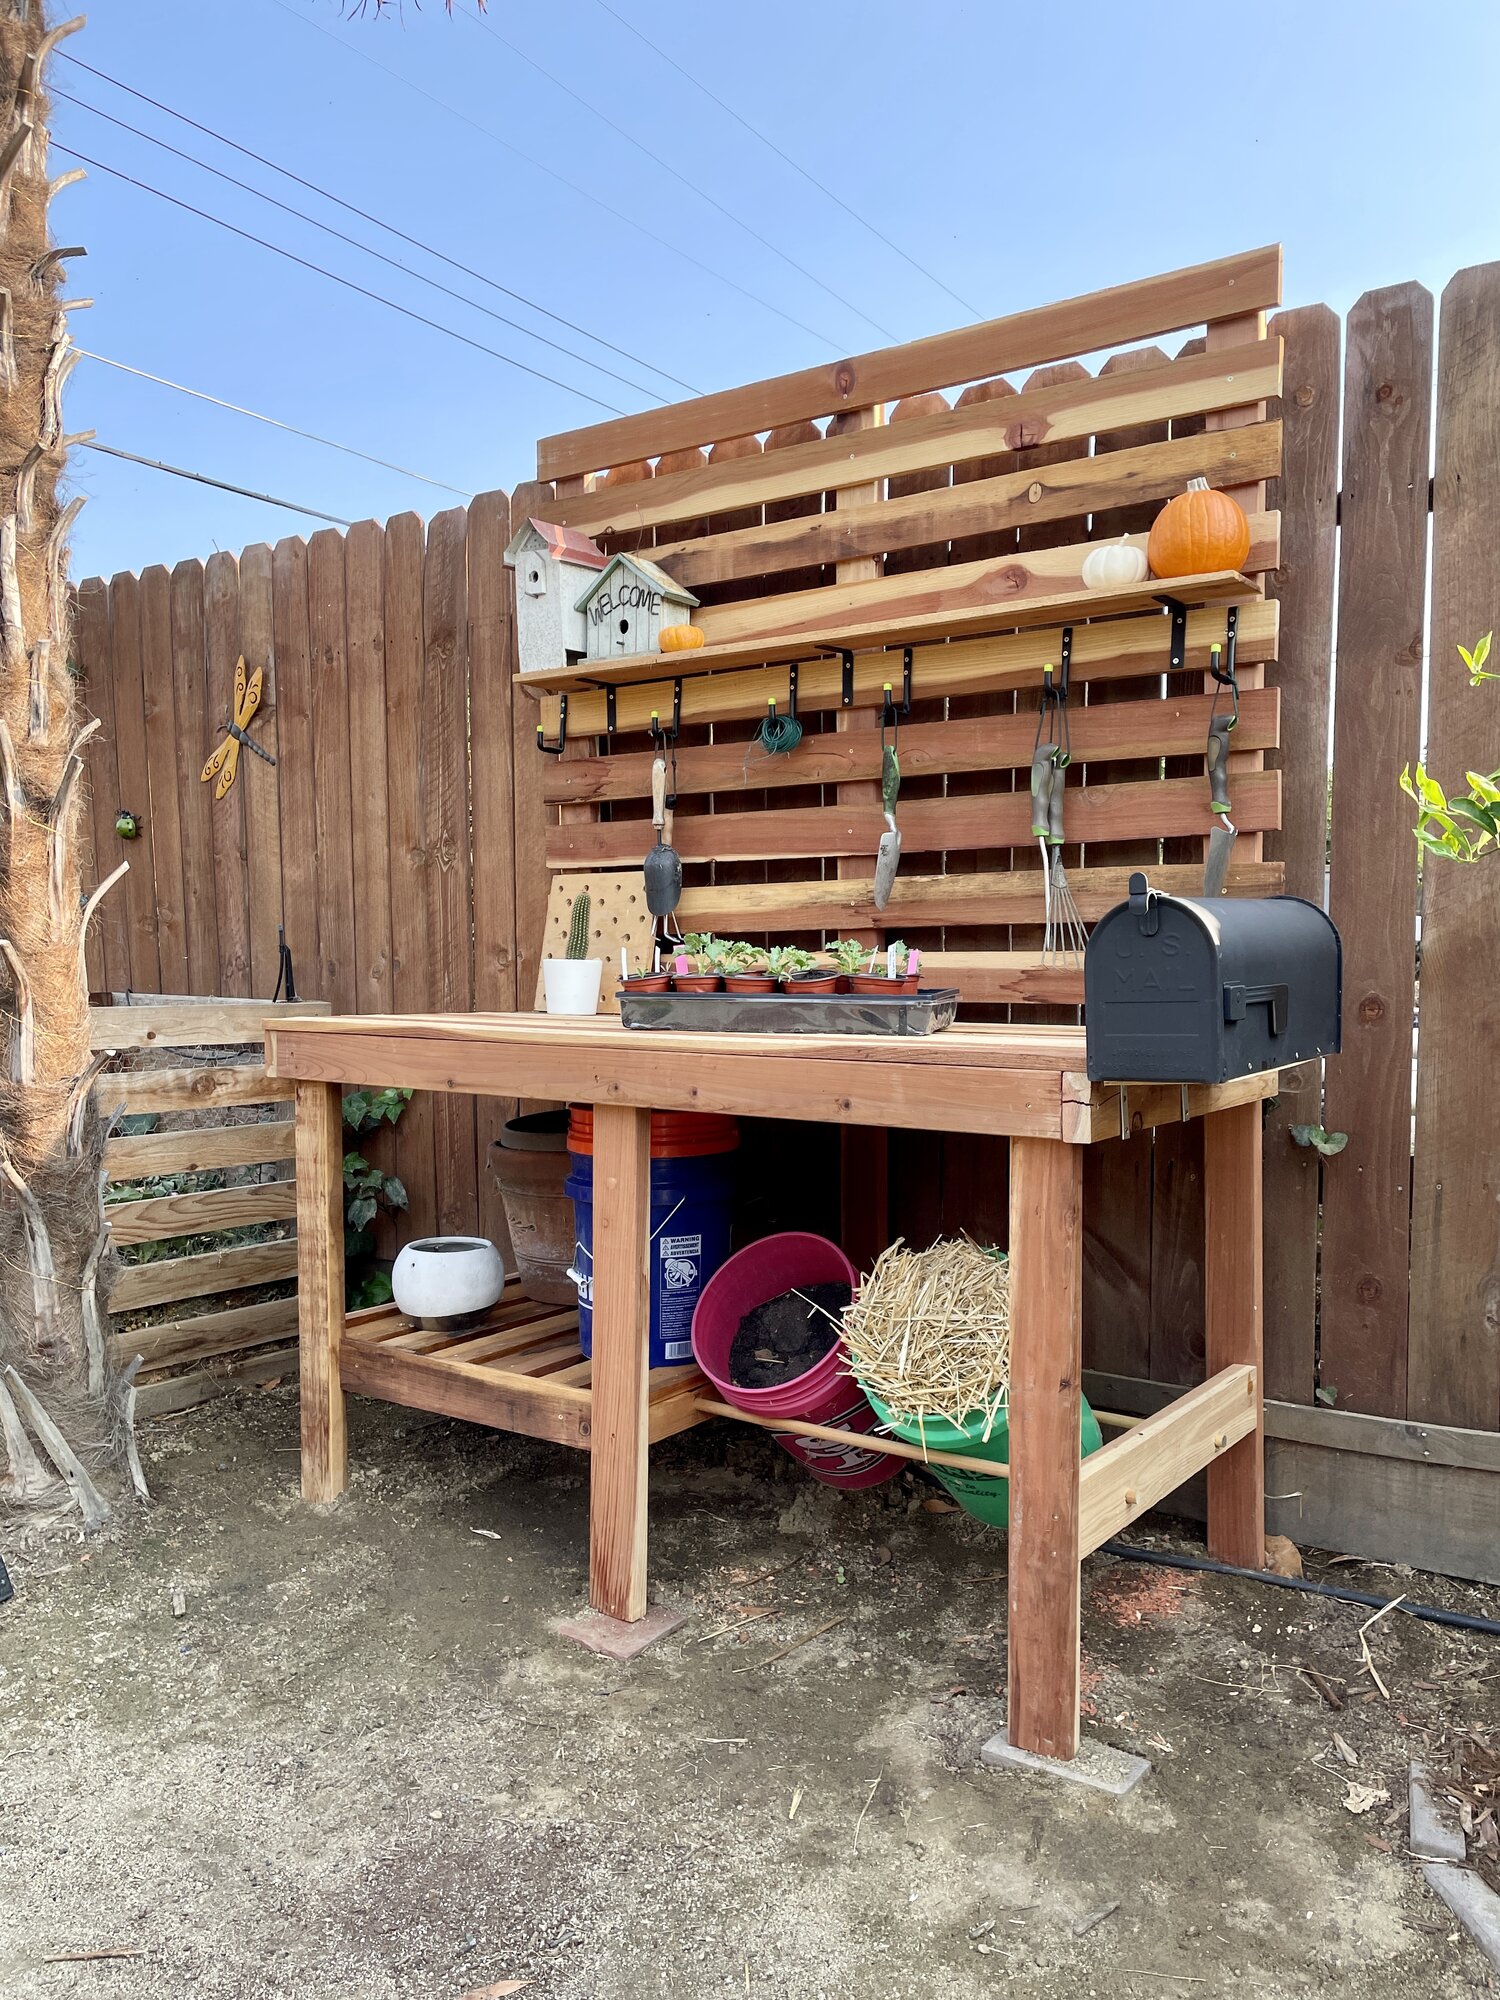
Credit: www.ourlibertyhouse.com
Designing Your Bench
Crafting a garden potting bench involves selecting sturdy materials and planning dimensions for optimal workspace. Focus on integrating storage solutions for tools and pots, ensuring easy access and organization. Personalize your bench with weather-resistant finishes to enhance durability and aesthetic appeal.
Designing Your Bench Creating a garden potting bench is more than just assembling wood and nails; it’s about crafting a space that enhances your gardening experience. Whether you’re an amateur or a seasoned gardener, a well-designed potting bench can transform how you work with plants. Let’s dive into some key considerations to make your bench a functional and personal retreat.Choosing The Right Size
The size of your potting bench should fit seamlessly into your garden space. Consider the area you have available and how much workspace you need. – Measure your space: Determine the dimensions that will allow you to move freely and store your tools efficiently. – Think about height: Ensure the bench is at a comfortable height to avoid strain during prolonged use. Your back will thank you! Do you have space constraints? Opt for a foldable design that can be tucked away when not in use.Incorporating Functional Features
A potting bench isn’t just a table; it’s your gardening command center. What features will make your tasks easier and more enjoyable? – Shelving and storage: Add shelves for pots and hooks for hanging tools. A drawer for seeds and small items can be a game changer. – Waterproof surface: Consider materials that resist water damage, as wet soil and plants are inevitable companions. Would a built-in sink or hose connection take your gardening to the next level? It’s worth pondering.Sketching The Layout
Before you start building, sketching your potting bench layout can save time and prevent mistakes. Visualize how you want your bench to look and function. – Draw your design: Use graph paper or digital tools to outline where each feature will go. – Iterate your ideas: Don’t be afraid to make multiple drafts until you land on a design that feels right. Imagining the final product can spark new ideas—will you include a trellis for climbing plants or a shaded section for delicate ones?Preparing The Workspace
Selecting a flat, sturdy area is crucial for building a garden potting bench. Clear any debris and ensure proper drainage. Organize tools and materials nearby for easy access during construction.
Preparing the Workspace Embarking on the journey of building a garden potting bench is both exciting and rewarding. Before you dive into the construction, it’s crucial to prepare your workspace effectively. A well-prepared area not only enhances your efficiency but also ensures that you enjoy the process without unnecessary hiccups. Imagine stepping into a clutter-free space, where every tool is within reach, and your creative juices can flow freely.Clearing And Organizing
Start by clearing out your designated workspace. This might be a corner of your garage or a shaded spot in your backyard. Remove any items that don’t serve your project. You want your focus solely on the task at hand. Organizing your tools and materials is equally important. Use shelves or pegboards to keep everything accessible. Think about how much more enjoyable your project will be if you don’t have to search for a hammer every ten minutes. Wouldn’t it be nice to have a place for everything and everything in its place?Safety Precautions
Safety should never be an afterthought. Before you begin, ensure that your workspace is well-lit and free of hazards. Avoid working in dimly lit areas where you might trip over tools or materials. Equip yourself with safety goggles and gloves. Consider the tools you’ll be using. Are they in good condition? Double-check electrical cords and blades for wear and tear. Remember, your garden potting bench project should be fun, but it should also be safe. What steps will you take to protect yourself during this DIY adventure?Cutting The Wood
Select sturdy wood for building a garden potting bench. Measure and cut the wood pieces to size with precision. Ensure each piece fits well to create a stable and functional bench for gardening tasks.
Cutting the wood is a critical step in building your garden potting bench. It sets the foundation for the entire structure. A precise cut ensures your bench is sturdy and functional.Measuring Accurately
Before you cut, measure twice. Accurate measurements will save you from costly mistakes. Use a reliable tape measure and mark clearly with a pencil. Think about the tools you have at your disposal. A combination square can help you maintain straight lines. Double-check each length and angle to ensure everything fits perfectly.Using Saw Techniques
A saw is more than just a tool—it’s your crafting partner. Choose a saw that matches the type of wood you’re cutting. A circular saw is excellent for long, straight cuts, while a jigsaw can handle curves. Safety should be your priority. Wear safety goggles and gloves to protect yourself. Keep your fingers away from the blade and maintain a steady pace to ensure clean cuts. Do you remember the first time you used a saw? Maybe your heart raced as you made the first cut. Embrace that excitement and channel it into creating something beautiful for your garden.Assembling The Frame
Begin by gathering wooden boards and screws. Secure the boards together to form a sturdy rectangular frame. Ensure corners are tight and stable for optimal support.
Assembling the frame of a garden potting bench is a rewarding task. This step sets the foundation for your gardening workspace. A sturdy frame ensures your bench will last through many planting seasons. Let’s dive into the essentials of building the frame.Building The Base
Start with the base to provide a strong support. Use treated wood for durability. Cut four pieces for the legs, each of equal length. Ensure they are stable when standing. Connect the legs with horizontal beams. Use screws for a solid joint. Check the base for levelness. This prevents wobbling.Securing The Structure
With the base ready, focus on securing the entire structure. Attach side and back panels for added stability. Use nails or screws to fasten them tightly. Ensure the panels are flush with the frame. This creates a neat appearance. Add cross braces for extra support. These braces help the bench withstand weight. Double-check all connections for tightness. A secure structure increases the bench’s lifespan.Adding The Work Surface
Adding the work surface involves securing a sturdy tabletop on your garden potting bench. Choose weather-resistant materials for durability. Ensure the surface is spacious enough for your gardening tasks.
Adding the work surface to your garden potting bench is a crucial step. It provides space for organizing tools and repotting plants. This section guides you on choosing and attaching the right surface.Selecting The Surface Material
Choosing the right material impacts durability and functionality. Wood is a popular choice. It adds a rustic charm and is easy to work with. Cedar and pine resist rot and insects, making them ideal. Metal surfaces are strong and easy to clean. They withstand weather elements well. Stainless steel offers a sleek look. Plastic or composite materials are lightweight. They are low-maintenance and often weather-resistant. Consider your climate and budget when choosing a surface material.Attaching The Surface
After selecting the material, secure it firmly. Ensure the bench frame is stable before attachment. Measure the surface to fit precisely over the frame. Use screws to attach the surface securely. Pre-drill holes to prevent splitting, especially with wood. Check alignment and levelness as you attach. Ensure the surface is flat and stable for ease of use. Add brackets for extra support if needed.Incorporating Shelves And Storage
Incorporating shelves and storage into your garden potting bench enhances organization. Utilize sturdy materials to ensure durability. Arrange tools and pots for easy access while working.
Building a garden potting bench can transform your gardening experience. Incorporating shelves and storage is key to maximizing functionality and organization. Proper storage solutions help keep tools and supplies handy, making gardening tasks more efficient. Thoughtful design and installation of shelves ensure every item has its place, reducing clutter and enhancing productivity.Designing Storage Solutions
Creating effective storage solutions requires careful planning. Consider the types of items you’ll store. Small tools, pots, soil bags, and fertilizers need different spaces. Use vertical space efficiently. Tall shelves can store larger items. Hooks and pegs are great for hanging tools. Labeling helps maintain organization. This ensures everything is easy to find.Installing Shelves
Installing shelves can be straightforward with the right tools. Choose sturdy materials like treated wood. This ensures durability in outdoor conditions. Measure the available space accurately. This prevents errors in shelf placement. Secure shelves firmly to avoid accidents. Use brackets for extra support. Adjustable shelves offer flexibility. Customize them based on changing storage needs.
Credit: www.instagram.com
Finishing Touches
Finishing touches bring charm to your garden potting bench. Add hooks for tools and shelves for organization. Paint or stain the wood to match your garden’s style, creating a cohesive look.
In the final stages of building your garden potting bench, the finishing touches bring everything together. These steps ensure your bench is not only functional but also visually appealing. Pay attention to details to enhance durability and aesthetics. This part of the process transforms your project from basic to beautiful.Sanding And Smoothing
Start by sanding every surface of the bench. Use medium-grit sandpaper for the first pass. This removes rough edges and splinters. Follow with fine-grit sandpaper for a smooth finish. Pay extra attention to corners and edges. Ensure all surfaces are even and pleasant to touch. Sanding provides a clean, polished look.Applying Protective Finish
Choose a suitable protective finish for your bench. Consider options like wood stain, paint, or varnish. Wood stain enhances the natural grain. Paint offers a pop of color. Varnish provides a glossy, protective layer. Apply with a brush or cloth. Ensure even coverage on all surfaces. Let each coat dry thoroughly before adding another. A protective finish shields against weather and wear. It also adds a touch of elegance to your creation.Maintenance Tips
Maintaining your garden potting bench ensures its longevity and functionality. Simple steps can make your bench last through many seasons. Regular care prevents damage and keeps it looking great.
Regular Cleaning
Regular cleaning is crucial for your potting bench’s upkeep. Dirt and moisture can cause damage over time. Use a gentle brush to remove soil and debris. Wipe surfaces with a damp cloth to remove stains. Let the bench dry completely to prevent mold. Consider using mild soap for stubborn spots. Avoid harsh chemicals that might damage the wood or metal.
Weatherproofing Strategies
Weatherproofing is key to protecting your bench from the elements. Seal wooden surfaces with a water-resistant finish. This protects against rain and sun damage. For metal parts, apply a rust-resistant coating. Cover the bench during harsh weather to prevent wear. Store it indoors during winter for extra protection. These steps will help your bench endure year-round.
Frequently Asked Questions
What Is The Best Wood For A Potting Bench?
Cedar is the best wood for a potting bench. It is naturally resistant to rot and insects. Teak and redwood are also excellent choices due to their durability and weather resistance. These woods ensure your bench lasts longer while maintaining a natural, appealing appearance.
What Height Should A Potting Bench Be?
A potting bench should ideally be 36 inches tall. This height ensures comfort during gardening tasks. It minimizes strain on the back and shoulders, enhancing productivity and enjoyment. Adjustable benches offer flexibility to suit individual preferences, promoting ergonomic gardening practices.
How To Build A Diy Garden Bench?
To build a DIY garden bench, gather wood, nails, a saw, and a hammer. Cut wood to size, assemble using nails, and ensure stability. Sand and paint for a finished look. Follow a simple design plan for best results. Enjoy your homemade garden seating!
Is A Potting Bench Worth It?
Yes, a potting bench is worth it. It provides a dedicated space for gardening tasks. It keeps tools organized and reduces mess. Enhances efficiency and comfort during potting and planting activities. Offers extra storage for gardening supplies. Ideal for both casual and serious gardeners.
Conclusion
Building a garden potting bench is a rewarding project. It enhances your gardening space and keeps tools organized. Follow the steps and enjoy the process. Choose sturdy materials for long-lasting use. Customize the bench to fit your needs. Adding shelves and hooks can increase storage.
A well-designed bench makes gardening tasks easier. It adds beauty to your garden area too. Whether you’re a beginner or expert, this project is achievable. Spend time on this creative endeavor. Feel proud every time you use it. A potting bench is more than furniture—it’s a gardening companion.
Enjoy your gardening journey!


