You lean over your plants, fingers hovering around a plump green bud. Is it ready? Harvesting brussels sprouts feels like a guessing game until you know the rules.
Pick too early and you get bitter, loose bites. Wait too long and the sprouts split open or bolt to seed.
A light frost changes everything. At 28 to 32 degrees Fahrenheit, starches convert to sugar, making sprouts noticeably sweeter. The University of Minnesota Extension confirms this frost-triggered sugar shift is what sets fall-harvested sprouts apart from anything you can buy in a store.
That's the secret most guides skip. Let's walk through exactly when and how to harvest yours.
Quick Answer
Harvest when sprouts are 1 to 2 inches wide and firm. Pick from the bottom of the stalk upward. A light frost improves sweetness.
Harvest everything before a hard freeze. Bottom-up picking extends your harvest window for weeks.
Image source: Web (Bing) / fkk-freudenberg.de (Web image (fair-use with source credit))
When to Pick Brussels Sprouts: The Decision Points
The question "Are these ready yet?" has three conditions to check.
Check size. If a sprout is smaller than a marble, leave it. If it measures between 1 and 2 inches across, it's in the harvest window. Sprouts larger than 2 inches often split before you can pick them.
Check firmness. A ready sprout feels dense when you squeeze it gently. If it's soft or spongy, it needs more time on the stalk. If the outer leaves are loose and pulling away from the center, that sprout is past its prime.
Check frost history. This is the biggest decision point. If your area has had a light frost, the sprouts will taste noticeably sweeter. That's your ideal harvest moment.
If no frost has hit yet and the forecast shows mild weather, you can wait. If a hard freeze below 28°F is coming in the next 48 hours, harvest everything now. Frozen sprouts turn to mush.
Check leaf color. If the lower leaves are yellowing, remove them. That lets sunlight reach the sprouts and speeds ripening. If the whole plant is yellow, it's stressed from nutrient deficiency.
Harvest what's there and don't expect more growth.
Start checking when the lowest sprouts reach marble size. From there, harvest from the bottom up every few days. Your frost date calendar tells you when to wrap up.
How Brussels Sprouts Ripen (and Why Frost Changes Everything)
Brussels sprouts don't ripen all at once. They mature from the bottom of the stalk upward. The lowest sprouts form first because the plant sends energy downward to support those buds while the top keeps growing.
That's why you pick them in stages over weeks.
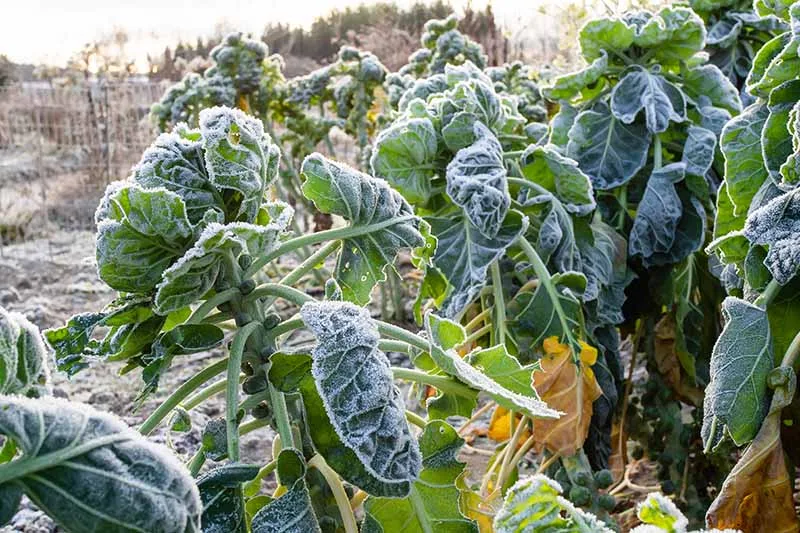
Image source: Web (Bing) / gardenerspath.com (Web image (fair-use with source credit))
The frost effect is real. A light frost triggers a chemical process in the plant. Starches stored in the sprouts break down into simpler sugars. That sugar makes the sprouts taste sweet and nutty instead of sulfurous and bitter.
It's the same process that sweetens parsnips and kale after cold weather.
What counts as a light frost. According to USDA hardiness guidelines, a light frost occurs between 29 and 32°F. A moderate frost hits 25 to 28°F. A hard freeze dips below 25°F.
Sprouts survive light and moderate frosts well. Hard freezes damage the cells permanently.
What happens without frost. If you're growing in a warmer climate (zones 8 and up), you may never get a frost at all. In that case, harvest when sprouts reach full size and firmness. The flavor won't be as sweet, but they're still perfectly edible.
Chill them in the fridge for a day before cooking. That mimics a light frost and improves taste.
The stalk keeps feeding the sprouts. Even after you remove lower leaves, the stalk continues pumping nutrients to the remaining buds. So don't strip all the leaves at once. Remove only the yellowed ones below your harvest line.
Leave the upper leaves intact until you're done picking.
Step-by-Step Harvesting Workflow
This is a straightforward process. Follow these steps in order for the best results.
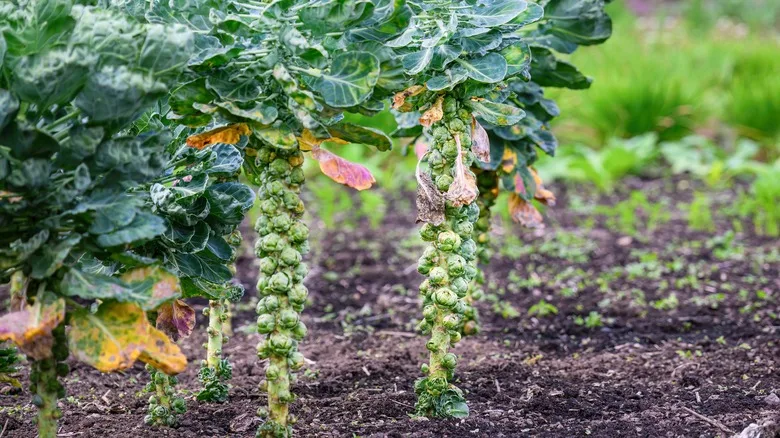
Image source: Web (Bing) / housedigest.com (Web image (fair-use with source credit))
Step 1: Gather your tools. You need a clean pair of garden shears or a sharp knife. A basket or bucket works for collecting. Gloves help if the stalks are prickly, but they're optional.
Step 2: Inspect the bottom of the stalk. The lowest sprouts are always the most mature. Look for sprouts that are 1 to 2 inches wide, deep green, and tightly closed. If they pass those checks, they're ready.
Step 3: Remove lower leaves first. Snap or cut off any yellowing leaves below the sprouts you're harvesting. This clears your workspace and improves air circulation. It also exposes the sprouts so you can see what you're doing.
Step 4: Pick the sprouts. Grasp each sprout and twist gently. If it comes off clean, it's ready. If it resists, use your shears to snip the short stem connecting it to the stalk.
Cut close to the stalk but avoid cutting into the stalk itself.
Step 5: Work upward. Move up the stalk about 6 to 8 inches per session. Leave the top sprouts and upper leaves in place. They'll continue ripening for your next harvest in 3 to 7 days.
Step 6: Clean as you go. Drop each sprout into your basket. Don't pile them on the ground where they can pick up soil and pests. Once inside, rinse them gently and trim the stem end.
Let them dry before storing.
Step 7: Store properly. Fresh sprouts keep in the fridge for 3 to 5 weeks in a perforated plastic bag. For longer storage, trim the whole stalk at the base and stand it upright in a bucket with a few inches of water in a cool, dark space. That method keeps sprouts fresh for up to 2 months.
Common Harvesting Mistakes That Ruin Your Crop
Even experienced gardeners slip up here. Avoid these five mistakes.
Waiting for all sprouts to ripen at once. They won't. If you wait for the top sprouts to reach full size, the bottom ones will split or rot. Start harvesting as soon as the lowest sprouts are ready.
The plant keeps producing for weeks if you pick steadily.
Harvesting before a hard freeze. A light frost is good. A hard freeze is not. If temperatures are forecast to drop below 28°F and you leave everything in the ground, the sprouts will freeze solid.
When they thaw, they turn into watery mush. Check your local weather alerts and harvest everything if a hard freeze is coming.
Removing all the leaves at once. Stripping the whole stalk bare sounds logical. But those upper leaves are the plant's solar panels. They're still photosynthesizing and sending energy to the ripening sprouts.
Remove only the yellowed lower leaves. Keep the green ones until the final harvest.
Picking sprouts that are too small. Sprouts smaller than a marble haven't developed their flavor profile yet. They'll taste grassy and bitter. Give them another week or two.
Size matters more than time on the calendar.
Storing sprouts wet. Moisture in storage leads to mold and rot. After rinsing, dry the sprouts thoroughly on a towel. Then transfer them to a perforated bag.
Don't seal them airtight. They need some air circulation to stay fresh.
Whole Stalk vs. Individual Sprouts: Which to Choose
You have two harvesting methods. Each fits a different situation.
| Method | Best For | Pros | Cons |
|---|---|---|---|
| Individual picking | Continuous harvest over weeks | You eat fresh sprouts each week. The plant keeps producing. Lower risk of rot. | Takes more time per session. You need to check plants regularly. |
| Whole stalk harvest | Late-season push or hard freeze | One cut and you're done. Stalks store for weeks in a cool space. Makes a striking display at markets. | You lose the extended harvest window. Upper sprouts may still be small. Requires more storage space. |
Choose individual picking if you want fresh sprouts over several weeks. This is the standard method for home gardeners. You pick the bottom 6 to 8 sprouts every 3 to 7 days.
The plant keeps growing and producing above your harvest line.
Choose whole stalk harvest if a hard freeze is imminent or you want to clear the garden bed. Cut the stalk at ground level with a sharp knife. Strip off all leaves.
Hang the stalk in a cool, dark space or stand it upright in a bucket with a few inches of water. Sprouts on the stalk stay fresh much longer than picked individual sprouts.
One more thing about the stalk method. Upper sprouts will continue to size up slightly after harvest if the stalk is kept in water. They won't grow as much as on the living plant, but you get a small boost over the first week.
That makes it a good option if you need to harvest early but want the upper sprouts to fatten a bit more before you eat them.
Real-World Harvesting Scenarios: What Would You Do?
Let's walk through three common situations gardeners face. Each one calls for a different decision.
Scenario One: Light frost is forecast for tonight, but your sprouts are still small.
You check the forecast and see 30°F expected overnight. Your sprouts are mostly marble-sized, with just a few at the bottom nearing 1 inch. Don't panic.
A light frost for one night won't damage small sprouts. It will actually improve their flavor. Harvest the few ready sprouts in the morning.
Let the rest keep growing. You've got weeks left in the season.
Scenario Two: A hard freeze is coming in 48 hours, and your plants are full of sprouts of all sizes.
This is an all-hands-on-deck situation. Harvest everything on the stalk. Cut the whole stalk at ground level.
Strip all leaves. Hang the stalk in a cool garage or basement. The upper sprouts will continue to size up slightly over the next week if kept in cool, humid conditions.
You lose the extended harvest window, but you save the crop. Better to eat smaller sprouts than frozen mush.
Scenario Three: You're in a warm climate with no frost expected at all.
You're growing in zone 9 or 10. Your sprouts reach full size but taste bitter. Harvest them at 1 to 2 inches firmness.
Then chill them in the fridge for 24 to 48 hours before cooking. That cold treatment mimics a frost and converts some starches to sugar. It won't match frost-grown sprouts, but it improves flavor noticeably.
Scenario Four: You've been picking for weeks and the upper sprouts stopped growing.
This happens when the plant runs out of steam. Check the upper leaves. If they're yellowing, the plant is done producing.
Harvest everything remaining, regardless of size. Small sprouts are edible, just less sweet. Cut the stalk and compost the plant.
Your season is over. Plan to plant earlier next year or choose a faster-maturing variety.
Frequently Asked Questions
How do you know when brussels sprouts are ready to harvest?
Check three things: size, firmness, and frost history. Sprouts should be 1 to 2 inches wide and feel dense when squeezed. A light frost improves sweetness.
If the outer leaves are loose or the sprout feels soft, it's past its prime.
Can you harvest brussels sprouts after a hard freeze?
No. A hard freeze below 25°F damages the cells. Sprouts turn to watery mush when they thaw.
Harvest everything before a hard freeze hits. If one sneaks up on you, check the sprouts immediately. Mushy ones are ruined.
Firm ones might be salvageable if picked and used right away.
Should you wash brussels sprouts before storing?
No. Wash them right before cooking. Moisture in storage causes mold and rot.
After harvesting, brush off loose soil. Store them dry in a perforated plastic bag in the fridge. Rinse and trim the stem end just before you cook them.
How long do brussels sprouts last on the stalk in the garden?
Healthy plants keep producing for 4 to 6 weeks in mild fall weather. Harvest from the bottom up every 3 to 7 days. The plant continues to grow and form new sprouts above your harvest line.
Cold weather slows production. A series of hard frosts ends the season.
Can you leave brussels sprouts in the ground over winter?
In mild climates with consistent snow cover, yes. Snow insulates the soil and sprouts. In cold climates with freeze-thaw cycles, no.
The sprouts rot or freeze. If you want winter sprouts, use a cold frame or row cover. Harvest before the ground freezes solid.
What happens if you harvest brussels sprouts too early?
Early sprouts are small, loose, and bitter. They haven't developed their full sugar content. Let them reach 1 to 2 inches and experience at least one light frost for best flavor.
If you need to harvest early due to weather, chill them in the fridge before cooking to improve taste.



