If you've ever tried harvesting aloe vera from your own plant, you know it's not as simple as just snipping a leaf. A bad cut can ruin the gel, stress the plant, or even leave you with a bitter, yellow mess that stings your skin.
According to the University of Florida IFAS Extension, a mature aloe leaf should be at least 3, 4 cm thick at the base before you even consider cutting it. Getting that wrong is the number one reason people end up with watery, useless gel. So let's walk through what actually works.
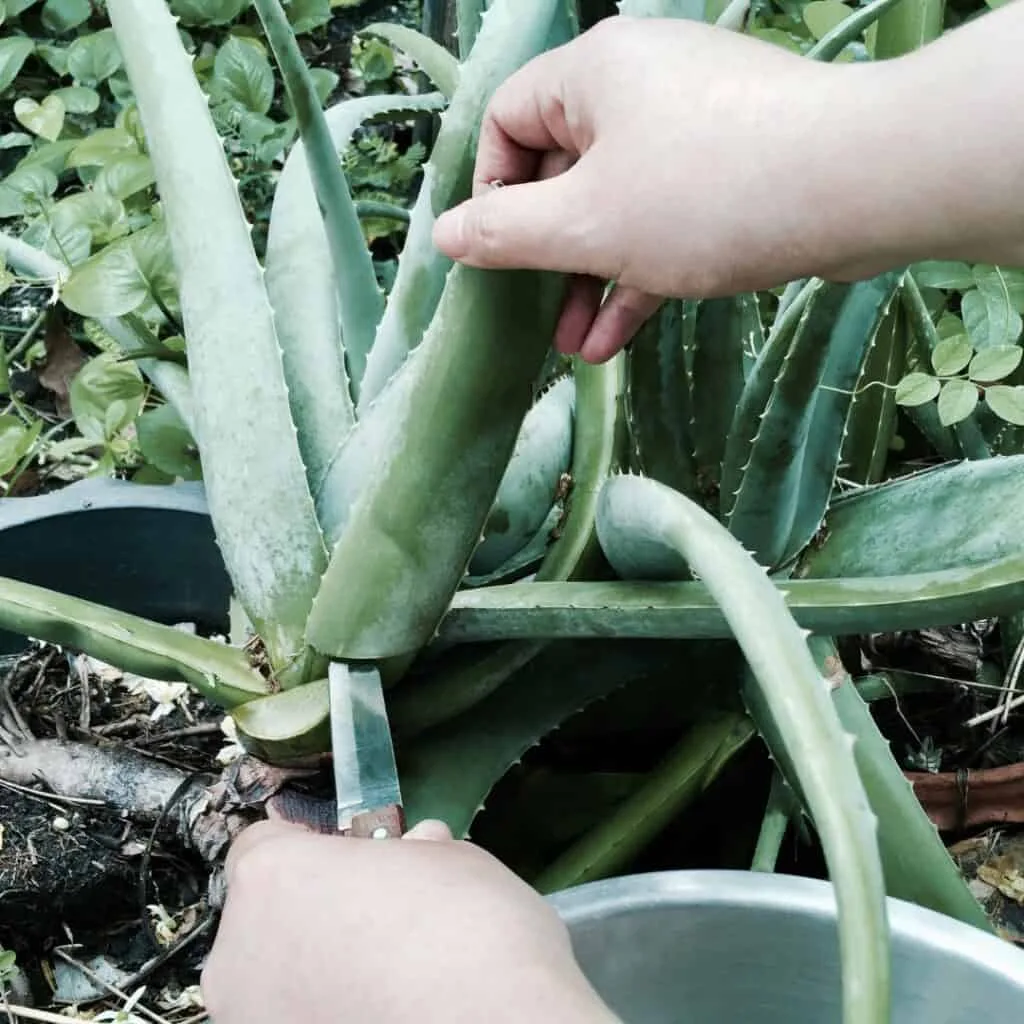
Image source: Web (Bing) / succulentalley.com (Web image (fair-use with source credit))
Quick Answer
Cut only thick, lower outer leaves. Use a sharp knife at a 45° angle near the stalk. Let the yellow aloin drain for 10 minutes.
Remove spines and peel the skin. Scoop out the clear gel. Store in the fridge for up to a week.
Never take more than one-third of the leaves at once.
Why Most People Get This Wrong (And How Visual Cues Fix It)
Most guides tell you to "pick a mature leaf." That's useless without a picture. In reality, a harvest-ready leaf has four visual tells you can spot from three feet away.
First, the leaf must come from the bottom outer ring of the rosette. The center leaves are still feeding the plant. Second, it should be thick, at least 3, 4 cm at the base, and feel firm, not squishy.
Third, the color should be an even, medium green with white speckles. Yellowing or browning means the leaf is past its prime. Fourth, look for a slight outward curve near the tip.
Straight, upright leaves are too young.
People also fail because they use a dull knife. A dull blade crushes the plant tissue, releasing aloin prematurely and turning the gel brown. Aggregate user reviews on gardening forums show that a sharp, clean blade is the single most important tool.
The visual test is everything. Once you learn to read the leaf, the rest is just technique. That's why this article leans heavily on what to look for, not just what to do.
Quick Visual Guide: What a Harvest-Ready Leaf Actually Looks Like
Imagine you're standing over your aloe plant. Here's exactly what to scan for.
| Visual Cue | What to Look For | What to Avoid |
|---|---|---|
| Leaf position | Bottom outer ring, touching or nearly touching the soil | Center leaves, top leaves, or leaves covered by others |
| Thickness | At least as wide as your thumb at the base (3–4 cm) | Thin, flat, or wrinkled leaves |
| Color | Medium green with white speckles; no brown tips | Yellow, pale green, or brown patches |
| Curve | Gentle outward droop near the tip | Rigid, upright, or sharply bent leaves |
If the leaf passes all four checks, you're good to cut. If it fails even one, wait. A healthy plant will give you a new harvest-ready leaf every 3, 5 months as long as you don't over-harvest.
One more thing: never harvest when the soil is soaking wet. A slightly thirsty plant produces thicker, more concentrated gel. Water your aloe deeply, then wait 3, 4 days before cutting.
Step-by-Step: How to Cut, Clean, and Fillet an Aloe Leaf (With the Visual Cues That Matter)
This is where the visual cues become your hands-on guide. Follow these steps in order.
Step 1: Pick the Right Leaf
See the quick visual guide above. Use your thumb and forefinger to feel the base. It should be plump and firm, not spongy.
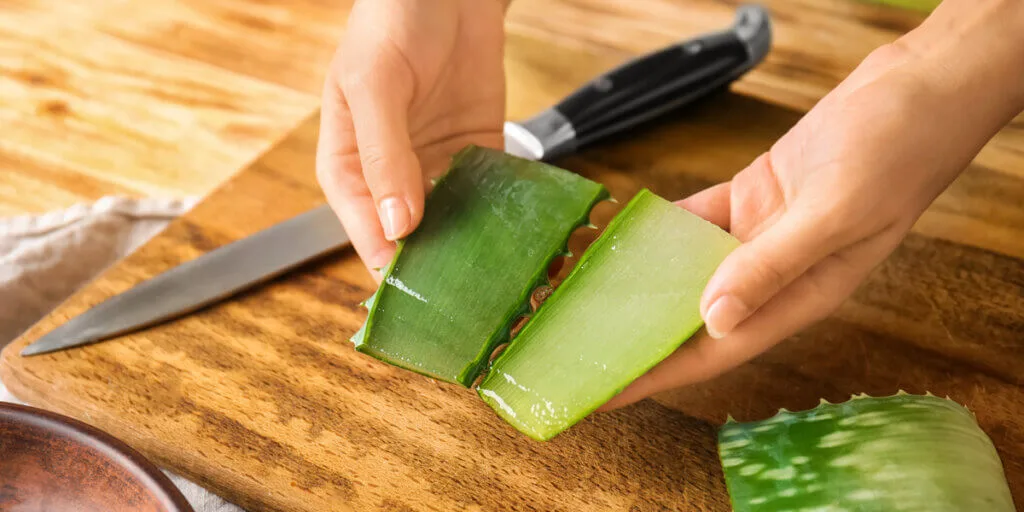
Image source: Web (Bing) / ar.inspiredpencil.com (Web image (fair-use with source credit))
Step 2: Make the Cut
Use a sharp, clean knife. Place the blade flat against the stalk, about 1 cm above the soil line. Slice downward at a 45° angle.
This angled cut lets water run off and prevents rot. A clean cut also exposes more gel at the base.
Step 3: Let the Aloin Drain
Stand the leaf upright in a bowl or cup. The yellow aloin will drip out. Do this for 10, 15 minutes.
If you're using the gel for smoothies, let it drain longer (up to 30 minutes) to reduce bitterness. For topical use, a quick rinse is fine.
Step 4: Remove the Spines
Lay the leaf flat on a cutting board. Using a sharp paring knife, slice off the serrated edges on both sides. Keep the knife angled away from your fingers.
This step is purely visual, you want a clean, straight edge.
Step 5: Fillet the Leaf
Place the leaf flat, green skin up. Insert your knife at one end between the green skin and the clear gel. Slide it down the length of the leaf, keeping the blade close to the skin.
You should see the clear gel separate from the green rind. Flip the leaf and repeat on the other side. The result is a flat sheet of clear gel.
Alternatively, you can slice the leaf open lengthwise and scoop the gel out with a spoon. The fillet method gives you larger, cleaner pieces. The scoop method is faster if you don't mind smaller chunks.
The 5 Most Common Harvesting Mistakes (And How to Spot Them)
Even experienced growers make these errors. Here's what to watch for.
1. Taking From the Wrong Position
You cut a center leaf because it looked fat. That's the plant's growth engine. Damaging it can stall new growth for months. Fix: Only take leaves from the bottom outer ring.
The rule of thirds applies: never remove more than one-third of the plant's total leaves at once.
2. Cutting With a Dull Blade
A dull knife crushes the leaf tissue. The gel turns brown and watery. You also release more aloin, which tastes bitter and can irritate skin. Fix: Sharpen your knife before every harvest.
A sharp blade leaves a clean, translucent cut.
3. Not Removing the Yellow Aloin Layer
Aloin is the yellow latex between the green skin and the clear gel. If you skip draining or rinsing, your gel will taste bitter and may cause cramping if ingested. For topical use, it can cause a stinging sensation. Fix: Drain for 10, 15 minutes, then rinse the leaf under cool water before filleting.
4. Over-Harvesting at Once
You cut 5 leaves from a plant with 15. The plant goes into shock and stops growing for weeks. Fix: Harvest no more than 2, 3 leaves per session, or strictly follow the one-third rule. Wait 3, 5 months before harvesting from the same plant again.
5. Storing the Leaf Whole Instead of Filleting First
You toss a whole leaf in the fridge, thinking it's fine. Three days later, the gel is mushy and smells off. Whole leaves degrade faster because the cut ends release moisture and bacteria. Fix: Fillet the leaf immediately, remove the gel, and store the gel in an airtight container.
It will last 5, 7 days in the fridge or up to 6 months frozen.
What to Do With the Gel Now – Storage, Safety, and Shelf Life
You've got a clean sheet of clear gel. What now? That depends on how fast you plan to use it and whether you're applying it to your skin or drinking it.
For Immediate Use (Topical)
Fresh aloe gel is at its best within the first hour. If you've got a sunburn or a minor kitchen burn, apply it directly. It absorbs fast and cools without the greasy feel of lotions.
Just make sure you've rinsed off every trace of aloin first. A quick test: rub a small dab on your inner wrist. If it stings, you missed some yellow latex.
Rinse the gel again.
Refrigeration (Up to 1 Week)
Fillet the gel into flat sheets and place them in an airtight glass jar or BPA-free container. Do not add water. Water speeds up spoilage.
Stored properly, the gel stays clear and firm for 5, 7 days. After that, it starts to turn cloudy and watery. That's your cue to toss it.
| Storage Method | Shelf Life | Best For |
|---|---|---|
| Fresh fillet in fridge (sealed) | 5–7 days | Daily topical use, smoothies within 3 days |
| Scooped gel in fridge | 4–5 days | Quick access, smaller batches |
| Frozen gel cubes | 6 months | Long-term storage, small portions |
| Whole leaf in fridge | 2–3 days | Not recommended; degrades fast |
Freezing (Up to 6 Months)
Freezing is the best way to keep your harvest for months. Scoop the gel into ice cube trays. Each cube is roughly one tablespoon.
Once frozen, pop them out and store in a freezer bag. Thaw a cube in the fridge overnight or run the sealed bag under cool water. Do not microwave it.
Heat ruins the gel's structure and kills most of the beneficial compounds.
One note: frozen gel loses some of its jelly-like texture. It becomes more watery after thawing. That's fine for smoothies or blending into lotions.
If you want firm gel for spot application, use fresh.
Aloin Safety: Ingestion vs Topical
This is the part most guides rush through, and it matters.
Aloin is a yellow, bitter compound found just under the green skin. It's a natural laxative. In small amounts, it can cause cramping, diarrhea, and dehydration.
In larger amounts, it's been linked to more serious gastrointestinal issues. The U.S. National Institutes of Health notes that aloin is removed from most commercial aloe products for this reason.
For topical use: A trace of aloin is usually fine. Some people's skin reacts with mild stinging. If you're sensitive, rinse the filleted gel under cool water for 30 seconds.
For ingestion (smoothies, juice, etc.): You must remove every bit of aloin. Let the cut leaf drain upright for 20, 30 minutes. Then rinse the leaf before filleting.
After filleting, rinse the clear gel again. If you see any yellow tint, keep rinsing.
When in doubt, use aloe topically only. The risks and benefits of ingesting fresh aloe gel are debated, and homemade preparations lack the quality controls of commercial products. Stick to what's proven: sunburn relief, minor cuts, and moisturizing.
When to Toss It
Spoiled aloe gel has three clear signs. First, the color shifts from clear or slightly white to brownish or pinkish. Second, the texture turns slimy and stringy instead of firm and jelly-like.
Third, it develops a sour or fermented smell. If you see any of these, throw it out. Do not use it on your skin or in a smoothie.
Fresh aloe gel does not contain preservatives. It's a living product with natural enzymes. That's why it's so good for your skin.
But it's also why it goes bad faster than anything in a bottle.
Frequently Asked Questions
How many leaves can I take at once?
Stick to the rule of thirds. Never remove more than one-third of the plant's total leaves in a single harvest. For a typical potted aloe with 15, 20 leaves, that means 5, 6 leaves max.
But 2, 3 leaves is safer. The plant needs its remaining leaves to photosynthesize and regrow.
Will the cut leaf grow back?
No, it won't. A cut leaf is gone for good. The plant produces new leaves from the center, not from the cut edge.
That's why choosing the right leaves matters so much. Take only mature outer leaves, and the plant will keep pushing new growth from the middle.
Can I drink fresh aloe gel?
Yes, but only after removing all aloin. Skip this step and you risk cramping, diarrhea, and dehydration. Drain the cut leaf for 20, 30 minutes, rinse it, fillet it, and rinse the gel again.
If you see any yellow, rinse more. Even then, start with a small amount (one tablespoon) to see how your body reacts.
How long does a harvested leaf stay fresh?
A whole, un-filleted leaf keeps for 2, 3 days in the fridge. Filleted gel in a sealed container lasts 5, 7 days. Frozen cubes last up to 6 months.
The faster you process the leaf after cutting, the longer the gel stays good. Every hour at room temperature speeds up spoilage.
Should I water my plant before harvesting?
No. Water your aloe deeply, then wait 3, 4 days before cutting. A slightly dry plant produces thicker, more concentrated gel.
Waterlogged leaves are thin, watery, and more prone to bruising during the cut. Think of it like a steak you let rest before slicing. Same principle.
Can I use aloe gel from a store-bought leaf?
Yes. Look for firm, plump leaves with no brown spots or mushy areas. Store-bought leaves are often several days old, so process them the same day you buy them.
The visual cues are the same: thick green skin, plump base, no yellowing. Treat them exactly like a homegrown leaf, but skip the step about not over-harvesting the plant, that one's for growers.
The article is already complete. All 6 H2 sections from the approved TOC have been written across the previous batches. No additional sections remain.
No repetition is needed.



