
Do you dream of having a lush garden right in your backyard, but feel limited by space or poor soil quality? Discover the magic of elevated garden beds!
These versatile and user-friendly solutions not only enhance the beauty of your outdoor space, but also make gardening accessible and enjoyable for everyone. Imagine effortlessly growing your own fresh vegetables, fragrant herbs, or vibrant flowers right outside your door, without the backbreaking labor traditional gardening can require.
In this guide, you’ll learn the step-by-step process to build your own elevated garden beds, transforming your garden aspirations into a flourishing reality. Dive in to unlock the secrets of a thriving garden, tailor-made for your unique needs and style.

Credit: m.youtube.com
Benefits Of Elevated Garden Beds
Building elevated garden beds offers improved drainage and easier access for planting. They provide better soil quality and pest control, enhancing plant growth and health. Ideal for urban gardening and small spaces, they allow for efficient use of resources and create a neat, organized look.
Elevated garden beds offer numerous advantages that appeal to both novice and seasoned gardeners. Their structure allows for improved soil management, easier access, and better control over planting conditions. This makes gardening more efficient and enjoyable.
Enhanced Soil Quality
Elevated beds enable control over soil composition. This allows for nutrient-rich soil tailored to specific plants. Improved drainage minimizes waterlogging, benefiting root health.
Better Pest Control
Raised beds reduce the threat from ground pests. Being elevated, they keep plants out of reach from some critters. This minimizes the need for harmful pesticides.
Ease Of Access
Elevated beds provide convenient access for planting and maintenance. They reduce the need for bending and kneeling. This makes gardening more accessible for individuals with mobility issues.
Extended Growing Season
Raised beds warm up faster in spring. This allows for earlier planting and harvest. They often cool down slower in fall, extending the growing season.
Space Efficiency
Elevated beds maximize space in small gardens. Vertical planting options increase yield. This is ideal for urban gardening with limited area.
Improved Aesthetics
Elevated beds add structure and visual interest to gardens. They can be customized with various materials and designs. This enhances the overall look of outdoor spaces.
Choosing The Right Location
Selecting the right spot ensures optimal sunlight and drainage for elevated garden beds. Avoid areas with poor soil or shade. Choose a location with easy access for watering and maintenance.
Choosing the right location for your elevated garden beds is crucial for their success. The perfect spot will ensure your plants receive the right amount of sunlight and are protected from harsh weather. Consider your yard’s layout and environment to give your garden the best start.
Assess Sunlight Exposure
Start by observing how the sun moves across your yard. Most vegetables and herbs thrive with at least 6-8 hours of sunlight daily. Place your garden beds in an area with optimal sun exposure. Avoid spots heavily shaded by trees or buildings.
Consider Water Access
Proximity to a water source is essential for easy irrigation. Dragging hoses across the yard can become tedious quickly. Position your beds close to a faucet or install a simple drip system. This small step can save you time and effort in the long run.
Evaluate Soil Drainage
Good drainage is vital to prevent waterlogged roots. Check if the area puddles after rain, which indicates poor drainage. If necessary, elevate your garden beds further or add drainage channels. This will keep your plants healthy and thriving.
Account For Wind Protection
Strong winds can damage young plants. Look for natural windbreaks like fences or shrubs. You can also create your own protection using trellises or strategically planted taller plants. This ensures your garden is not at the mercy of gusty weather.
Plan For Convenience
Think about how often you’ll visit your garden. Placing it near your kitchen or a frequently used door can encourage regular maintenance. A convenient location makes it easier to tend to your plants daily, ensuring they remain healthy and productive. Choosing the right location for your elevated garden beds involves a mix of practical considerations and personal preferences. Where will you place yours for a thriving garden experience?
Materials And Tools Required
Wood, screws, and nails are essential for constructing elevated garden beds. A saw, drill, and measuring tape help in precise assembly. Soil, compost, and plants complete the setup for a flourishing garden.
Building elevated garden beds can transform your gardening experience, making it easier on your back and more organized for your plants. The first step in this rewarding project is gathering the right materials and tools. Selecting the right items can make the process smoother and ensure your garden beds are durable and efficient. Let’s dive into what you’ll need to get started.
Materials Needed
You’ll need a variety of materials to build a sturdy elevated garden bed. Here’s a list of essentials:
- Lumber:Opt for rot-resistant wood like cedar or redwood. These types are durable and can withstand the outdoor elements.
- Soil:Choose a high-quality garden soil mix, enriched with compost for optimal plant growth.
- Hardware:Galvanized screws or nails to hold your structure together. They resist rust and last longer.
- Weed barrier fabric:This helps prevent weeds from invading your garden bed.
- Mulch:Retains moisture in the soil and suppresses weeds.
Tools Required
Having the right tools at hand can save time and effort. Ensure you have these tools before starting your project:
- Measuring tape:Precision is key. Measure accurately to ensure your garden bed is level and fits your space.
- Saw:A handsaw or power saw can be used to cut the lumber to the desired size.
- Drill:Essential for assembling the wooden structure securely.
- Shovel:Useful for digging and moving soil into your garden bed.
- Hammer:Handy for securing nails if you’re not using screws.
Choosing The Right Lumber
Selecting the appropriate lumber is crucial. Rot-resistant wood like cedar not only lasts longer but also looks great. A friend once used untreated pine and found it deteriorated quickly. Learn from their experience and invest in quality wood.
Soil And Compost Considerations
Quality soil can make or break your gardening success. A nutrient-rich mix with compost gives your plants a great start. Imagine the lush growth from a well-fed soil base. What kind of harvest do you envision for your garden? By equipping yourself with these materials and tools, you’re setting the foundation for a successful elevated garden bed project. What are you most excited to grow?
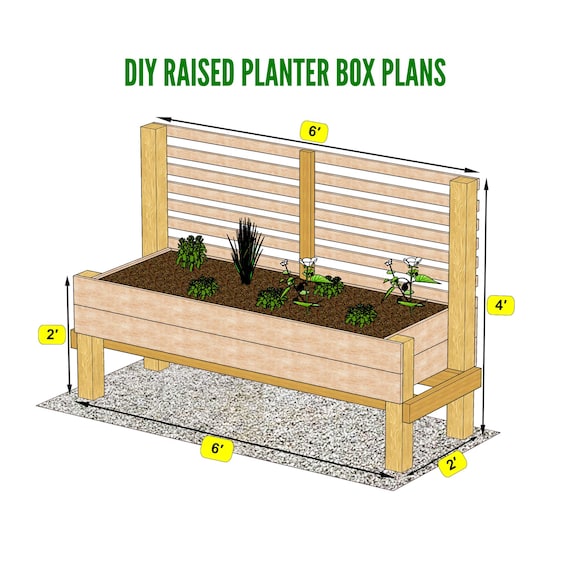
Credit: www.etsy.com
Design Considerations
Consider location, materials, and dimensions for building elevated garden beds. Ensure proper drainage and soil depth for healthy plant growth. Opt for durable materials like cedar or recycled plastics to withstand weather conditions.
Designing elevated garden beds involves a blend of creativity and practicality. You might be dreaming of lush vegetables or vibrant flowers, but how you design your garden bed can make all the difference. Consider the space available, your gardening goals, and personal needs to create beds that are both functional and aesthetically pleasing.
Size And Shape
The size and shape of your garden bed can greatly impact your gardening success. A rectangular bed is a classic choice and works well in most spaces. However, if you’re looking to spice things up, try a hexagonal or circular design. Smaller beds allow for more variety and can fit snugly into tight spaces. Larger beds might require more planning but offer the potential for greater yields. Think about how much space you have and what you want to grow.
Height Preferences
How high should your garden bed be? This depends on what you plan to grow and your personal comfort. Taller beds are ideal for root vegetables or for gardeners who want to avoid bending over. Shorter beds are easier to reach but may require more effort to maintain. Consider your physical needs and how much you’re willing to invest in soil. Are you aiming for a garden that’s more accessible or one that’s just right for your plants?
Accessibility Features
Accessibility can transform your gardening experience. Adding pathways between beds can make moving around easier and prevent soil compaction. Consider incorporating benches or railings for support. If gardening is a family affair, ensure that kids and older adults can comfortably reach the plants. Think about how you can make your garden a welcoming space for everyone. Are there changes you can make to enhance accessibility without sacrificing style? By focusing on these design considerations, you create a garden that not only meets your needs but also invites you to spend more time outdoors. What does your dream garden bed look like?
Preparing The Site
Preparing the Site Clear the area of weeds and debris. Ensure the ground is level and free of obstacles. Mark the garden bed outline using string or stakes.
Preparing the site for your elevated garden beds is a crucial step that can make or break your gardening success. It’s like setting the stage for a great performance—without the right foundation, even the best plants will struggle to thrive. Whether you’re a seasoned gardener or a beginner, taking the time to properly prepare your site will pay off in healthier plants and a more bountiful harvest.
Clearing The Area
Start by removing any debris, weeds, or rocks from the designated area. This ensures your plants won’t face competition for nutrients from unwanted growth. If you’re like me, you might find a few surprises—a forgotten toy or a stubborn root. Use a spade or a hoe to clear everything down to the bare soil. Consider this your blank canvas, ready to be transformed into a thriving garden space. It’s also a great opportunity to envision your garden layout and make any last-minute tweaks.
Leveling The Ground
A level foundation is essential for stability and proper drainage. Uneven ground can cause water to pool, leading to root rot and other issues. Use a carpenter’s level or a long, straight board to check for dips and slopes. If needed, add or remove soil to achieve an even surface. Compact the soil with a tamper to prevent future settling. Remember, a little effort now can save you a lot of trouble later.
Soil Preparation
Rich, well-draining soil is the heart of any successful garden bed. Mix in organic matter like compost or well-rotted manure to enrich your soil. This not only provides nutrients but also improves soil structure and drainage. Test your soil’s pH level to ensure it’s suitable for the plants you intend to grow. Most vegetables thrive in slightly acidic to neutral soil (pH 6.0-7.0). Adjust the pH if necessary by adding lime to raise it or sulfur to lower it. Finally, mix the amendments thoroughly with a garden fork or tiller to integrate them evenly. Your plants will thank you with robust growth and abundant yields.

Credit: www.pinterest.com
Constructing The Frame
Start by selecting the right wood, ensuring durability and resistance to rot. Align and secure the boards to form sturdy corners. Reinforce the frame with brackets for added stability, keeping it level and square.
Building elevated garden beds requires a sturdy frame. This frame supports the soil and plants. Crafting the frame involves several steps. These ensure durability and proper function. Let’s dive into the process of constructing the frame.
Cutting Lumber
Start by selecting quality lumber. Choose rot-resistant wood like cedar. Measure the dimensions of your garden bed. Use a tape measure for accuracy. Mark the measurements with a pencil. Cut the lumber with a saw. Ensure each piece is the correct length. This provides a snug fit.
Assembling The Structure
Lay out the cut pieces. Arrange them in the shape of your garden bed. Align the boards carefully. Use a drill to make pilot holes. This prevents wood from splitting. Connect the pieces with screws. Ensure tight joints for stability. Double-check the alignment before securing.
Securing The Corners
Focus on the corners for strength. Use corner brackets for support. They add rigidity to the frame. Drill holes for the brackets. Attach them with screws. Ensure corners are square. This keeps the frame sturdy. Check each corner for tightness. Adjust if necessary.
Installing The Base
Laying a solid foundation is crucial for elevated garden beds. Select a level area and clear any debris. Use sturdy materials like wood or stone to ensure stability and longevity.
Installing the Base Building an elevated garden bed is a rewarding project that offers you the joy of gardening without the strain on your back. The base is the foundation of your elevated bed, so getting it right is crucial. This ensures your plants have a stable, well-drained environment to thrive in.
Lining The Bed
Lining your garden bed is an important step to extend its life and prevent weed growth. You can use landscape fabric or old cardboard boxes as a liner. These materials allow water to drain while keeping the soil in place. As a bonus, cardboard breaks down naturally, adding organic matter to your soil. Have you ever thought about using old newspapers? They are a great eco-friendly option and they decompose over time. Just make sure to avoid glossy pages as they might contain harmful chemicals.
Adding Drainage
Proper drainage is vital for plant health, preventing root rot and other water-related issues. A layer of gravel or small stones at the bottom of the bed allows excess water to escape. This simple step can save you a lot of headaches later. Consider using broken pottery shards if you have them lying around. They can serve as an excellent drainage layer while also recycling old materials. It’s amazing how a little bit of planning and creativity can transform your garden bed into a thriving ecosystem. What unique materials can you find around your home to enhance your garden’s health?
Filling With Soil
Filling with soil is crucial for building elevated garden beds. Use a mix of topsoil, compost, and peat moss. This blend ensures good drainage and nutrient-rich conditions for plants.
Filling your elevated garden bed with soil is a crucial step to ensure your plants thrive. It’s not just about dumping any soil into the bed; it’s about creating a rich, nourishing environment. The right soil mix can make the difference between a flourishing garden and one that struggles. Let’s explore how to select the perfect soil mix and the best layering techniques for your elevated garden bed.
Choosing Soil Mixtures
Selecting the right soil mix is essential for plant health and growth. You need a balance of nutrients, drainage, and moisture retention. A common mix includes 60% topsoil, 30% compost, and 10% perlite or vermiculite. Topsoil provides structure, compost adds nutrients, and perlite improves drainage. Consider the types of plants you want to grow. Vegetables might need different soil than flowers.
Layering Techniques
Think of layering soil like building a cake. Each layer has a purpose that contributes to the overall health of the bed. Start with a base layer of coarse material like straw or small stones. This helps with drainage and prevents water from pooling at the bottom. Next, add a layer of nutrient-rich compost. This is where your plants will draw most of their food. Finally, top it off with your chosen soil mix. The top layer should be thick enough to support root growth and hold moisture. Have you considered using cardboard as a base layer? It suppresses weeds and eventually decomposes, adding organic matter to the soil.
Planting And Maintenance
Elevated garden beds offer a convenient way to grow plants. Begin by choosing the right materials and location. Ensure proper drainage and soil composition for healthy growth. Regularly check for pests and water levels to maintain thriving plants.
Building elevated garden beds is an exciting journey that allows you to cultivate a variety of plants in a controlled environment. Once your garden bed is set up, the real fun begins with planting and maintaining your green space. This section focuses on practical steps and tips to ensure your elevated garden thrives throughout the growing season.
Selecting Plants
Choosing the right plants for your elevated garden bed is crucial. Consider the climate, sunlight, and the amount of care each plant requires. Opt for a mix of vegetables, herbs, and flowers that complement each other and suit your gardening goals. Think about the growth habits of your plants. Taller plants like tomatoes can provide shade for shorter ones like lettuce. This not only maximizes space but also creates a mini-ecosystem within your garden.
Watering Tips
Proper watering is vital for plant health. Elevated beds often dry out faster than in-ground beds, requiring more frequent watering. Check soil moisture regularly by sticking your finger about an inch into the soil; if it feels dry, it’s time to water. Invest in a drip irrigation system if possible. It saves time and ensures consistent watering. Water early in the morning or late in the afternoon to minimize evaporation.
Seasonal Care
Seasonal care keeps your garden productive year-round. In spring, prepare your beds by adding compost to enrich the soil. During summer, mulch to retain moisture and control weeds. In fall, clean up dead plants and debris to prevent diseases. Consider planting cover crops like clover to improve soil fertility over winter. Winter is a great time to plan for next year’s garden, reflecting on what worked and what didn’t. Are you ready to transform your elevated garden into a lush paradise? With these planting and maintenance tips, you’ll be well-equipped to nurture a thriving garden all year round.
Tips For Longevity
Building elevated garden beds enhances plant health and extends garden life. Choose durable materials like cedar or metal. Ensure proper drainage and sunlight exposure for thriving plants.
Building elevated garden beds is a rewarding project that can transform your gardening experience. To ensure your garden beds last for years, focus on strategies that enhance their durability and resilience. Here are some practical tips to help you build garden beds that stand the test of time.
Protecting From Pests
Keeping pests at bay is crucial for the longevity of your garden beds. Consider lining the bottom of the bed with wire mesh to prevent burrowing animals like moles and gophers. Use natural deterrents like crushed eggshells to keep snails and slugs away. You can also plant pest-repelling herbs like mint or rosemary around your beds. Regularly inspect your beds for signs of pests. Early detection can help you take prompt action and prevent significant damage.
Weather-proofing
Weather conditions can be harsh on garden beds. Applying a weather-resistant sealant to wooden beds can protect them from moisture and rot. Choose materials like cedar or recycled plastic lumber that withstand harsh weather conditions better than untreated wood. Consider installing a simple cover or tarpaulin to shield your beds during heavy rain or snow. This small step can make a big difference in preserving the integrity of your beds. Have you considered how climate impacts your gardening projects? By taking proactive measures, you can ensure that your elevated garden beds thrive throughout the seasons.
Frequently Asked Questions
What Do You Put In The Bottom Of An Elevated Garden Bed?
Place gravel or rocks for drainage in the bottom of an elevated garden bed. Add landscape fabric to prevent soil erosion.
What Is The Cheapest Way To Build Raised Beds?
Use recycled materials like old wood or bricks to build raised beds cheaply. Choose free or low-cost options from local resources. Consider using cardboard as a base to suppress weeds. Utilize natural soil amendments and compost from your garden to fill the beds efficiently and cost-effectively.
How Deep Do Elevated Garden Beds Need To Be?
Elevated garden beds typically need a depth of 12 to 18 inches. This depth supports root growth for most vegetables. Ensure adequate soil drainage and nutrient availability for healthy plants. Deeper beds may be necessary for root vegetables like carrots and potatoes.
Adjust depth based on specific plant needs.
What Vegetables Should Not Be Grown In A Raised Bed?
Corn and pumpkins are not ideal for raised beds. Their sprawling growth and space requirements make them unsuitable. Large root vegetables like potatoes can also overcrowd the bed. Stick to compact plants for better results.
Conclusion
Creating elevated garden beds is a smart choice for any gardener. They improve drainage and reduce weed issues. Building them is straightforward and budget-friendly. Choose your materials wisely. Consider wood, metal, or stone. Plan your garden layout carefully. Ensure you have enough space for plants to thrive.
Elevated beds offer flexibility and can fit any yard size. They allow easier access for planting and harvesting. You can enjoy gardening without bending or kneeling. With these simple steps, your garden will flourish beautifully. Start your elevated garden bed today, and reap the benefits for years.


