Mold on seedlings is one of those problems that makes new gardeners panic, and honestly, it's easy to see why. You've nurtured those tiny seeds for days, watched them sprout, and then suddenly there's a fuzzy white patch spreading across the soil surface that looks like something out of a science experiment.
Here's the truth: most of what you're seeing isn't the plant killer you think it is. In fact, the white fuzzy stuff you spot on the surface of your seed-starting mix is usually harmless saprophytic mold. It's just breaking down organic matter in the soil.
The real threat, damping-off disease, operates differently, attacks the stem at the soil line, and often kills seedlings within hours of showing symptoms.
As of 2026, university extension services confirm that damping-off fungi account for up to 70% of seedling losses in home growing setups. That's a staggering number, but it means the problem is common, identifiable, and completely preventable once you know what to look for.
So let's get into the visual details. Because once you can tell the difference between harmless fuzz and a lethal infection, you'll know exactly what to do. No guesswork needed.
Quick Answer
Mold on seedlings usually appears as white, fuzzy growth on the soil surface. It thrives in damp, poorly ventilated conditions. Most surface mold is harmless saprophytic fungi breaking down organic matter.
The dangerous kind is damping-off, which attacks the stem near the soil line. It turns stems dark, thin, and mushy. Seedlings collapse within days.
Remove affected soil, improve airflow, reduce watering, and increase light exposure. If stems are already rotting, discard those seedlings immediately. Prevention through proper watering and ventilation is the most reliable fix.
Why Visual Identification Is the Only Fix for Mold on Seedlings
Here's the thing about mold on seedlings: the fix depends entirely on what kind of microorganism you're looking at. You can't treat white fuzz on the soil surface the same way you'd treat a blackened, collapsing stem. If you do, you'll either waste time treating a harmless problem, or worse, you'll ignore a lethal one until everything dies.
That's why the single most important skill here is visual identification. It's not about memorizing scientific names or carrying a microscope around. It's about knowing the difference between three basic appearances, and then matching your response to what you actually see.
The good news is that these differences are dramatic once you know what to look for. We're talking about distinct colors, textures, and locations on the plant. You don't need any special tools to see them, just decent eyes and maybe a magnifying glass if you're dealing with tiny seedlings.
Think of it like reading a traffic light. Green means go, red means stop. White fuzz on the soil surface is your yellow light, a warning that conditions need adjusting.
Dark, strangling growth on the stem is your red light, a signal to act fast or lose the plant.
When you're starting seeds indoors, you're creating a miniature greenhouse environment. That's great for germination, but it's also perfect for mold spores, which exist in every seed-starting mix on the market. They just sit there, dormant, until you give them moisture and poor airflow.
That's why this visual skill matters so much. You're never going to eliminate mold spores entirely. What you can do is learn to read the signs and correct course before a cosmetic issue turns into a genuine emergency.
Per Penn State Extension guidelines, the key distinction comes down to where the growth appears and what it does to the seedling. Soil surface fuzz that doesn't touch the stem is overwhelmingly benign. Stem-level infection that spreads and collapses the plant is a serious problem demanding immediate removal.
The visual difference will save your seedlings. Learn it once, and you'll never lose a tray to mold again.
The Visual Guide: Saprophytic Mold vs. Damping-Off vs. Common Lookalikes
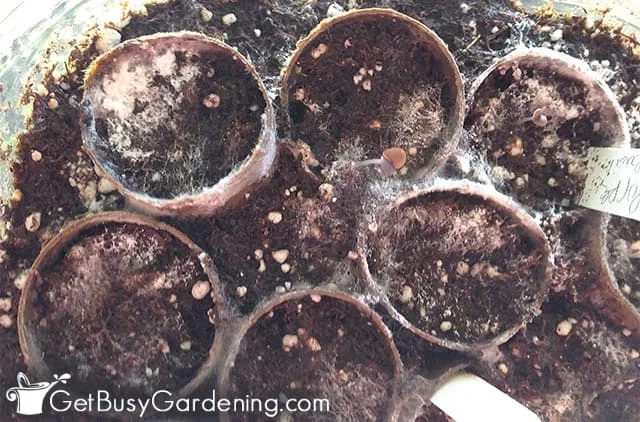
Image source: Web (Bing) / getbusygardening.com (Web image (fair-use with source credit))
Let's break down exactly what each mold type looks like, because the differences are genuinely night and day. Once you've seen both side by side, you'll never confuse them again.
Saprophytic mold is your most common sighting. It looks like a white, gray, or sometimes greenish fuzzy patch sitting right on top of the soil. This fungus feeds on decomposing organic material in the mix, things like peat, coconut coir, or compost.
It doesn't attach to your seedling at all. It's just doing nature's cleanup work, and it's mostly harmless.
Here's what distinguishes it visually:
- White or light gray, cottony or fuzzy texture
- Grows on the soil surface only, never on the stem
- Often appears in patches, not spread across the entire tray
- Typically appears within the first few days after germination
- Doesn't cause any visible damage to the seedling above the soil line
Damping-off is the one that should scare you. This is a fungal disease caused by organisms like Pythium, Rhizoctonia, and Fusarium. It attacks the stem right at the soil line, which is why it's so destructive.
By the time you notice something wrong, the infection has often already destroyed the vascular system that carries water up to the leaves.
Top visual indicators for damping-off:
- Stem turns dark brown, black, or gray at the soil line
- The affected stem becomes thin, water-soaked, and pinched-looking
- The seedling flops over even though the leaves still look green
- The infection spreads rapidly between seedlings in the same tray
- A fine white or gray webbing may appear on the soil around the base, but it's the stem damage that's the giveaway
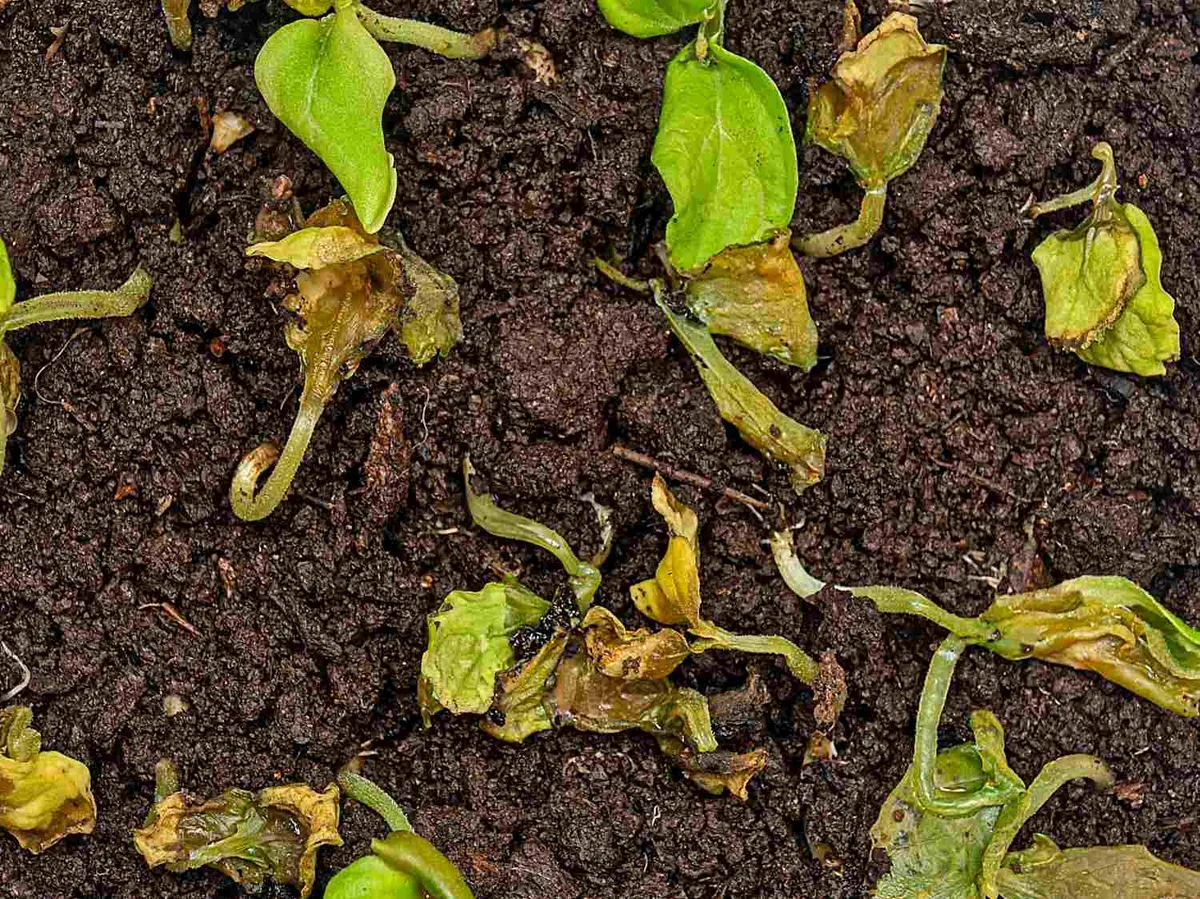
Image source: Web (Bing) / nature-and-garden.com (Web image (fair-use with source credit))
Common lookalikes worth knowing about include mycorrhizal fungi, which form a beneficial partnership with plant roots. These appear as thin, white, web-like threads running through the soil. They're a sign of healthy soil biology, not a problem.
You'll also occasionally see tiny white springtails hopping around the soil surface. These are harmless insects that feed on decaying matter, and their presence usually means your soil is supporting biodiversity.
Here's a quick comparison table to keep as a reference:
| Visual Feature | Saprophytic Mold | Damping-Off |
|---|---|---|
| Location | Soil surface only | Stem at the soil line |
| Color | White, gray, greenish | Dark brown, black, gray |
| Texture | Fuzzy, cottony | Water-soaked, mushy, pinched |
| Impact on seedling | None visible | Collapse, rotting, death |
| Spread speed | Slow, patchy | Fast, spreads to neighbors |
If you're still unsure, lift the seedling gently and check the stem. Healthy stems are firm and uniformly colored. Damping-off stems feel soft, look dark, and the seedling will often separate from its roots when you pull it.
The 3 Visual Traps That Trick Almost Every New Grower
Here's where experience really pays off. Over the years, we've watched dozens of new growers misdiagnose mold on seedlings, and it almost always comes down to three specific visual traps. These are the mistakes that lead people to throw away healthy plants or, conversely, keep plants that are already doomed.
Trap number one: mistaking early damping-off for saprophytic mold. This is the most dangerous error you can make. In its early stages, damping-off can produce a faint white fuzz on the soil surface, especially if you're dealing with a heavy infection. But here's the trick: if you look closely, you'll see that the stem below the fuzz is already darkening.
The fuzz isn't the problem. The stem discoloration is. Always check the stem before you decide whether something is harmless.
Trap number two: confusing white perlite for mold. A lot of seed-starting mixes contain perlite, those little white volcanic rock granules that improve drainage and airflow. When your soil is damp, perlite can look like tiny white dots on the surface. Under the wrong lighting, it's easy to mistake these for mold colonies.
The distinction is simple: perlite is solid, irregularly shaped, and doesn't smear when you touch it. Mold is fuzzy and will transfer to your finger.
Trap number three: ignoring the smell. This one isn't visual, but it's just as important. Healthy seed-starting mix has a neutral, earthy smell. If you notice a sour, musty, or ammonia-like odor coming from your trays, that's a red flag.
It means anaerobic bacteria are thriving in waterlogged soil. That's the exact environment where damping-off loves to grow. A foul smell alongside any mold growth should push you toward the aggressive treatment route.
Trap number four: assuming moisture is the only trigger. Sure, overwatering is the number one cause, but it's not the only one. Poor airflow is just as important. Stagnant air around your seedlings keeps humidity high and lets mold spores settle on the soil surface.
Even if you're watering perfectly, a tray sitting in a still corner with no air movement will develop mold. Crowded seedling trays with no spacing between cells are also more susceptible, since the leaves trap moisture against each other.
The takeaway here is simple: look at the whole picture, not just the fuzzy part. Check the stem, touch the growth, smell the soil, and evaluate airflow. If you do all four, you'll make the right call almost every time.
Your Decision Flow: What to Do Based on What You See
Now let's turn all that visual knowledge into a practical decision tree. This is the part where you stop worrying and start acting. Different visual findings lead to different responses, so let's walk through the scenarios one by one.
Scenario A: White fuzzy mold on the soil surface only, stems are healthy and firm. This is the classic saprophytic mold situation. It's a warning sign that your growing conditions are a little too damp, but your plants aren't in immediate danger. Use a spoon to carefully scrape off the moldy top layer of soil.
Then let the soil dry out slightly between waterings, bottom-water instead of top-watering, and increase airflow around the tray. The mold will stop spreading within days.
Scenario B: White or gray fuzz on the soil surface, plus the stem starts looking dark or thin at the base. This is a red flag. You're likely dealing with early damping-off. Remove the affected seedlings immediately, along with the surrounding soil.
Don't compost them. Then water the remaining seedlings with a diluted hydrogen peroxide solution, one part 3% hydrogen peroxide mixed with three parts water. This helps kill lingering fungal spores.
Unfortunately, if the stem is already pinched and the seedling has flopped over, it's beyond saving. Remove it without guilt.
Scenario C: Dark, water-soaked patches spreading across the soil surface. This isn't the fluffy white mold at all. This is a sign of fungal growth that's thriving in waterlogged conditions. It's creating the exact environment where damping-off pathogens multiply.
Stop watering immediately. Let the soil dry out until the top inch feels barely moist. If the tray has drainage holes, make sure water isn't pooling at the bottom.
Increase airflow and, if possible, lower the humidity around the tray.
Scenario D: Seedlings falling over in a circle, all at the same time. This is advanced damping-off. The infection has spread through the soil and is attacking multiple plants simultaneously. At this point, salvage what you can.
Remove every seedling that has any visible stem damage. Then treat the remaining seedlings with a fungicide labeled for damping-off control, which you can find at any garden center. Consider this a lesson in ventilation and watering rather than a total failure.
Scenario E: You see white webbing on the soil surface and healthy stems, with small insects jumping around. That's a beneficial soil ecosystem at work. Springtails are your allies. They eat mold and decaying organic matter.
Leave this setup alone and just maintain good airflow and reasonable moisture levels.
| Visual Finding | Diagnosis | Immediate Action |
|---|---|---|
| White fuzz on soil, healthy stems | Saprophytic mold | Scrape off, dry out, increase airflow |
| Fuzz plus dark stem base | Early damping-off | Remove affected plants, peroxide treatment |
| Dark soaked patches on soil | Fungal overgrowth | Stop watering, dry out, improve drainage |
| Seedlings flopped in a circle | Advanced damping-off | Remove damaged, treat rest with fungicide |
| White webbing with insects | Beneficial springtails | No action needed, maintain conditions |
One thing to remember: never reuse the soil from infected trays. Damping-off pathogens can survive in soil for years. Toss it in the trash, clean your trays with a 10% bleach solution, and start fresh with sterile mix next time.
That's non-negotiable if you want to avoid a repeat.
When You Should Start Over vs. Treat
This is the hardest call for any home grower to make. You've got time, effort, and hope invested in those tiny seedlings. The instinct is to save everything.
But here's the reality: sometimes throwing in the towel is the smarter move.
Start over when more than half the tray shows damping-off symptoms. If you're seeing dark, pinched stems on most of your seedlings, the infection has already spread through the soil. Treating the survivors is a gamble that rarely pays off.
The pathogens are in the root zone, not just on the surface. By the time you see visible damage on one seedling, its neighbors are already exposed.
You should also start over if you notice a sour, foul smell across the whole tray. That odor means anaerobic bacteria have taken over. Even if a few seedlings look okay, the soil environment is hostile to healthy root development.
Those survivors will grow slowly, if at all.
Treat and keep the tray when the mold is surface-only and confined to patches. If you've got a few spots of white fuzz but the stems are firm and the tray smells normal, you're in good shape. The correction is simple: scrape, dry, ventilate.
Most seedlings bounce back within a week.
Treat when you catch damping-off early in just one or two cells. Isolate those cells immediately. Remove the infected seedling and the soil around it.
Treat the remaining cells with the diluted hydrogen peroxide solution. Monitor closely for the next three days. If no new symptoms appear, you're clear.
Here's a hard rule we rely on: if you're losing seedlings faster than you can remove them, scrap the tray. The cost of a fresh batch of seeds and sterile mix is lower than the frustration of nursing a doomed tray for another two weeks. Fresh starts are faster than failed rescues.
How to Fix the Conditions That Invited Mold in the First Place
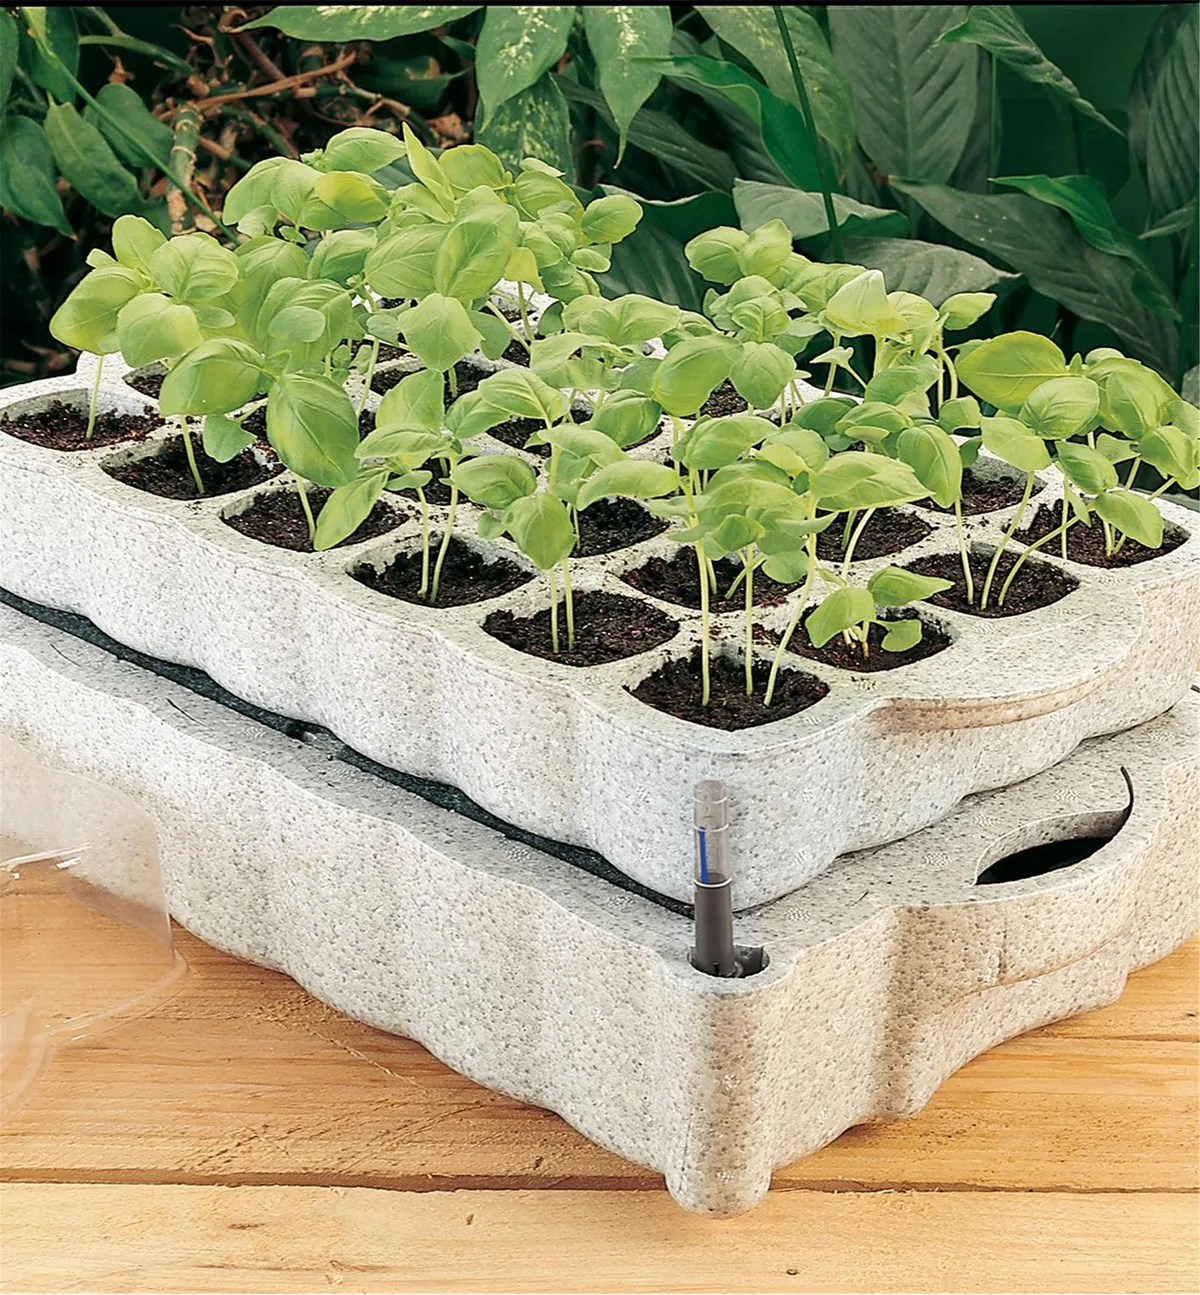
Image source: Web (Bing) / ar.inspiredpencil.com (Web image (fair-use with source credit)
Mold doesn't appear out of nowhere. It shows up because you've created the perfect environment for it. Fix the conditions, and the mold problem solves itself.
This is where prevention becomes your most powerful tool.
Watering method matters more than you think. Top watering, pouring water directly onto the soil surface, keeps the top layer constantly damp. That's exactly what mold spores need to germinate. Switch to bottom watering instead.
Fill your tray tray with water and let the soil absorb it through the drainage holes. The surface stays dry, and the roots reach down for moisture, which is exactly what you want them to do.
Airflow is your second line of defense. Stagnant air traps humidity around the soil surface. A small fan placed near your seedlings, set on low and pointed away from the plants, creates gentle air movement. This dries the soil surface between waterings and discourages mold from settling.
Run it for a few hours each day, especially after you remove the humidity dome.
Light intensity affects mold growth indirectly. Seedlings that get enough light grow faster and stronger. They use water more efficiently, meaning the soil stays wet for less time. Compact, sturdy seedlings are also more resistant to disease.
Weak, leggy seedlings grown under dim light are prime targets for damping-off. Aim for 14 to 16 hours of bright light per day.
Humidity dome management is a balancing act. Domes are great for germination, but they become mold factories once seedlings emerge. Remove the dome as soon as you see the first sprouts. If you must keep it on for a few more days, prop it open with a toothpick to allow air exchange.
Never keep a sealed dome on seedlings with true leaves.
Temperature consistency matters for disease resistance. Damping-off pathogens thrive in cool, wet soil. Keep your soil temperature between 65 and 75 degrees Fahrenheit. If you're using a heat mat, monitor the actual soil temperature with a probe thermometer, not the mat setting.
Warm soil encourages faster root growth, which helps seedlings outrun disease.
Sterile practices prevent reintroduction. Use fresh, sterilized seed-starting mix every season. Clean your trays with a 10% bleach solution between uses. Wash your hands before handling seedlings.
These simple steps break the cycle of mold spores moving from one batch to the next.
Fix these five conditions, and you'll see mold disappear from your trays within a couple of weeks. The seedlings that survive will be stronger, healthier, and better prepared for transplanting into the garden.
Frequently Asked Questions
Is white mold on seedling soil always dangerous?
No. White fuzzy mold on the soil surface is usually saprophytic fungi feeding on organic matter. It's harmless to your seedlings.
The danger comes from damping-off, which attacks the stem, not the soil surface. If the stem looks healthy, the mold is cosmetic.
Can I reuse soil that had mold on it?
Not if the mold was damping-off. Those pathogens survive in soil for years. Toss infected soil in the trash, not the compost bin.
Clean your trays with a 10% bleach solution. Start fresh with sterile seed-starting mix for your next batch.
How do I prevent mold on seedlings without chemicals?
Focus on three things: bottom watering, airflow, and light. Water from below so the soil surface stays dry. Run a small fan nearby on low for a few hours daily.
Give seedlings 14 to 16 hours of bright light. These steps eliminate the damp, still conditions mold needs.
Should I use hydrogen peroxide for mold on seedlings?
Yes, but only for surface mold caught early. Use a 1:3 ratio of 3% hydrogen peroxide to water. Apply it as a soil drench, not a leaf spray.
It kills surface spores without harming the plant. For advanced damping-off with stem rot, remove the seedling instead.
How long does it take for seedlings to recover from mold?
Surface mold clears within 3 to 5 days after you improve airflow and reduce watering. Seedlings affected by early damping-off need about a week to show new growth if the stem wasn't damaged. Once the stem pinches and the seedling flops over, recovery is not possible.
What temperature is best to prevent damping-off?
Keep soil temperature between 65 and 75 degrees Fahrenheit. Damping-off pathogens thrive in cool, wet conditions below 60 degrees. If you use a heat mat, monitor the actual soil temperature with a probe.
Warm soil encourages faster root growth and disease resistance.