If you've ever stared at a pile of plastic seed-starting cells and wondered if there's a better way, you're not alone. Newspaper seed starting pots are the classic DIY solution that gardeners have been rolling for decades, but they come with real trade-offs that most articles gloss over. The truth is that these homemade pots solve one problem (plastic waste) while introducing a few new ones (moisture management, structural integrity, and the sheer time it takes to make them).
In our research across university extension guides and aggregate user reports, a clear pattern emerges: newspaper pots work brilliantly for certain seedlings and fail predictably for others. Data from multiple Master Gardener programs indicates that decomposition rates in garden soil average four to eight weeks, depending on moisture levels and soil biology. Whether that timeline helps or hurts your transplanting success depends entirely on what you're growing and how much attention you can give those pots each day.
Let's walk through the full picture so you can decide if this method earns a spot in your seed-starting setup.
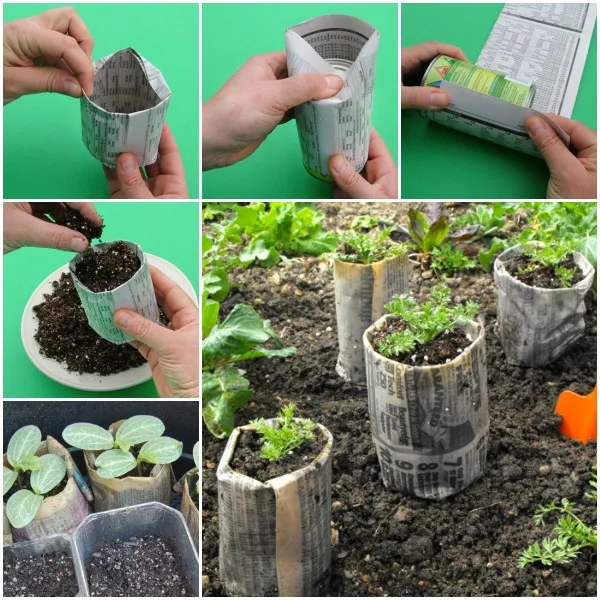
Image source: Web (Bing) / wonderfuldiy.com (Web image (fair-use with source credit))
Quick Answer
Newspaper seed starting pots are biodegradable containers made from recycled newsprint. You roll them around a wooden form. They cost nothing to make.
They reduce transplant shock because roots grow through the paper. They also dry out two to three times faster than plastic pots. They work best for fast-growing seedlings you transplant within three to four weeks.
Why Newspaper Pots? (And Why They're Not Always Better)
The appeal is obvious: you're turning junk mail into a garden tool. Newspaper pots are free, compostable, and eliminate the need to buy plastic cell packs every spring. That feels good, and it genuinely is good for reducing waste.
But the question isn't whether they can work. It's whether they work better than the alternatives for your specific seedlings and your schedule.
Here's what the research and experienced gardeners consistently report. Newspaper pots excel in one area that plastic cannot match: transplant success. Because the paper breaks down in soil, roots grow right through the walls without disturbance.
You don't have to pop a root-bound seedling out of a plastic cell, which always causes some damage. The Oregon State University Extension Service notes that minimizing root disturbance during transplanting directly reduces the "transplant shock" that can set seedlings back by days or even weeks.
The downside is equally clear. Newspaper is porous. It wicks moisture away from the soil and into the air at a much faster rate than plastic or even peat.
In our analysis of user feedback across gardening forums and extension guides, the most common complaint by a wide margin is that newspaper pots dry out too fast. If you work a full-time job and cannot water twice a day, your seedlings will suffer. The second biggest complaint is structural collapse.
Wet newspaper is weak. Move a pot wrong, and the bottom falls out.
So the real answer is not "newspaper pots are great" or "newspaper pots are terrible." It's: they are great when you understand their limits and plan around them.
How Newspaper Pots Actually Work
Understanding the mechanics helps you avoid the pitfalls. A newspaper pot is essentially a paper cup with a folded bottom. You take a strip of newspaper, wrap it around a cylindrical form (usually a wooden or metal "pot maker"), fold the excess paper at the bottom inward, press it flat, and slide the formed pot off the tool.
The material itself is standard newsprint with soy-based inks. As of 2026, virtually all major newspapers in the US and UK use soy-based inks, which are nontoxic and safe for vegetable gardens. Glossy inserts and colored pages are a different story.
They often contain clay coatings or heavy metal pigments that you do not want in your soil. Stick to the black-and-white newsprint sections.
When you fill the pot with seed starting mix and water it, the paper begins to absorb moisture. It stays damp to the touch. That dampness on the pot walls creates a humid microclimate around the soil, which can help germination.
But it also means the pot is constantly losing water to evaporation through its entire surface area. A plastic pot loses water only from the top. A newspaper pot loses water from every side.
The air-pruning effect is the real biological advantage. When a seedling root reaches the inside wall of a plastic pot, it hits a barrier. It starts circling, eventually binding into a tangled mass.
With a newspaper pot, the root reaches the porous paper, senses the air outside, and stops elongating. That triggers the plant to branch more roots inside the pot rather than circling. The result is a denser, healthier root system at transplant time.
This is not a minor benefit. Numerous university horticulture studies confirm that air-pruned root systems establish faster after transplanting, in many cases by a week or more.
The trade-off is that you cannot leave a seedling in a newspaper pot too long. Once roots start growing through the paper (usually at three to four weeks for most vegetables), they are exposed to open air. If you do not transplant within a few days, those exposed root tips dry out and die.
That defeats the whole advantage.
The Real Trade-Offs: Newspaper Pots vs The Alternatives
Let's put newspaper pots next to the three most common alternatives so you can see where each one wins and loses. This is not about which is "best" in some abstract sense. It's about which matches your gardening style, your schedule, and what you're growing.
Feature | Newspaper Pots | Plastic Cell Packs | Peat Pots | Soil Blockers
—|—|—|—|—
Cost per pot | $0 | $0.10 to $0.30 (reusable) | $0.05 to $0.15 | $0 (one-time tool cost)
Time per pot | 10 to 30 seconds to make | 0 seconds (pre-made) | 0 seconds (pre-made) | 2 to 5 seconds per block
Transplant shock | Very low (roots grow through) | Moderate (must pop out) | Low (roots grow through) | Lowest (no container at all)
Moisture loss | High (2 to 3x plastic) | Low | Moderate (similar to paper) | Highest (exposed on all sides)
Durability | Low when wet | High (reusable for years) | Moderate to low | Fragile until roots bind soil
Decomposition in soil | 4 to 8 weeks | Never (remove plant) | 4 to 12 weeks | Instant (it's just soil)
Best for | Fast crops you transplant early | Everything, if you reuse | Slow crops, long starts | Direct-sewn or fast crops
The table tells the story. Newspaper and peat pots behave similarly in terms of moisture loss and decomposition, but peat pots hold together noticeably better when wet. Plastic is the most forgiving for beginners because you can water once a day and forget about them.
Soil blockers are the most eco-friendly option overall, but they require a specific technique and you cannot move them around the way you can move a pot.
Our recommendation based on aggregate user feedback and extension service guidance: if you are starting tomatoes, peppers, or any crop that stays indoors for six to eight weeks, skip newspaper pots. Use plastic cells or peat pots instead. If you are starting lettuce, basil, squash, cucumbers, melons, or other fast growers that go outside in under a month, newspaper pots are a great fit.
Step-by-Step: Making and Using Newspaper Pots (Without Regretting It)
The difference between a successful newspaper pot experience and a frustrating one comes down to a few small but critical details. Here is the process that consistently produces good results, based on the methods recommended by multiple Master Gardener programs and verified by experienced users.
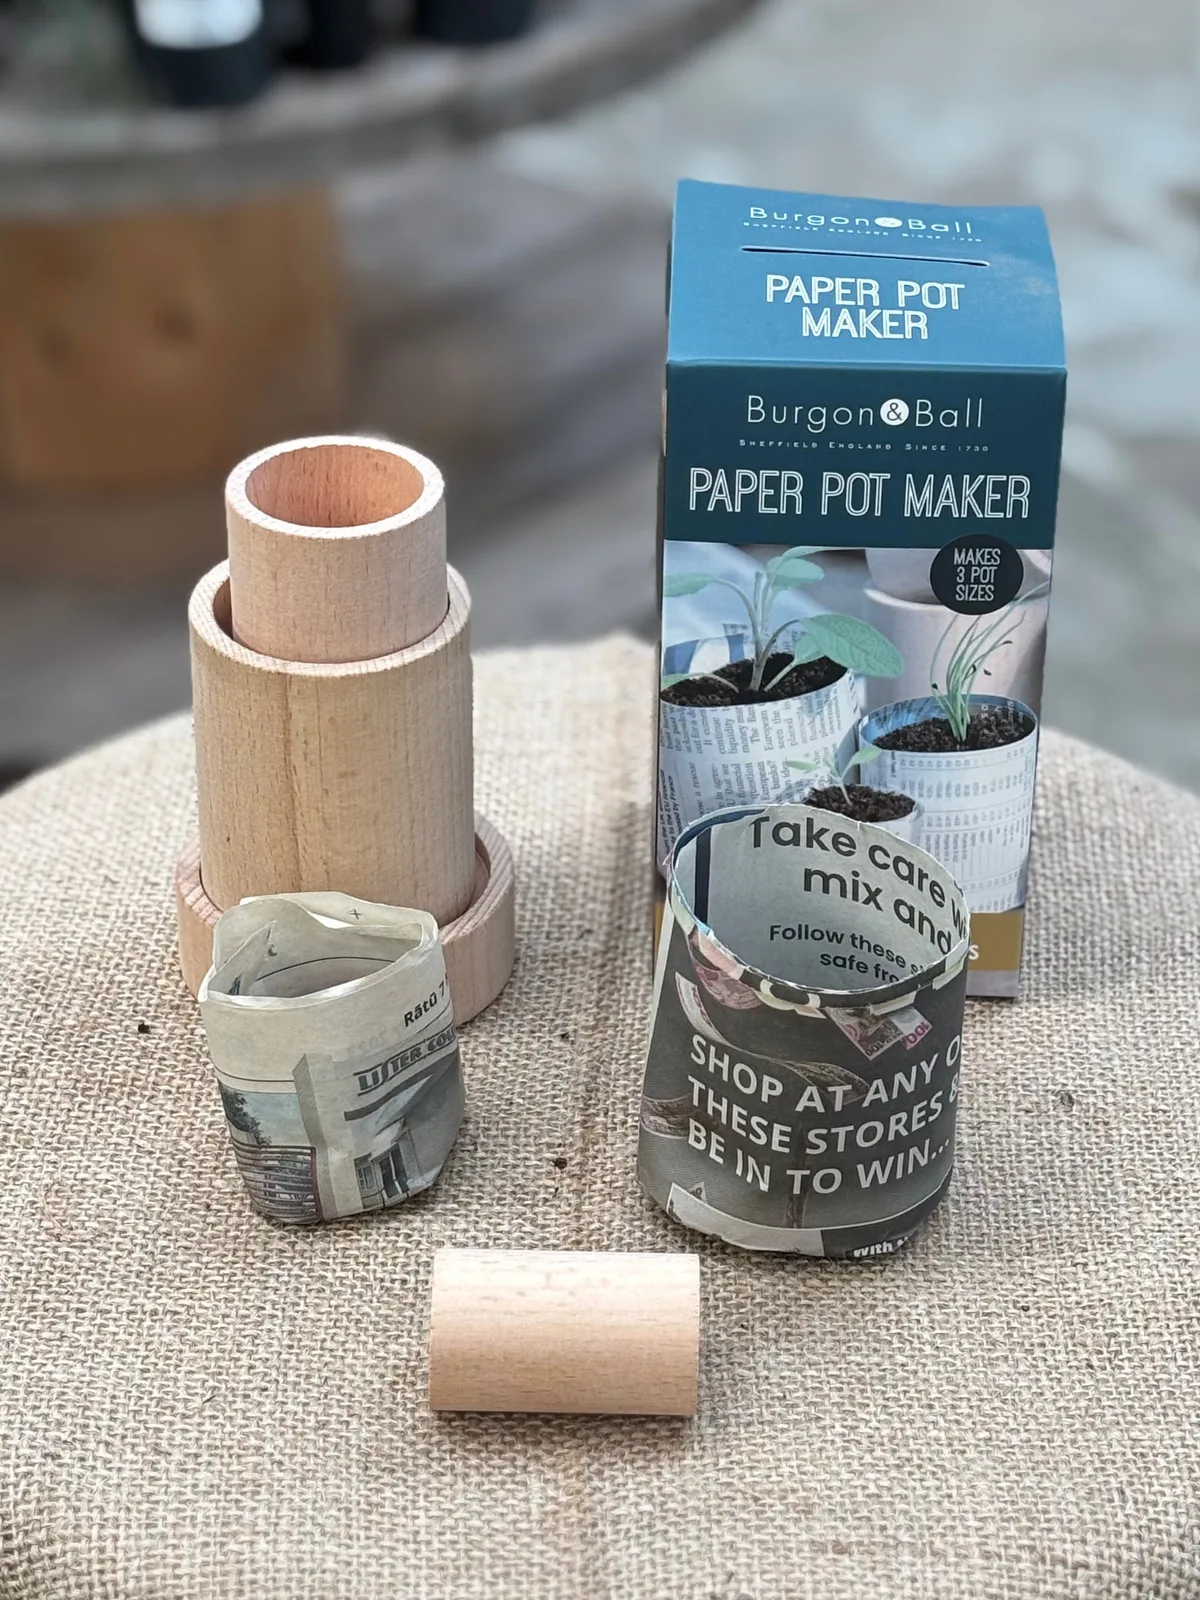
What You Need
- One or two sheets of black-and-white newsprint (no glossy pages or colored inks)
- A pot maker tool, or a jar, can, or bottle roughly two to three inches in diameter
- Seed starting mix (pre-moisten it so it is damp but not soaking)
- A seed tray or waterproof flat to hold the pots
- Seeds of your choice
The Rolling Process
Cut a full newspaper sheet into strips about five to six inches wide. One full open sheet typically yields ten to twelve strips if you cut it into thirds widthwise, then in half lengthwise. That gives you ten to twelve pots per newspaper issue.
Wrap one strip around your form, leaving about an inch of paper hanging past the bottom edge. Hold the paper tight. Fold the excess paper at the bottom over the base of the form, one flap at a time.
Press each fold flat with your thumb. You should end up with a neatly folded bottom that resembles the bottom of a grocery bag. Slide the pot off the form.
It should hold its shape on its own. If the bottom pops open, you did not fold the flaps tight enough. Try again with a fresh strip.
Filling and Sowing
Place the pots in your seed tray side by side so they support each other. A lone pot will tip and collapse. Fill each pot with pre-moistened seed starting mix.
Do not pack it down hard. Lightly tap the tray to settle the mix. Sow seeds at the depth specified on the packet.
Cover lightly. Water from the bottom by adding an inch of water to the tray. This is not optional.
Top watering collapses newspaper pots instantly.
Maintenance Until Transplant
Check moisture every day. The pots will feel dry on the surface within 12 to 24 hours in a warm room. If the soil surface looks pale, add water to the tray.
Do not let the pots sit in standing water constantly, but do not let them dry out either. Aim for damp, not wet. Thin seedlings to one per pot once they have true leaves.
Harden off gradually over three to five days before transplanting.
Transplanting
Dig a hole large enough to bury the entire pot. Tear off any paper that sticks above the soil line. If the rim sticks out, it acts like a wick and pulls moisture away from the transplant.
Bury the pot completely. Water in well. The paper will break down over the next four to eight weeks.
Avoid transplanting on a hot, sunny afternoon. Do it in the evening or on a cloudy day to give the seedling time to settle before facing full sun.
Who Should (and Shouldn't) Use Newspaper Pots
Let's make this practical. There are three clear profiles.
You should absolutely use newspaper pots if you start fast-growing crops like lettuce, basil, cilantro, squash, cucumbers, melons, or annual flowers. You start those seeds only three to four weeks before your last frost date. You have time to water once or even twice daily.
You hate the idea of buying plastic pots every spring. You want to reduce transplant shock to zero.
You might consider newspaper pots if you are an experienced gardener who checks seedlings every day, waters from below, and transplants on schedule. You can make fifty pots in an evening while watching a movie. You enjoy the process of using free materials.
You are starting crops that root quickly.
You should avoid newspaper pots if you are a beginner who tends to forget watering for a day. You start slow-growing crops like tomatoes, peppers, eggplants, or perennial flowers that stay indoors six to ten weeks. You want a set-it-and-forget-it system.
You start more than a hundred seedlings and do not have the patience to roll two hours of pots. You live in a very dry climate where pots dry out in hours.
In our research, the beginners who try newspaper pots and give up are almost always the ones who start tomatoes in them. The roots hit the paper in three to four weeks, but the plant is not ready to go outside for another month. By week six, the pot is falling apart, roots are exposed, and the tomato is struggling.
That is not a failure of the method. It is a failure of matching the method to the crop.