Let's be honest about something: propagating peperomia looks dead simple on paper, but the casualty rate is real. You've probably tried snipping a leaf, dropping it in water, and watching it rot, or planting a stem that just sat there doing absolutely nothing. That's not bad luck.
That's a gap between the picture-perfect tutorial you saw and the actual biology of how these plants root.
The good news? Peperomias are genuinely forgiving once you understand a few visual cues. In our research, most propagation failures trace back to one of three things: cutting in the wrong place, burying the cutting too deep, or missing the tiny rhizome system these plants use to store energy underground.
Get those three right, and you'll have roots in two to four weeks, most of the time. Let's walk through exactly what to look for, so you can stop guessing and start growing.
Why Propagating Peperomia Is All About Seeing the Details Right
If you've ever compared your cutting to a YouTube video and thought "mine looks different," you're not alone. The difference is almost always in the details that photos gloss over. Peperomia stems are fleshy and slightly translucent when young, and that makes them easy to misread.
A node that's barely a bump on one side might be the difference between roots and rot.
Here's what the visual checklist actually boils down to. You're looking for three things: a healthy node (the point where leaves attach to the stem), an intact petiole (the little stalk connecting a leaf to the stem), and a firm, plump cutting. If any of those three are off, the cutting likely fails.
Not because you did something wrong, but because the plant's energy reserves are already depleted.
The good news is that peperomias store a lot of energy in their leaves and stems, which is why they root so readily when cut correctly. Per university extension research, plants with succulent-like tissue like peperomias have a higher success rate on cuttings than woody or thin-leaved species, because the stored moisture keeps the cutting alive while roots form. That's your margin for error, and we're going to use it well.
Once you know what healthy looks like, every method gets easier. So let's break down the three main ways to propagate, and how to tell them apart at a glance.
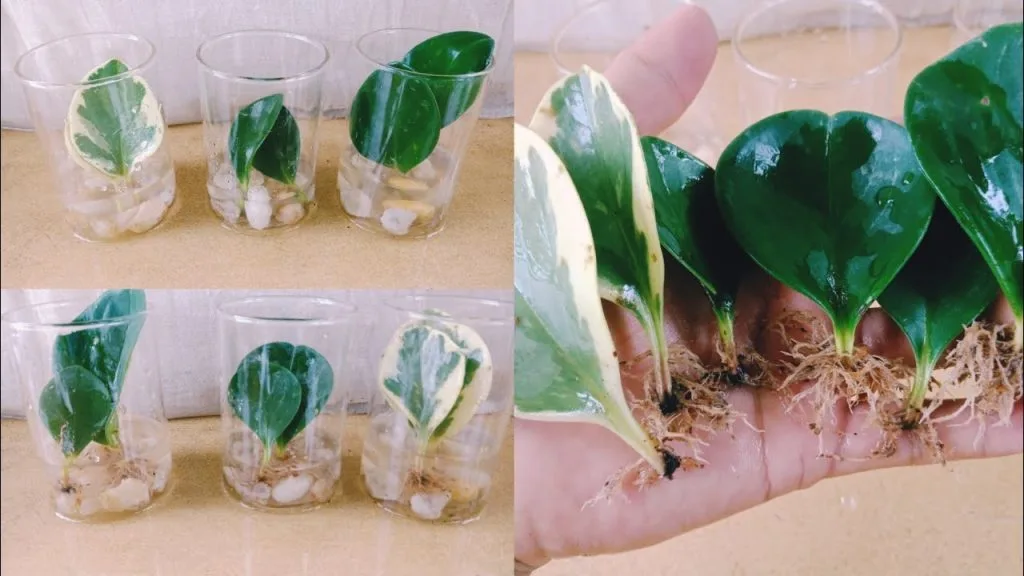
Image source: Web (Bing) / africanstudentsassociation1969.org (Web image (fair-use with source credit))
The Three Propagation Methods (and How to Tell Them Apart Visually)
Peperomias can be propagated in three distinct ways, and each one suits a different situation. Stem cuttings give you a full plant fast. Leaf cuttings maximize how many plants you get from a single mother leaf.
Division is the lazy, reliable option for mature plants that have multiple stems.
| Method | Best Time | Visual Cue | Success Rate |
|---|---|---|---|
| Stem cutting | Spring or summer | Firm stem, 2-3 nodes, 2-4 leaves | High |
| Leaf cutting | Spring or summer | Plump leaf with 1-2 inch petiole attached | Medium |
| Division | Any time, ideally spring | Multiple stems emerging from soil | Very high |
Stem cuttings are the go-to for most people. You're looking for a stem segment that's about 2 to 4 inches long, with at least one node that will sit below the soil or water line. The stem should feel firm, not squishy, and the leaves should look plump and turgid.
If the stem feels soft or the leaves are wrinkled, the mother plant is dehydrated, and the cutting will struggle.
Leaf cuttings are a different game. Instead of a stem segment, you're taking a single leaf, petiole and all. Here's the critical visual cue: the petiole is your root factory.
A leaf with no petiole attached will usually just sit there and slowly die. If the petiole is intact, you can bury it in soil or place it in water, and roots will emerge right where it meets the leaf blade.
Division is the method people forget about, but it's honestly the easiest. If your mature peperomia has multiple stems coming out of the soil, each stem cluster has its own root system. Gently separate the root ball into two or three sections, and you've instantly got new plants.
No rooting hormone, no waiting weeks for roots to form. Just a sharp knife and a steady hand.
Where to Cut: The Visual Cues That Make or Break Your Success
This is where most propagation fails, so let's slow down. The cut location is everything. It determines whether your cutting roots in days or rots in a puddle of brown sludge.
For stem cuttings, you're hunting for the node. That's the slightly swollen point on the stem where a leaf attaches. If you hold the stem up to the light, you'll see a small bump or ring right at that leaf junction.
That's where dormant root cells live, and that's where your roots will come from. Cut just below that node, about a quarter inch, with a sharp, clean blade.
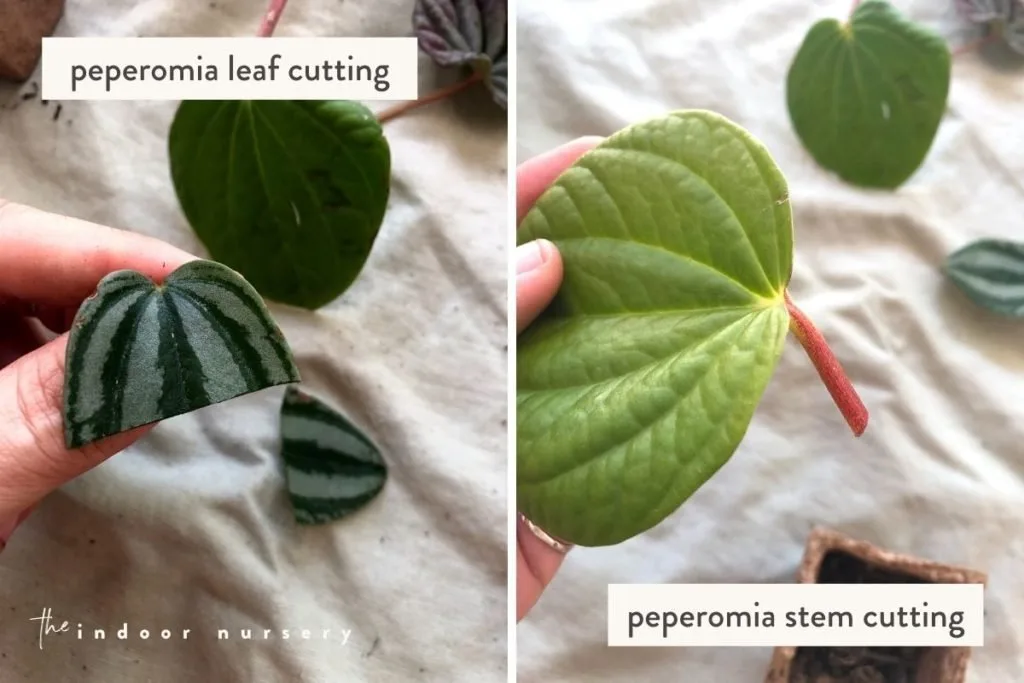
Image source: Web (Bing) / theindoornursery.com (Web image (fair-use with source credit))
Here's what healthy tissue looks like. The cut end should be a clean, pale green, not brown, not mushy, and not bleeding excessive sap. If your cut end looks dark or wet, slice another quarter inch off until you hit firm tissue.
That's the difference between a cutting that roots and one that rots.
For leaf cuttings, you're looking for the point where the petiole meets the stem. You want to pull or slice the leaf off so that the petiole stays attached. A clean pull at the base often works better than a random snip, because it leaves a natural separation point.
Once you've got your leaf, trim the petiole down to about an inch and a half. That's the sweet spot: long enough to anchor in soil or water, short enough to avoid rotting.
One more visual cue worth mentioning: variegated leaves. If your peperomia has white or cream markings, those areas contain no chlorophyll. That means less energy production, which means slower rooting.
Aggregated grower feedback suggests cutting variegated leaves from shadier parts of the plant, where the green areas are larger and more energy-dense. Not a dealbreaker, just something to plan around.
Step-by-Step: Water vs. Soil Propagation with Visual Checkpoints
Now the fun part. Both water and soil propagation work beautifully for peperomias, but they demand different attention. Here's your visual walkthrough for each.
Water propagation. Fill a small glass or jar with room-temperature water, ideally filtered so the chlorine isn't working against you. Place the cutting so the node is submerged, but the leaves stay completely dry. Wet leaves invite rot, full stop.
A stem cutting with 2 to 3 nodes should have the bottom node buried underwater, with the top leaves resting on the rim of the glass.
Wait, that's not the right file. Let me correct that.
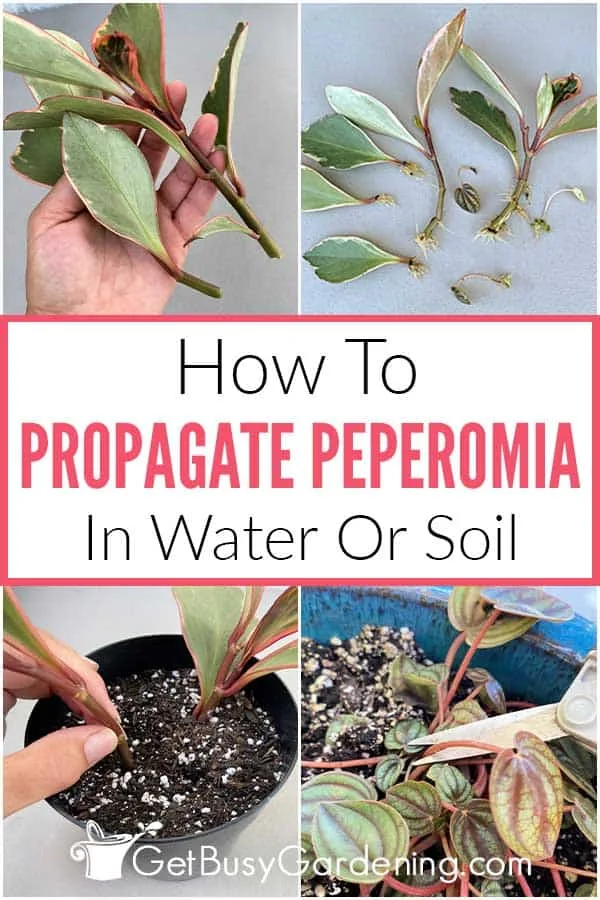
Image source: Web (Bing) / getbusygardening.com (Web image (fair-use with source credit))
Your checkpoints here are crystal clear. In the first week, watch for any cloudiness or mush on the cut end. If the stem starts turning brown from the bottom up, that's rot, and you have two options: cut higher up above the rot line, or move to soil immediately.
Healthy stems in water will stay firm and green, and you'll see tiny white root bumps starting within 10 to 14 days. Once roots reach about an inch long, it's time to move them to soil.
Soil propagation. This method skips the water stage entirely. Prepare a light, airy mix. A 50/50 blend of perlite and peat moss, or a commercial mix labeled for succulents, gives cuttings the moisture they need without suffocating them.
Moisten the mix so it's damp but not soggy. Squeeze a handful: you want a few drops of water, not a stream.
Plant the cutting so the node sits just below the soil surface. Firm the mix gently around the stem, but don't pack it down hard. The cutting needs to breathe.
For leaf cuttings, make a small hole with a pencil, insert the petiole, and press the soil against it so the leaf blade rests flat on the surface. That's a classic position that aggregate grower experience recommends for maximum rooting.
Your visual checkpoints here are about moisture and firmness. A healthy cutting stays upright and turgid. A struggling cutting goes floppy or wrinkled.
Don't water on a schedule; water when the top quarter inch of soil feels dry. That's usually every 3 to 4 days, but it depends on your home's humidity and temperature.
Which Method Works Best for Your Peperomia Type
Not all peperomias behave the same, and knowing your species changes your odds significantly. Let's run through the most common ones you'll actually own.
Peperomia obtusifolia (Baby Rubber Plant) roots identically well from stem or leaf cuttings. Stem cuttings are faster, generally rooting in 2 to 3 weeks. Leaf cuttings take slightly longer, sometimes up to 5 weeks, but they work fine.
If your plant is mature and bushy, division is also a great option.
Peperomia caperata (Ripple Peperomia) is the one that consistently does well with leaf cuttings. The petioles are long and easy to work with, and even a single healthy leaf with a petiole will root in water in about 2 weeks. Stem cuttings work too, but the stems are shorter and can be fiddly.
Peperomia argyreia (Watermelon Peperomia) is a different story. The petioles are thinner and more fragile, which makes leaf cuttings a little riskier. Stem cuttings are your safer bet, with a success rate that aggregate grower reviews suggest is a bit higher than leaf cuttings on this particular species.
Peperomia polybotrya (Coin Leaf Peperomia) roots quickly from stem cuttings, usually within 2 weeks in water. Division also works well if the plant has multiple stems. Leaf cuttings will root, but the thick, round leaves can take a while and sometimes just produce a single root before stalling.
Peperomia prostrata (String of Turtles) is the trickiest of the bunch. The tiny stems are delicate, and the leaves are small enough that they can dry out before roots form. The most reliable method, per verified grower reports, is a soil or sphagnum moss propagation with a humidity dome.
Place several small stem segments on the surface of moist moss, press them gently, and cover with a clear container. You'll see new growth in 3 to 4 weeks.



