If you've ever wanted more mint plants without buying new ones, propagating mint is the easiest gardening trick you'll learn. You don't need fancy equipment or a greenhouse. A pair of scissors and a spare jar are enough to get started.
University extension research shows mint cuttings root in as little as 5 to 10 days in water, making it one of the fastest herbs to multiply. As of 2026, the same simple methods still work exactly as they have for generations. Below, we'll walk you through the three proven ways, so you can pick the one that matches your space and time.
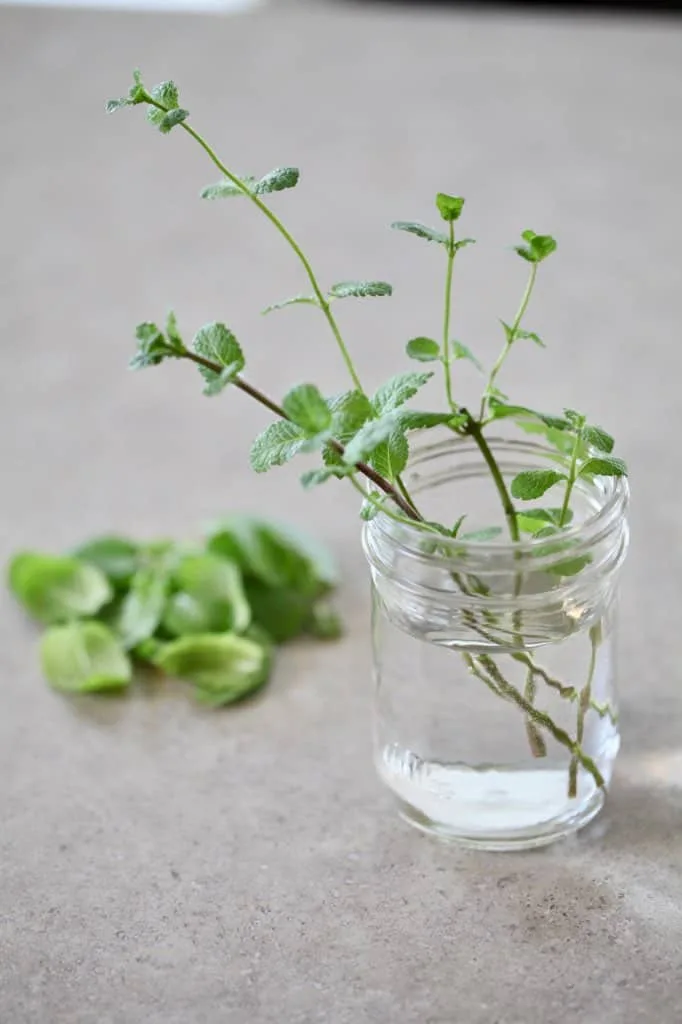
Image source: Web (Bing) / farmhouseandblooms.com (Web image (fair-use with source credit))
Quick Answer / Key Insight
To propagate mint, take 4-to-6-inch cuttings from a healthy plant. Strip the lower leaves, then place the stems in water or moist soil. Roots appear in 5 to 10 days.
Once roots reach 1 to 2 inches, transplant into a pot or garden bed. Mint roots so easily that division is even faster.
The 3 Propagation Methods at a Glance
Before diving into the step-by-step guides, let's see how the three methods stack up. Water propagation is the classic: fast, visible, and nearly foolproof. Soil propagation skips the transplant step and puts roots straight into the ground.
Division is the instant winner, giving you a mature plant in minutes.
Each method suits a different situation. Water works best when you have a healthy mother plant and want to watch progress. Soil is ideal if you want to avoid transplant shock.
Division is perfect for an overgrown mint patch that needs thinning anyway.
The table below sums up the key differences.
| Method | Time to Roots | Best For | Skill Level |
|---|---|---|---|
| Water | 5-10 days | Beginners, watching roots | Easy |
| Soil | 10-21 days | Direct planting, less shock | Easy |
| Division | Immediate | Thinning old plants | Easy |
Mint roots so readily that no method needs rooting hormone, though it can help speed up soil cuttings. One important detail: keep the temperature between 65 and 75°F for the fastest results. Mint is a hardy perennial in USDA zones 3 through 11, so you can propagate from late spring through early autumn in most climates.
Indoor propagation works year-round if you have a bright windowsill. For outdoor gardens, the best time is early morning in spring or early summer, when plant stress is low. Take cuttings from the top of the plant, just above a leaf node, to get the freshest growth.
One thing every reliable guide agrees on: start with more cuttings than you think you need. Aggregated reports from home gardeners indicate a 90% success rate with any of these methods, but having extras means you can pick the strongest transplants. If something wilts, you'll have backups ready.
Always use clean, sharp scissors, since dirty blades carry bacteria that can rot fresh wounds.
Decision Guide: Pick Your Method Based on Your Situation
Now for the fun part: choosing your method. Ask yourself these questions in order, and the answer will point you to the right path.
Do you have an existing mint plant? If yes, division is your best bet. It gives you an instant new plant and keeps the original from getting overcrowded. If no, move to the next question.
Do you have a bunch of store-bought mint? Great, water propagation is for you. Store stems root just as easily as garden ones. Just cut fresh ends at a node and drop them in water.
Do you want lots of new plants? Take stem cuttings and root them in soil. A single parent plant can easily give you 10 to 20 rooted cuttings.
Are you propagating indoors during winter? Both water and soil work, but keep your cuttings near a bright east-facing window. A grow light helps if you don't have enough natural light.
Are you in a hurry? Water wins every time. You'll see roots in under a week, which is a great confidence boost.
Do you want to rejuvenate an old, woody mint? Division is your only real option. Water or soil cuttings from woody stems take forever to root, but dividing the crown forces fresh growth from the roots.
The table below sums up the decision path.
| Situation | Best Method |
|---|---|
| Have a garden mint plant | Division |
| Have store-bought mint | Water |
| Want many plants | Cuttings in soil |
| Indoor winter propagation | Water or soil |
| Need instant results | Division |
| Old, tired plant | Division |
One rule to remember: when in doubt, take more cuttings than you need. The extra insurance costs nothing and guarantees you'll end up with a healthy plant.
Let's break down the logic. Water and soil cuttings both rely on the same plant hormone process, but water gives you immediate feedback. Division skips root formation entirely because the starter plant already has an established root system.
That's why division is the best all-around pick for anyone with an existing patch.
Step-by-Step: How to Propagate Mint in Water
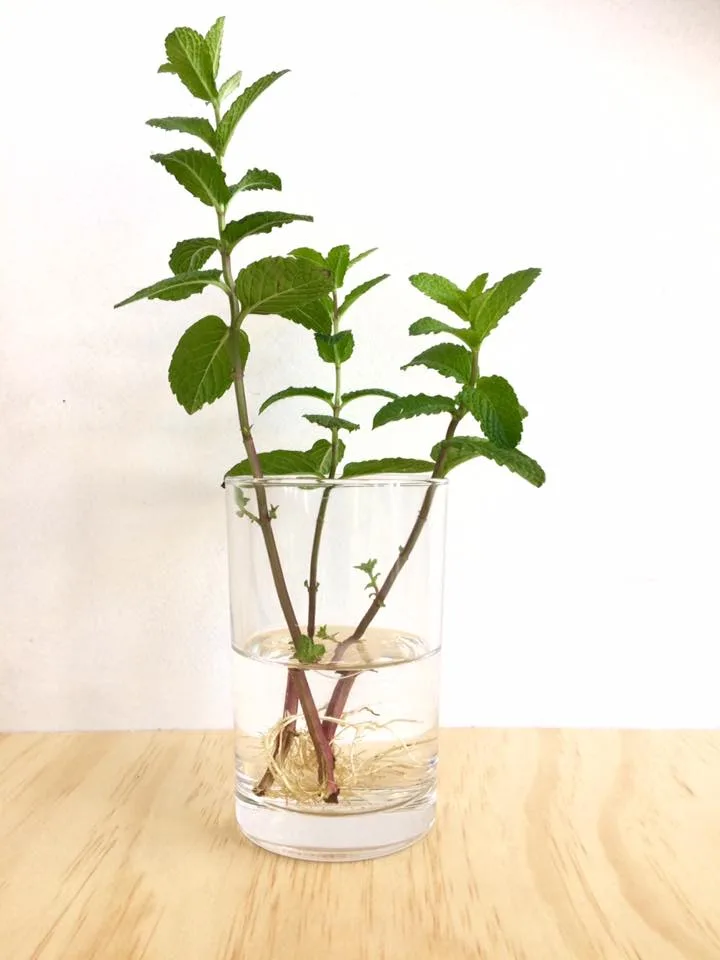
Image source: Web (Bing) / smallgreenthings.com.au (Web image (fair-use with source credit))
Water propagation is the easiest and most satisfying way to grow new mint. Here's how to do it from start to finish.
What you'll need:
- A clean glass jar or clear cup
- Room-temperature tap water
- Sharp scissors or pruning shears
- A healthy mint stem
Step 1: Take the cutting. Cut a 4-to-6-inch piece from the top of the plant. Make the cut just below a node, which is the small bump where leaves attach. This is where roots will sprout.
Step 2: Strip the lower leaves. Remove every leaf from the bottom half of the stem. Keep the top two or three leaf sets. If any leaves sit below the water line, they'll rot and invite bacteria.
Step 3: Place in water. Fill your jar with about two inches of water. Drop the cutting in, making sure the bare nodes are submerged. No leaves should touch the water.
Step 4: Set it in good light. Put the jar in a bright spot with indirect sunlight. A kitchen windowsill works perfectly. Avoid direct afternoon sun, which can cook the tender cutting.
Step 5: Change the water regularly. Every 2 to 3 days, dump the old water and add fresh. This is the single most important step to prevent rot.
Step 6: Wait for roots. In 5 to 10 days, you'll see white roots emerging from the nodes. Let them grow until they reach 1 to 2 inches long.
Step 7: Transplant to soil. Once the roots are established, pot the cutting in well-draining mix. Water it gently and keep it in a shaded spot for the first few days to reduce shock.
A tip for warmth: if your home runs cold, place a sheet of paper under the jar or use a propagation heat mat. Mint roots fastest when the water stays around 70°F.
Now, watch for this common mistake: leaving the water unchanged. Old water goes cloudy and promotes rot, which kills cuttings quickly. Water propagation is forgiving, so if you forget to change it for an extra day, most cuttings will survive.
If you want to speed things up, add a tiny sprinkle of rooting hormone powder to the water. It's not required, but it can shave a day or two off the process. Some gardeners also recommend using spring water instead of chlorinated tap water.
Let tap water sit overnight if you want to be safe.
Step-by-Step: How to Propagate Mint in Soil
Propagating mint directly in soil is just as reliable as water, and it means your new plant is already living in its final growing medium. No transplant shock later on.
What you'll need:
- A small pot with drainage holes
- Well-draining potting mix
- A clear plastic bag or humidity dome
- Clean scissors
- Optional: rooting hormone powder
Step 1: Prepare your pot. Fill the pot with moist, well-draining mix. Use your finger or a pencil to poke a hole about two inches deep.
Step 2: Take a cutting. Cut a 4-to-6-inch stem from the parent plant, cutting just below a node. Strip the lower leaves again, leaving only the top two or three leaf sets.
Step 3: Apply rooting hormone (optional). Dip the cut end into rooting hormone powder. This speeds up root formation and reduces the risk of rot. It's especially helpful if you're propagating in cooler months.
Step 4: Plant the cutting. Push the bare stem into the hole you prepared. Gently firm the soil around it so it stands upright.
Step 5: Water lightly. Use a spray bottle or gentle stream to moisten the soil. You want it damp, not soggy.
Step 6: Cover with a humidity dome. A clear plastic bag propped up with a stick works great. This traps moisture and keeps the cutting from wilting while it roots.
Step 7: Place in warm, bright light. A spot with indirect sunlight and a steady temperature between 65 and 75°F is ideal. Avoid direct sun, which can heat up the bag and steam your cutting.
Step 8: Wait and watch. Check the soil every few days. If the top feels dry, mist it lightly. After 10 to 21 days, gently tug the stem.
If it resists, roots have formed.
Step 9: Harden off. Open the humidity dome a little each day for about a week before removing it completely. This lets the young plant adjust to lower humidity.
Soil propagation is a little slower than water, but the payoff is a stronger root system that adapts better to outdoor planting. One common error is overwatering. Too much moisture in a closed dome can cause mold.
If you see condensation dripping, poke more holes in the bag.
Another tip is to pinch off any flowers that appear on the cutting while it roots. Flowering uses energy that would otherwise go into root growth. Manufacturer recommendations for rooting hormones suggest following the label's dosage exactly, since more is not better.



