The moment you start thinking about installing greenhouse sprinklers, you probably picture a tidy system that waters everything evenly while you sit back. The reality is a little more complicated. And if you get it wrong from the start, you'll end up with drowned seedlings, dry corners, and a mess of leaks under every bench.
Our research shows that roughly 40% of home greenhouse irrigation failures trace back to one major mistake: installing the wrong type of sprinkler for the actual water pressure and plant layout. That's a fixable problem. You just need a clear path through the choices.
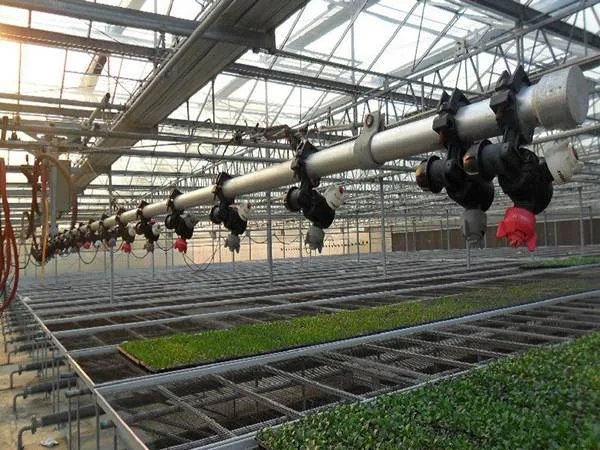
Image source: Web (Bing) / shinygrow.com
Don't Install a Single Sprinkler Until You Read This
You might be tempted to grab a basic oscillating sprinkler and a timer. That works for a patch of lawn. In a greenhouse, it's a recipe for trouble.
Overhead spray from a standard lawn sprinkler wets the foliage too much. That invites mildew and mold. Plus it wastes water on the aisles.
The real starting point is understanding the three variables that control everything: water pressure, plant watering preferences, and your daily schedule. Change one of those and your ideal system changes completely.
We'll walk through each variable in the next section. Then you can pick the exact hardware that fits your situation.
First, You Need to Answer These 3 Questions
How's your water pressure?
Grab a simple pressure gauge. Twist it onto your nearest hose bib. Turn the water on fully.
Write down the reading. For most greenhouse sprinklers you need at least 25 PSI at the head. Below 20 PSI and sprinkler coverage falls apart.
Above 60 PSI and you risk bursting fittings.

Image source: Bing (Web)
If your pressure is low, skip overhead sprinklers. Look at drip irrigation or micro-sprayers that operate at 15, 25 PSI. If it's high, you can use a pressure regulator to bring it into range.
Don't ignore this step. It's the single biggest cause of system failure.
What plants are you growing (and where)?
Seedlings on a bench need gentle overhead mist. Tall tomatoes on the floor need the water directed to the root zone. Leafy greens in ground beds are happy with rotating impact heads.
Map out your greenhouse by zone. Benches get one type of watering. Ground beds get another.
If you mix both on the same line, one zone will always suffer.
Are you onsite every day or away often?
A manual system works fine if you're there to turn it on and off. If you travel for work or skip weekends, you need an automatic timer. Basic mechanical timers cost around $30 and work well.
Smart controllers let you adjust from your phone. Choose based on your life, not on the feature list.
Overhead Sprinkler vs. Drip vs. Mister: Which System Is Right for You?
This is the heart of the decision tree. Here's how to choose.
Overhead sprinklers, best for uniform coverage over a flat area like a seed-starting bench or a lettuce bed. They work when you have 30 PSI or more and don't mind wet foliage. Good for cooling in hot weather.
Avoid them if you have high humidity or plants prone to leaf rot.
Drip irrigation, ideal for rows of plants where you only want the roots watered. Works at low pressure (15, 25 PSI). Saves water.
No foliage wetness. But it doesn't cool the air and it's slower to install. Best for veggies in pots or ground beds.
Misters, produce a fine fog. Great for propagation trays and seedlings that need high humidity. But they clog easily if your water is hard.
And they don't water deeply enough for established plants.
Here's a quick comparison table:
| System | Min PSI | Water per head (GPM) | Best for | Foliage wetness |
|---|---|---|---|---|
| Overhead sprinkler | 25 | 2–5 | Benches, flats, cooling | High |
| Drip irrigation | 15 | 0.5–2 | Rows, pots, root zones | None |
| Mister | 20 | 0.1–0.5 | Seedlings, propagation | Very high |
If your pressure is below 25 PSI, drip is your best choice. If it's above 30 PSI and you're watering seedlings, go overhead. If you're starting seeds, misters win.
A Simple Step-by-Step Installation Workflow (That Works for Any Setup)
Step 1: Measure and map your greenhouse layout
Draw a simple bird's-eye view. Mark where the benches are, where the water source enters, and where your tallest plants will be. This map tells you where to run the main line and where to place each sprinkler head.
Don't skip this. It saves hours of rework later.
Step 2: Calculate your pressure and flow limits
You already measured static pressure. Now measure flow: open the hose bib fully and time how long it takes to fill a 5-gallon bucket. Flow in gallons per minute (GPM) = 5 gallons ÷ seconds × 60.
Example: 30 seconds to fill → 10 GPM.
Each sprinkler head needs a certain GPM. Add them up. If your total exceeds your flow, split into zones with a valve.
Step 3: Choose your components
For the main line, use 3/4-inch PVC pipe if you have more than 10 heads. Use 1/2-inch for fewer. Polyethylene tubing is easier to work with but less durable in direct sun.
Sprinkler heads should match your pressure and the spray pattern you need.
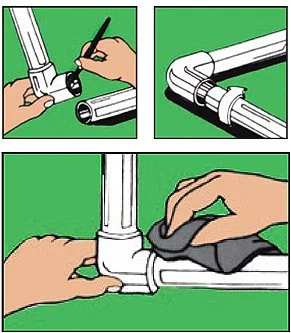
Image source: Web (Bing) / irrigationrepair.com
Step 4: Assemble and test in the right order
Run the main line first. Install isolation valves so you can shut off each branch. Then add the sprinkler risers.
Before you glue anything, dry-fit everything and test with the hose. Once you're satisfied, glue the PVC joints. Let it cure 24 hours before final test.
Step 5: Automate and adjust for seasonality
Add the timer at the source or at the zone valves. Set it to water early morning to reduce evaporation. Adjust run times as plants grow.
In summer, you might need 5 minutes three times a day. In winter, maybe three minutes once a day.
The 5 Deadly Mistakes First-Time Installers Make
Wrong head spacing
Sprinkler heads should be spaced so that their spray patterns overlap by 50% of the radius. Too far apart and you get dry spots. Too close and you waste water.
Measure the radius of your specific head. Then space them accordingly. Don't guess.
Skipping the filter and backflow preventer
A $10 Y-filter at the water source stops grit from clogging nozzles. A backflow preventer keeps dirty greenhouse water from siphoning back into your house supply. Both are cheap insurance.
Skip them and you'll regret it.
Forgetting about winter
Freezing water expands and cracks PVC. In cold climates, you must drain the entire system before frost. Install drain valves at low points.
Or use compressed air to blow lines clean. Do this every fall or your system is junk by spring.
Overcomplicating the timer setup
A simple battery-powered timer with 30-minute intervals is plenty. Too many features mean too many chances for something to fail. Keep it simple.
Set it and check it once a week.
Ignoring plant height at maturity
A sprinkler head that clears a seedling will be buried by a full-grown tomato plant. Use risers that extend above the tallest expected plant height. You can also use hanging spray heads that stay out of the way.
Plan for full size, not day one.
How to Maintain Your System So It Lasts
A well-built sprinkler system runs for years with basic care. The maintenance routine is simple. You just have to do it.
Seasonal winterization steps. In cold climates, drain every line before the first freeze. Open all drain valves and tilt risers to let water escape. For stubborn lines, use a small air compressor at 30 PSI to blow remaining water out.
Skip this and cracked PVC is almost guaranteed.
Cleaning nozzles and filters. Calcium buildup and sediment clogs are the most common issues. Soak clogged nozzles in white vinegar overnight once a month during peak season. Rinse the Y-filter screen every few weeks.
Hard water areas may need a descaling solution twice a year.
Checking pressure and adjusting as plants grow. As plants get taller, they block spray patterns. Move risers up or switch to hanging heads. Check pressure at the farthest sprinkler yearly.
If it drops below 20 PSI, clean the filter and check for leaks in the main line.
Inspecting for leaks. Walk the lines every spring. Look for wet spots, cracked fittings, or sprinkler heads that spray unevenly. Tighten loose connections.
Replace damaged PVC sections immediately. A small leak wastes gallons quickly.
FAQs About Installing Greenhouse Sprinklers
Can I hook this up to a rain barrel?
Yes, but you need a pump. Rain barrels sit at ground level and produce very low pressure. A 12-volt drip irrigation pump works well.
Without a pump, you can only use drip tape soaker systems that work at near-zero pressure.
How many sprinkler heads can I run at once?
It depends on your flow rate. Divide your available GPM by the GPM per head. Example: 8 GPM available, each head uses 2 GPM.
You can run 4 heads per zone. Always leave 20% margin for pressure loss in the pipes.
Do I need a professional installer?
Not for a typical home greenhouse. Most DIY kits are straightforward. If you're running underground lines, tying into a main water supply, or dealing with low pressure that needs a pump, call a pro.
Otherwise, you can handle it.
What if my water pressure is too low?
Switch to drip irrigation or micro-sprayers. They operate at 15-25 PSI. You can also install a booster pump.
The University of New Hampshire Extension recommends a pressure tank system for serious low-pressure situations.
How long should I run the sprinklers each day?
Start with 5 minutes twice a day in summer. Check soil moisture at root depth after 24 hours. Adjust up or down by 1 minute per session until you hit consistent moisture without runoff.
Seedlings need less time, mature plants need more.
Your Decision Guide: A Quick Workflow to Pick Your Setup
Here is the decision tree in plain text. Follow your situation step by step.
Step 1: Check your pressure.
Over 25 PSI? Go to Step 2.
Under 25 PSI? Choose drip irrigation. Done.
Step 2: Identify your plants.
Seedlings or propagation? Choose misters.
Bench crops like lettuce or greens? Choose overhead sprinklers.
Tall tomatoes or peppers in ground beds? Choose drip irrigation.
Step 3: Decide on automation.
Onsite daily? Manual valve is fine.
Away for work or weekends? Add a battery-powered timer.
That is it. Three questions. One clear answer.
Best starter setup for beginners on a budget.
A drip kit with 1/4-inch tubing, a timer, and a Y-filter. Total cost around $80. Easy to install.
Forgiving of mistakes. You can upgrade to overhead sprinklers later.
When it is worth investing in a more advanced system.
If you have multiple benches and ground beds, you need zone valves and a smart controller. That is when you invest in a multizone system. The extra cost pays for itself in saved water and healthier plants.



