If you have ever tried to grow potatoes and ended up with a handful of marble-sized tubers, you are not alone. The problem is rarely bad luck, and almost always a missing fork in the road: you chose the wrong method for your space, your soil, or your climate. Learning how to grow potatoes well means picking the right path before you ever put a seed piece in the ground.
University extension research shows that a single well-grown potato plant can yield up to 3 pounds of tubers in a 5-gallon container, yet most home growers average less than half that. The difference comes down to three decisions you make before planting: what seed to use, where to put it, and how deep to go. Here is what the research actually says, and why a one-size-fits-all guide usually fails you.
Quick Answer
Choose certified seed potatoes for your climate. Plant them 4 inches deep in loose, well-drained soil. Hill the stems when they reach 6 and 12 inches tall.
Water 1 to 2 inches per week. Harvest new potatoes after flowers fade. Wait for vines to die back for storage potatoes.
Cure at 60 to 70°F for two weeks before storing.
The Real Problem with Potatoes (And Why Most First-Timers Get Stuck)
Most beginners treat potatoes like any other garden vegetable. They dig a hole, drop in a seed, water it, and expect a full harvest. Potatoes do not work that way.
They are heavy feeders that need consistent moisture, loose soil, and a specific process called hilling that keeps developing tubers covered from sunlight.
The biggest failure point in our research is improper seed choice. Grocery store potatoes are often treated with sprout inhibitors, and they can carry soil-borne diseases that ruin your entire bed. Certified seed potatoes cost a few dollars more per pound, but they are tested for common pathogens like late blight and potato scab.
That small upfront investment is the single most reliable way to avoid a failed harvest.
Another common issue is planting too early. Soil temperature matters more than air temperature. Potatoes will not grow in cold, wet soil, and planting before the ground reaches about 45°F at a 4-inch depth often leads to rot before the first sprout appears.
A simple soil thermometer is cheap insurance.
The Secret Weapon of Every Good Harvest: Your Seed Potato Decision
Your choice of seed potato variety sets the ceiling on your harvest, your storage window, and how much space you need. This is the first branching point in the decision tree, and it pays to get it right.
Here is a quick comparison of the most common types home gardeners use:
| Variety | Best Use | Days to Maturity | Storage Life | Space Needed |
|---|---|---|---|---|
| Russet | Baking, frying, storage | 90-110 days | Long (5-7 months) | 15 inches in-row |
| Yukon Gold | Boiling, mashing, roasting | 70-90 days | Medium (3-4 months) | 12 inches in-row |
| Red Pontiac | Boiling, salads, new potatoes | 70-90 days | Short (2-3 months) | 12 inches in-row |
| Fingerling | Roasting, gourmet dishes | 80-100 days | Medium (3-4 months) | 10 inches in-row |
If you have limited space and want the earliest harvest, choose Yukon Gold or Red Pontiac. If you want potatoes that last through winter, go with Russet. If you are growing for flavor and don't care about storage, Fingerlings are worth the patience.
Certified seed potatoes come whole or cut. For most varieties, cut larger seed potatoes into pieces that each have 2 to 3 eyes (the dimples where sprouts grow). Let the cut pieces dry at room temperature for 24 to 48 hours before planting.
This creates a callus that resists rot in damp soil. Do not skip this step.
Where Are You Growing? (That's the Whole Game)
The second major fork in the road is your growing space. The method you choose determines everything else: how deep to plant, how often to water, and how much yield to expect. There is no one best method, only the best method for your situation.
The Ground Option
If you have an in-ground garden bed with loose, well-drained soil and full sun, this is the easiest and highest-yielding route. Till the soil to about 10 inches deep, mix in 2 to 3 inches of aged compost, and plant seed pieces 4 inches deep and 12 to 15 inches apart. Rows should be 30 to 36 inches apart to allow room for hilling.
This method works best for gardeners in zones 3 through 8 with a standard growing season of at least 90 frost-free days. It requires the least maintenance once hilling is done. Water deeply once a week.
The ground holds moisture better than containers.
The Raised Bed Option
Raised beds give you control over soil quality, drainage, and compaction. This is the best choice if your native soil is heavy clay or has poor drainage. Fill beds with a mix of topsoil, compost, and perlite or coarse sand for drainage.
Plant at the same depth and spacing as in-ground rows. The loose soil makes it easier for tubers to expand, and raised beds warm up faster in spring. You can plant a couple of weeks earlier than in-ground beds in cooler climates.
The Container Option
Container growing is ideal for patios, balconies, or small yards. Use a 5-gallon container per plant for small yields (1 to 2 pounds per plant) or a 10-gallon container for larger yields (4 to 5 pounds per plant). Fabric grow bags work especially well because they provide drainage and air pruning, which prevents root circling.
The catch with containers is watering. They dry out much faster than ground or raised beds, especially in hot weather. You will likely need to water daily or even twice a day in the peak of summer.
For many gardeners, this is a manageable trade-off for the space savings.
The No-Dig Straw Option
Some experienced gardeners use a no-dig method that skips tilling entirely. Lay seed potatoes directly on the soil surface, cover them with 6 to 8 inches of straw or hay, and add more straw as the stems grow. The straw holds moisture, prevents weeds, and makes harvesting as simple as pulling back the mulch.
This method is best for lazy gardeners or those with poor soil. It produces decent yields, but you will get more for your space if you use any of the other three methods. It is a fine option if you want low effort and don't mind slightly smaller harvests.
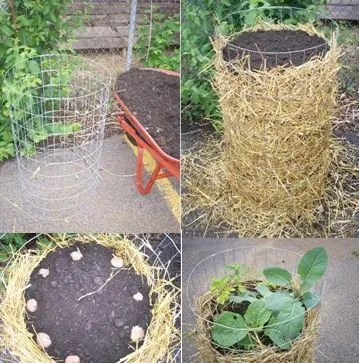
Image source: Web (Bing) / pinterest.com (Web image (fair-use with source credit))
The Step-by-Step Process (Your Decision Branch Map)
Now the rubber meets the road. Here is the complete workflow, simplified into decision branches.
Chitting or Not Chitting
Chitting means pre-sprouting seed potatoes in a bright, cool spot (not direct sun) for 2 to 4 weeks before planting. It shortens the time from planting to emergence by about 1 to 2 weeks. If you have a short growing season (less than 90 frost-free days), chitting gives you a head start.
If you have a long season, skip it. The yield difference is negligible.
Planting Depth and Spacing by Method
- In-ground and raised beds: plant 4 inches deep (from the top of the seed piece to the soil surface). Spacing: 12 to 15 inches between plants, 30 to 36 inches between rows.
- Containers: plant 4 inches deep in a 5-gallon container (one seed piece per 5 gallons). If using a 10-gallon container, you can plant 2 to 3 seed pieces spaced 5 inches apart.
- No-dig straw: place seed pieces on the soil surface and cover with 6 to 8 inches of straw.
Hilling: When and How Many Times
Hilling is the process of mounding soil (or straw) around the stems as they grow. It prevents sunlight from reaching developing tubers, which turns them green and toxic. It also encourages more tubers to form along the buried stem.
Hill when the stems are about 6 inches tall. Pull soil from between the rows or around the container up to cover the lower 4 to 5 inches of stem. Hill a second time when stems are 12 to 15 inches tall.
After that, the vines will bush out and shade the soil naturally.
For containers, add more potting mix up to the rim as the stems grow. Do not cover the top leaves.
Watering by Container vs Ground
- Ground and raised beds: Water deeply once a week, aiming for 1 to 2 inches of water per week (rain plus irrigation). If you use drip irrigation, run it for 2 to 3 hours per week depending on soil type.
- Containers: Check daily. Stick your finger 2 inches into the soil. If it feels dry, water. In hot weather, that means daily watering. In very hot weather, twice a day.
Harvest Timing by Variety
Harvest times depend on the variety and your goal. New potatoes (small, thin-skinned) are ready about 2 weeks after the plants flower. Storage potatoes need the full growing period.
Wait until the vines turn yellow and die back naturally, then cut the vines to the ground and wait another 2 weeks before digging. This toughens the skins for storage.
Mistakes to Avoid (And How to Fix Them)
Image source: Wikimedia Commons / Henry G. Gilbert Nursery and Seed Trade Catalog Collection.; Peter Henderson & Co.
Here are the most common mistakes we see in aggregate reviews and university extension reports.
Grocery Store Potatoes
Do not plant grocery store potatoes. They are often treated with chlorpropham, a sprout inhibitor that can reduce germination rates significantly. They also carry diseases like bacterial ring rot and common scab that can persist in your soil for years.
Spend the money on certified seed potatoes. It is the cheapest insurance you can buy.
Overwatering and Rot
Potatoes need consistent moisture, but they rot in saturated soil. If your soil stays wet for more than a day or two after rain, improve drainage by adding organic matter or switching to raised beds. In containers, make sure there are adequate drainage holes.
A 5-gallon bucket needs at least 6 quarter-inch holes in the bottom.
Under-Hilling and Green Potatoes
Green potatoes contain solanine, a toxic compound that causes nausea and headaches. The green color is chlorophyll, which develops when tubers are exposed to light during growth. Hill thoroughly, and cover any tubers that push above the soil surface with more soil or straw.
If you find green spots after harvest, cut them off generously. If more than a quarter of the potato is green, compost it.
Ignoring Soil Temperature
Planting in cold soil is a common beginner mistake. The ideal soil temperature at planting time is 45 to 55°F at a 4-inch depth. If the soil is colder, the seed piece will sit there and rot before it grows.
Use a soil thermometer, and wait until the temperature is right. In many regions, that means waiting until 2 to 4 weeks after the last frost date.
Digging Too Early or Too Late
Harvest too early and you get small potatoes that will not store well. Harvest too late and the potatoes can rot in the ground, especially in wet fall weather. The sign to watch for is vine die-back.
When the vines turn yellow and flatten, wait 2 weeks, then dig. For new potatoes, mark the calendar 2 weeks after flowering and harvest only what you need immediately.
Storing Your Harvest (Don't Lose Your Work Now)
You spent months watering and hilling. Do not let a bad storage method waste your harvest.
Potatoes store best at 40 to 50°F with high humidity (85 to 90 percent). A basement, garage, or root cellar works well. Avoid refrigerators, which are too cold and convert starches to sugar, ruining the texture.
Keep them in a dark place. Light triggers solanine production and turns them green.
Cure the potatoes first. Lay them out in a single layer in a dark, well-ventilated spot at 60 to 70°F for about 2 weeks. This thickens the skins and heals minor nicks.
After curing, brush off loose soil, do not wash them. Washing introduces moisture that invites rot. Store in perforated plastic bags, burlap sacks, or cardboard boxes with ventilation holes.
Check your stored potatoes every couple of weeks. Remove any that show soft spots, sprouts, or rot. One bad potato can spoil a whole crate quickly.
Frequently Asked Questions
How many potatoes will one plant produce?
A single plant yields 1 to 3 pounds of potatoes. Container plants in 5-gallon buckets average about 1.5 pounds. In-ground plants with good soil and full sun can reach 3 pounds or more.
Can I plant store-bought potatoes?
It is not recommended. Grocery store potatoes are often treated with sprout inhibitors and may carry soil diseases like bacterial ring rot. Certified seed potatoes are tested and give much better results.
Why are my potatoes green?
Green skin comes from sunlight exposure during growth. The green contains solanine, a toxic compound. Hill your plants thoroughly and cover any exposed tubers.
Cut off green parts before cooking and discard if more than 25 percent is green.
When should I water my potato plants?
Water deeply when the top 2 inches of soil feel dry. In ground beds, that is usually once a week with 1 to 2 inches of water. Containers may need daily watering in hot weather.
Consistent moisture is key for even tuber growth.
How do I know when potatoes are ready to harvest?
New potatoes are ready about 2 weeks after the plants bloom. Storage potatoes are ready when the vines turn yellow and die back naturally. Wait 2 more weeks after vine die-off, then dig.
Quick Decision Guide: Which Method Is Right for You?
| Your Situation | Best Method | Why |
|---|---|---|
| Large yard, good soil | In-ground | Highest yield per square foot |
| Clay or poor soil | Raised bed | Control over drainage and texture |
| Small space or patio | Container (10-gal) | Portable, decent yield per plant |
| Short growing season | Container + chitting | Get a head start, avoid frost |
| Low effort / lazy gardener | No-dig straw | Minimal digging, easy harvest |
| Want storage potatoes | In-ground or raised | Larger tubers cure and store better |
Pick the row that matches your space and goal. Then follow the planting and hilling steps from earlier in this guide. The rest is patience and consistent watering.



